Whether these puppies are in a breeder's kennel or a shelter pen is less important that the fact that they shouldn't be growing up in these environmentally impoverished, cramped, dirty, stressful conditions.
Here’s something that all of us can agree on: No one should ever buy a puppy from a puppy mill. Puppy mills are horrific and should be put out of business.
An estimated 2 million puppies are “produced” annually in puppy mills in the U.S. Since the number of dogs who are euthanized by shelters in this country every year is estimated to be 1.2 million, you can see why simply shutting down puppy mills is such an alluring idea to those of us who have worked in shelters. But it’s difficult to put an end to any practice that some people profit from, no matter how cruel it is.
That’s why we try to educate people – to make sure they understand, first of all, that any “purebred” or “designer-mix” puppy that’s for sale in a pet shop has been produced by a puppy mill, no matter what the store employees have been told to say.
We also try to make would-be buyers understand that when they pay for a puppy from a pet store, they are directly supporting canine suffering at the hands of all the shady breeders, brokers, and scammers that supply pet stores.
Most of us have seen photos and videos taken by animal protection groups following a raid on the worst kind of puppy mill, where the living conditions of the dogs are unspeakably horrendous, with cages crammed with sore-covered dogs stacked on top of more cages, and all of them full of filth. No one would argue for ”businesses” like this to be allowed to continue operation.
It’s much more difficult to recognize the cruelty of puppy mills that advertise how many veterinarians they have on staff, discuss their healthcare and socialization programs, and display pictures of shiny-clean facilities alongside their United States Department of Agriculture (USDA) licenses. The conditions look better – but their breeder dogs are still puppy-producing machines who have no semblance of quality of life. And the puppies will be sold to anyone willing to pay for them and shipped anywhere in the country at too-early ages.
The bottom line for mills is that puppies are simply “products” – and the puppy miller’s bottom line will always be more important than the welfare of the dogs.
The USDA’s Animal Welfare Act (AWA) establishes legal requirements for the care, handling, housing, transportation, and sale of animals at licensed breeding facilities. Puppy-millers and their downstream co-conspirators like to claim that their USDA licenses and unannounced AWA compliance inspections keep the industry honest. But the reality is, these laws are woefully inadequate. For example, under the AWA:
• There is no limit to the number of dogs on the premises. A puppy mill could have hundreds or even thousands of dogs.
• There is no minimum requirement for the number of staff that must be available to care for the dogs.
• Dogs may be kept in stacked cages.
• Mesh or wire flooring is allowed.
• Dogs may be forced to relieve themselves in their cages.
• Dogs may be confined in spaces only six inches longer than their bodies, not including the tail.
• A dog may be caged 24 hours a day for his or her entire life, only removed from the cage to be bred.
• There is no exercise requirement if dogs are housed with other dogs and minimum size requirements are met for the dog’s enclosure.
• Dogs can be housed indoors or out with minimal temperature regulation.
• Human interaction is not required.
• Breeding females at the first heat cycle and every heat cycle thereafter is permissible.
• Unwanted animals may auctioned off or killed in a variety of ways.
• There is no transparency to consumers or the public about the results of USDA inspections.
And finally, it should be obvious that the USDA can’t adequately inspect the entire puppy mill industry; currently there are only an estimated 110 inspectors on staff to inspect all the animal facilities under its supervision, including zoos and research labs, in addition to commercial dog breeders and brokers.
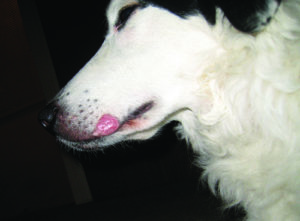
It's very common for dermatophytosis (better known as ringworm) to develop on a dog's muzzle, especially in dogs who frequently dig. The fungi that infect the dog's skin and hair and cause the unsightly lesions are common in soil.
Ringworm is not a worm. Nor is it always ring-shaped. This misnomer of a term derived from an early inaccurate belief that the infection – which often causes a round, red, raised lesion on human skin – was caused by a worm. Unfortunately, this counterfactual name stuck and it continues to mislead to this day.
Ringworm, or dermatophytosis as it is scientifically called, is actually a fungal infection of the superficial layers of the skin, hair, and/or nails. While a diagnosis of ringworm might give you the heebie-jeebies, it rarely causes serious problems and it is both treatable and, to an extent, preventable. Identifying ringworm infections at an early stage can prevent transmission and limit contamination, so dog owners should become familiar with the common signs.
RISK FACTORS
Although ringworm fungi are everywhere, there are conditions that predispose dogs to infection. Dogs that are at a higher risk of contracting the disease include puppies, senior dogs, and dogs with a compromised immune system. Other risk factors include poor nutrition, high-stress environments (such as shelters), high-density housing of animals, skin with pre-existing trauma, and living in close contact with affected dogs.
Certain dogs may have lifestyles that increase their risk of ringworm exposure, such as hunting and working dogs (including the German Short-Haired Pointer, Fox Terrier, Labrador Retriever, Beagle, Jack Russell Terrier, German Shepherd Dog), possibly due to increased contact with contaminated soil. Yorkshire Terriers seem to be more susceptible as well and are often overrepresented in ringworm research.
The good news is that the occurrence of ringworm is relatively uncommon in healthy dogs. Even if a dog has been exposed, it does not mean that he will develop the disease.
CLINICAL PRESENTATION
Dermatophytes invade keratinized structures found on skin, hair, and nails. In dogs, the head, ears, tail, and front paws are the most common sites of infection, although they may occur on any part of the body.
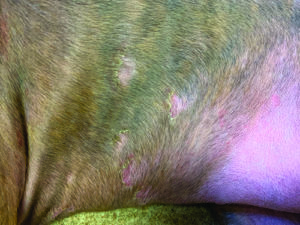
Ringworm infections tend to manifest as small, non-itchy asymmetrical patches of alopecia (hair loss), that spread outward on the skin. However, any combination of hair loss, papules, scales, crusts, redness, follicular plugging, hyperpigmentation, and changes in nail growth may be seen. The affected hair shafts are usually brittle and break near the skin surface, giving the lesion the appearance of having been shaved.
In the early stage, the center of the lesion often contains light-colored skin scales, giving it a powdery appearance, and the edges are generally reddish in color. Vesicles and pustules may also be seen. In later stages, the lesion may be covered by a crust and the edges of the lesion become swollen.
As these circular lesions enlarge, the central area may sometimes heal, leaving a circular lesion with central crusts or even hair regrowth. In some cases, there may be only one location of infection; in others, several patches may be present. As the fungus grows, the lesions may become irregularly shaped and spread, and individual lesions may merge to form large, irregular regional patches.
Severe infections may generalize (spread over the body); as a result, the appearance can resemble demodectic mange. Generalized cases usually occur in dogs who are immunosuppressed, especially those that have adrenal disorders or have been treated with corticosteroids. Occasionallyringworm infects a dog’s nails (as nails are comprised of keratin), causing them to become rough, brittle, and easily broken.
Fungi to Know
This culture plate contains a sample of skin and hair from a dog suspected of having ringworm. Microsporum Canis has grown in the culture, confirming the diagnosis.
Fungi occur throughout the earth and have a critical role in most ecosystems. While the early fossil record for fungi is not extensive (their inherent structure does not lend to preservation), scientists recently reported a discovery in the Canadian arctic of a fossilized fungus estimated to have lived almost a billion years ago – which is even before the existence of plants! Suffice to say fungi have been around a really long time.
Early domestication of animals, such as cats and dogs, appears to have led to a later evolution of host-specific fungi. The group of fungi referred to as keratinophylic process keratin – a structural protein that forms hair, nails, feathers, horns, claws, hooves, calluses, and the outer layer of skin among vertebrates.This group of fungi is quite large, but only three genera – Microsporum, Trichophyton, and Epidermophyton – are known to cause disease in animals and humans.
The microscopic organisms responsible for ringworm infections belong to this keratinophylic group and are known as dermatophytes (derma = skin, phyton = plants). That’s why the infection caused by these agents is called dermatophytosis.
Some species of dermatophytes are species-specific, meaning they infect only one species; others can be transmitted between different species of animals, including humans. The three most common fungal species that cause ringworm in dogs are Microsporum canis, Microsporum gypseum, and Trichophyton mentagrophytes. Each of these are zoonotic (which means the infection is transmissible between animals and humans), but the rate of transmission is not known. M. canis is the etiologic agent of about 70% of the cases of canine ringworm; the remainder of the cases are from M. gypseum (20%) and T. mentagrophyte (10%).
INFECTION, TRANSMISSION, COMMUNICABILITY
Dogs who come into contact with the spores of the fungi may become infected if the dermatophytes infect growing hair or the keratin-rich outermost layer of the skin. Under most circumstances, dermatophytes live only in the dead cells of skin and hair and do not affect living cells or inflamed tissue.
As a dog’s immunity to the disease develops, further spread of infection usually ceases, but this process may take several weeks and infectious spores can still be dispersed. Therefore it is a good idea to treat cases of ringworm so that spread of the contagion can be limited and the healing process and time is improved.
While ringworm isn’t common in dogs, it is contagious and most cases of ringworm are spread by contact with infected animals or contaminated objects. Infected dogs shed spores into their environment, and spore-covered broken hairs are important sources for the spread of the disease. Thus, grooming tools, dog beds, toys, bowls, and home furnishings are prime objects for harboring the infectious spores. All of these should be disinfected if ringworm enters the picture. Ringworm spores are very hardy and can survive (i.e., be infective) in suitable environments for up to 12 to 20 months.
Ringworm fungi also resides in soil. Dogs who like to dig or roll around on the ground or stick their head in rodent holes may be exposed it regularly. While these favorite pastimes may expose them to the ringworm fungi, the likelihood of infection is not high; the establishment of infection depends on the fungal species and on the canine host factors. Susceptibility is increased when the dog has exposed skin surfaces (e.g., open wounds, cuts, scrapes, burns), as well as with high temperatures and humidity.
Note: Some dogs may be asymptomatic carriers; they carry dermatophytes on their body but do not develop any clinical signs of infection. These dogs are contagious and can contaminate the environment, which can be especially problematic in multi-animal environments.
Ringworm lesions may be mistaken for other skin conditions, so don’t delay a visit to the veterinarian for a definitive diagnosis.
A ringworm-infected dog is considered contagious and can transmit the disease to people or other pets including cats, pocket pets, cows, goats, pigs, and horses. Children (especially very young children), elderly people, and people with weakened immune systems or skin sensitivities may be more vulnerable to infection.
Because ringworm can be transmitted to humans, you should take appropriate steps to minimize exposure to the fungus while the dog is being treated. It is important to wear appropriate protection (especially gloves) and wash hands thoroughly after handling an infected dog. Environmental decontamination and control are critical in treatment.
Ringworm in humans generally responds well to treatment. Chances are, if a person hasn’t contracted it from their dog by the time it is diagnosed, it is unlikely that it will occur.
DIAGNOSIS
There is not a single test to diagnosis ringworm; obtaining an accurate diagnosis of ringworm requires utilizing a few complementary diagnostic tests to confirm the infection and to rule out several other skin conditions that can have a similar appearance.
* Wood’s lamp examination. A Wood’s lamp is a small hand-held ultraviolet lamp that emits light in a specific range of wavelengths. When they bind to hair shafts, the M.canis fungi produce a chemical reaction that fluoresces a striking, distinct, apple green under the Wood’s light in a darkened room. In many cases, using the Wood’s light uncovers additional sites of infection that were not visible to the eye.
That said, neither T. mentagrophytes nor M. gypseum fluoresce under a Wood’s lamp, so while the light is useful in establishing a tentative diagnosis, it cannot be used to exclude a ringworm infection.
* Microscopic examination. Since dermatophytes are visible under magnification, your veterinarian can take a sample of hair and skin scrapings for viewing under a microscope to see if any fungal spores are present. About 85% of ringworm infections, regardless of which type of fungus is present, can be confirmed this way.
* Fungal culture. The most accurate test for diagnosing ringworm in dogs is by fungal culture of a sample of hair or skin cells. The sample is collected from the lesion(s) and placed in a special culture medium where it is monitored for fungal growth. A positive culture can sometimes be confirmed within a couple of days, but in some cases the fungal spores may be slow to grow; culture results can take up to four weeks. Therefore, a suspected sample cannot be deemed negative until four weeks have passed.
* PCR testing. Polymerase chain reaction (PCR) testing is a newer diagnostic technique that can be performed on either tissue or hair samples. These samples are collected by your veterinarian and sent to a lab for processing. This test detects the DNA from any ringworm-causing fungi, providing results in just one to three days. A caveat: The test is highly sensitive and is not able to discern between true disease, contamination from surfaces, and non-viable fungal spores (which can’t cause disease but can be detected in a DNA test). This means that PCR testing is beneficial for making the initial diagnosis, but not helpful in determining whether the infection has resolved and treatment can be discontinued.
TREATMENT
In living hosts, dermatophytes usually remain in superficial tissues such as the skin, hair, and nails, living on the dead top layer of keratin protein. The lesions may be disfiguring and uncomfortable, especially when they are widespread.
But in rare cases, dermatophytes may go deeper into the body, invading subcutaneous tissues and other sites, especially in immunocompromised hosts.
Infections in healthy animals are usually self-limiting and may resolve within a few months without therapy.Treatment is recommended anyway, to accelerate recovery, reduce environmental shedding, and decrease the risk of transmission.
There is not a universal treatment plan for ringworm; your veterinarian will develop a plan based on the severity of the infection, how many pets are involved, whether there are children or other at-risk and susceptible individuals in the household, and how difficult it will be to disinfect yourenvironment.
Effective therapy involves elimination of the infection in the dog through use of topical and/or systemic therapies, prevention of further dissemination, and disinfecting and removal of infective materials in the environment.
* Topical treatment. Topical therapy destroys the fungal spores on the lesion itself, thereby limiting environmental contamination and preventing transmission. Topically treated hairs are no longer infectious when they disperse into the environment. Topical therapy is especially important situations where infected dogs can’t be or aren’t confined.
For generalized dermatophytosis, a twice-weekly, whole-body treatment is recommended. Typical treatments include a lime sulfur (calcium polysulfide) dip (leave-on rinse), an enilconazole leave-on rinse (a broad spectrum antimycotic not available at this time in U.S.), or a miconazole-chlorhexidine rinse/shampoo (this antifungal and disinfectant combination work together to combat the disease).
For localized treatment, clotrimazole, miconazole, and enilconazole have been shown to be effective, but these are recommended as concurrent treatments, not as sole therapies. Topical treatment may be necessary for a period of several weeks to several months.
* Systemic therapy. Administration of an oral anti-fungal medication can be an important adjunct to topical therapy, especially for chronic or severe cases. Systemic antifungal therapy targets the active site of fungal infection and spread on the infected dog.
Effective systemic antifungal drugs include itraconazole, terbinafine, fluconazole ketoconazole, and griseofulvin. While griseofulvinhas been the traditional antifungal drug for decades, its use is not as prevalent as it once was; newer medications appear to be safer and have less side effects.
Ketoconazole may cause liver pathology and is not recommended as the first-line of attack, but rather reserved for resistant cases.
Studies have determined that lufenuron (brand name Program) has not proven to be effective in either treating or preventing ringworm infection.
The drawbacks of systemic treatment are the relatively high cost of the drugs and the possibility of toxic side effects, which should be taken into consideration when developing a treatment plan. Dogs receiving any systemic antifungal should be closely monitored and all directions for administering the medications carefully followed.
Duncan the Digger Dog Gets Ringworm
When my 10-year old Border Collie Duncan developed a lesion onhis muzzle at age 10, I was surprised to learn that he had contracted ringworm. He hadn’t been around any infected animals; I couldn’t figure out how he had contracted it – until my veterinarian explained that the fungus exists in the soil.
Trying to keep Duncan the Digger Dog from excavating was near impossible –
nor did I want to spoil his fun. But at least there was a good theory on how he had contracted it. In hindsight, in addition to being a senior dog, it was likely that he also had a compromised immune system, as we learned later when he developed other health concerns.
What began as a small hairless spot soon grew into a shiny quarter-sized lesion. When he was examined with the Wood’s light, the affected area lit up like a glowing orb in the night sky. Because ringworm is not all that common in dogs, my veterinarian called in all his staff to see my dog’s muzzle fluoresce. To confirm the diagnosis of M. canis infection, a sample of skin and hair were taken for culture.
While we waited for the results, we began topical treatment of clotrimazole 1% applied to the lesion two to three times a day and observed for response to this therapy. The good news is that he responded well to the localized topical treatment and neither I nor Daisy (my chemotherapy-immunocompromised Border Collie) contracted the infection. In about three months, the lesion was gone, the fur had grown back, and there was little to remind us of the fungal invasion.
ENVIRONMENT THERAPY
Diligent and thorough environmental decontamination is an imperative part of treatment. Without adequate attention to the environment, the infection may not resolve, it can spread, or even cause of reinfection.
If your pet has been diagnosed with ringworm, dermatophytes are now probably everywhere your dog has been. Infected hairs contain numerous microscopic fungal spores that can be shed into the environment and can survive for almost two years.
Because infection of other animals and humans can occur, either by direct contact with an infected dog or through contact with fungal spores, you now have to clean and disinfect everything your pet has come into contact with – and continue to do this throughout the treatment period. Yep, it’s a big bummer. But it is an essential part of treatment because affected dogs will continue to reinfect their environment until the infection has resolved completely.
How often you need to clean and disinfect depends on several factors, including the number of infected individuals, whether the treatment is topical, systemic, or both, and if there any at-risk individuals in the household. Your veterinarian can advise a tailored plan, but it is generally recommended thattwice weekly cleaning includes mechanical removal of hair and washing and disinfection of target areas followed by disinfection.
As soon as possible following a diagnosis of ringworm, perform an initial thorough cleaning of your entire home, targeting your dog’s favorite spots. Mechanically remove hair, dander, and skin particles from all surfaces. Be aware that vacuuming alone does not decontaminate surfaces, but it does remove infective hair, so vacuum everywhere possible. After vacuuming, dispose of the vacuum bag outside of the home or disinfect the canister immediately.
Vacuum or use duct tape or lint rollers to remove hair from upholstered furniture. Carpet and rugs can be decontaminated by washing twice with a carpet shampooer with detergent or via hot water extraction. For hard surface floors, use commercial disposable cleaning cloths designed for dry mopping floors (such as Swiffer). Avoid brooms and mops as they are difficult to thoroughly clean and disinfect after use.
Dust with electrostatic cloths and dispose of immediately after use. Clean all washable surfaces with soap and water. Infective material is easily removed from the environment; if it can be washed, it can be decontaminated.
Any water temperature and any detergent are sufficient for decontaminating washable textiles (don’t forget to launder your dog’s bedding and toys); two washings on the longest wash cycle are recommended. Wash exposed items separately from non-exposed items and disinfect the appliances afterwards.
Daily removal of hair from the area where your dog is being confined is recommended.
Proper disinfection is a three-step process:
1. Mechanically remove all visible debris (hair and skin flakes); disinfectants are not effective in the presence of organic debris.
2. Wash the target item or surface with a detergent until the area is visibly clean, following with a rinse to remove the detergents, as cleansers some may inactivate disinfectants.
3. Apply a disinfectant to kill any residual spores. Readily available disinfectants include:
• Sodium hypochlorite (household bleach). Effective when used at concentrations ranging from 1:10 to 1:100 even with short contact time.
• Enilconazole. Available as a spray or environmental fogger. Relatively expensive. Has limited availability in some countries.
• Accelerated hydrogen peroxide (AHP). A newer broad-spectrum disinfectant that has gained widespread use. Available in concentrates and ready-to-use formulations.
• Rescue (Accel). Another effective broad-spectrum disinfectant. Available in a ready-to-use formula, concentrate, or wipes.
Should You Lock Him Up?
It’s often recommended that infected dogs be confined to one area of the home that is easy to clean. This needs to be balanced with preserving the mental and behavioral health of your dog, however, especially if he’s young or newly adopted. Confinement should be used with care and for the shortest time possible. Ringworm is curable; behavior problems can be lifelong.
RESOLUTION OF INFECTION
Many dogs will respond fairly quickly to treatment, often showing improvement within a week or two. Full treatment to clear the infection usually takes at least six to 10 weeks but can even last as long as three to four months.
Do not discontinue treatment as soon as your dog visually appears healed; dogs can still carry infective fungi even after signs appear to have completely resolved. Recurrent or lingering infections tend to be the result of treatment failure, either through inadequate duration of therapy or failure to properly decontaminate the environment.
Your veterinarian can monitor the healing progress (using a Wood’s light and/or fungal cultures) and use these results to determine when your dog is cured. Following your veterinarian’s recommendations is very important to ensuring a successful outcome and to prevent recurrence.
The good news is that almost all dogs recover completely with no long-term effects (hair loss is not permanent unless the follicle has been destroyed). Humans, on the other hand, may develop a permanent aversion to housecleaning!
Laurie and her altese, Andrew, on "Greatest American Dog"
Several of the major dog training associations have addressed the issue of racism with recently crafted position statements and messages sent to members. This is encouraging! It’s my hope that we will see these statements followed up with action. Note that each one of us can have a hand in influencing that. If you are member of a dog-related group or association, let them know you are excited about and counting on the implementation of concrete plans and courses of action to increase diversity in the ranks of dog trainers, both professional and amateur.
– Laurie C. Williams
Certification Council for Professional Dog Trainers (ccpdt.org)
The CCPDT joins other organizations in emphatically stating that systemic racism, injustice, and discrimination permeate our society and culture. We are hopeful that profound and permanent change is coming.
We recognize that our organization – along with our industry – lacks diversity. We will review our policies, practices, and commitment to inclusion, equality, and stopping racial disparities. Every interaction we have, whether with a client, candidate, certificant, or colleague, will be considered. On behalf of the CCPDT Board of Directors, we will build a more inclusive community of trainers, embrace diversity, and create equality in our work. Specifically, this will include:
• Examining CCPDT outreach efforts in advance of board member elections.
• Ensuring fair and unbiased questions and requirements are part of our formal application and exam processes.
• Creating a pathway into the profession, so that anyone with a desire to become a dog trainer has an opportunity to do so.
We pledge to continue this work with renewed vigor and purpose. Suggestions are welcome.
International Assoc. of Animal Behavior Consultants (iaabc.org)
What can (the IAABC) do, as an organization, as a community, and as individuals to improve this situation, and to reject the normalcy of this country’s racist legacy and policies? What can we do to finally, fully wake up and demand the equality and fairness this land of opportunity is supposed to offer?
• We can learn.
• We can carefully examine our own biases and fears.
• We can do the work of understanding and seeing.
We have done all those things for the non-human animals we work with. We must now ask, have we done it for ourselves? For our neighbors? To paraphrase the historian Ibram X. Kendi, in order to stress the points he makes in his crucially important book, How to Be an Anti-Racist:
• “Racist” should be a plain, descriptive term for policies and ideas that create or justify racial inequities, and not used as a personal attack. It is simply a factual term.
• One is either racist or anti-racist. “Not racist” doesn’t exist. Either one is reaping the benefits of (or suffering under) racist policies, or one is fighting against them.
• “Not racist” and racist are therefore the same thing.
Trainers and behavior consultants are in touch with the general public every day. We can make a difference, one interaction at a time, one effort at a time, to better our little corner of the world. We know how this works. We understand learning, and we understand how successes build upon successes.
Karen Pryor Clicker Training (karenpryoracademy.com)
KPA stands with the protesters against the violence Black, Indigenous, and people of color face too often. Change is needed. As positive reinforcement trainers, we know that behavior is never static; if we stay silent, we, in effect, reinforce past behavior. By speaking out and protesting, we can alter environmental conditions and lay the groundwork for meaningful change.
We also recognize the need to identify and explore ways to take a stand and contribute to change in our own industry. Black, Indigenous, and people of color are under-represented in the dog trainer and behavior specialist professions and related occupations. We are committed to the conversations and dialogs, education, and steps that lead to greater understanding and that can make the profession more inclusive.
PetProfessional Guild (petprofessionalguild.com)
PPG’s statement affirming its commitment to stand in solidarity against racism in support of #BlackLivesMatter:
It was important to our organization not just to make this statement, but to commit to action both in the short- and long-term. We are working with our membership to develop an advisory group that can identify and develop tangible, actionable programs to help us move our industry forward in a more fully inclusive manner.
As such, we are pleased to announce that we have appointed Connecticut-based dog trainer Christina Horne and Virginia-based dog trainer Laurie C. Williams to help us formulate, establish, and oversee this advisory team to support our goals in this endeavor. Christina and Laurie will report directly to PPG president Niki Tudge. Together, they will ensure we establish enduring practices that hold us accountable to the commitment we have made and that both PPG and the pet services industry at large represent the diversity of our population.
Training organizations develop a collaborative survey
The IAABC has collaborated with the CCPDT and Karen Pryor Academy to build an online survey for members of those organizations. Leaders in the positive reinforcement training and behavior community are asking all training and behavior professionals to share information to help take important steps to ensure equity and diversity in the field in the “Training and Behavior Diversity and Equality Survey,” found at https://iaabc.typeform.com/to/cQeE6A.
The survey will be used to strengthen and improve the organizations’ policies and practices, and to inform future speakers and panelists of issues that are important to members of the participating organizations.
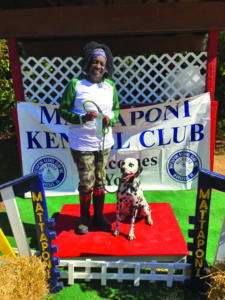
Trainer Laurie Williams and her dogs Andrew (the Maltese she appeared with on a 2008 dog-training competition/reality show broadcast on CBS) and Dalmatian, Tucker. We published an interview with Laurie following the conclusion of the show. See "Positive Dog Trainer Wins Second Place in 'Greatest American Dog'"WDJ November 2008. Laurie is also a past contributing writer for WDJ. See "Could My Dog Be Racist?" WDJ February 2016.
As an African American, I’ve found these past few months difficult. I’ve been examining different aspects of my personal and professional life and reflecting on the various journeys that brought me to where I am today.
I’m a dog trainer – a professional in an industry with few Black colleagues. This isn’t the first time I’ve wondered why there are so few people of color in my profession, but it’s potentially the most impactful time to discuss it, in hopes of increasing the diversity of what has long been an extremely white occupation in the U.S.
HOW I GOT HERE
In 1985, I walked into my first dog obedience class with Casey, my new Irish Setter puppy. The class was run by the local kennel club and held at a community center in Jacksonville, North Carolina, where my U.S. Marine husband was stationed.
As the only African American in the class, I stood out, but this did not concern me. As a child, I attended predominantly white schools and lived in many white-majority neighborhoods; I was used to being one of the few Black people in many situations! Besides, I enjoyed what I learned in class so much that, after only a few sessions, I decided that I wanted to earn obedience titles with Casey and become an obedience instructor myself.
Recognizing my enthusiasm and knack for training, the seasoned and much older ladies of the kennel club took me under their wings, mentored me, and welcomed me into their inner circle. I’ve been thoroughly immersed in the world of dog training and behavior ever since.
IN THE MINORITY
I was incredibly lucky to have so much support from my fellow dog trainers, especially since I have often been the only African American wherever I went in the dog world, whether I was competing at local conformation dog shows or obedience or agility trials. I see more people of color in the dog world today, but at most local events, out of the dozens in attendance, you’d be able to count Black people on one or maybe two hands.
I’m confident when competing with my dogs against anyone in a dog show. But in all these years, I have felt most uncomfortable among my dog-trainer peers at professional dog-training conferences, workshops, and seminars. Why is this? I’ve thought about it a lot.
For one thing, I stand out even more at these educational meetings than at dog shows. The dog-training profession is strikingly white and largely comprised of white, middle- and upper middle-class women. This is especially true of the subset of trainers who use positive reinforcement and science-based training.
But it’s more than just being a minority. Through the years I have attended many dog-training conferences and events. While I can’t say I experienced any overt racism or bigotry, I often felt discounted and downright invisible. Worse, on occasion I was mistaken as “the help” at the conference hotels where the events were being held.
I don’t know how to explain this, except to say that dog trainers are not always perceived as the most inclusive people, welcoming and open to different points of view and perspectives. There is a joke about dog trainers that goes, “If you put two dog trainers in a room, what’s the only thing they would agree on? That the third dog trainer is wrong!” The profession is rife with contrasting schools of thought and methodologies, complete with exclusive cliques and very strong lines drawn in the sand.
Most people who know me know that I walk to the beat of my own drummer and I’m generally unbothered by the opinions of others. But I must admit that stepping out of the comfort zone of my own little training community into the big one at large was sometimes daunting even for me, a middle-class, suburban Black woman raised and educated among white people. Think of how difficult it might be for newcomers to break into the dog-training profession, especially when they don’t see anyone else who looks like them at the table.
Laurie and her altese, Andrew, on “Greatest American Dog”
It wasn’t until I became a minor celebrity from appearing on the reality television show “Greatest American Dog” in 2008 that other trainers started noticing and acknowledging me and speaking to me at events. At that point, dog training hadn’t ever been the center of a prime-time broadcast television show, and most trainers had seen at least one episode; it seemed like the show was a safe topic as an entry point to conversation. I met and made friends with many more fellow trainers after the show ended.
FRAUGHT RELATIONS BETWEEN DOGS AND AFRICAN AMERICANS
Historically, the relationship between Black Americans and dogs is quite different than that of white Americans. Our relationship with dogs has been complicated and tainted and affected by violence, fear, and intimidation.
Laurie and her Dalmatian, Eliis, at a “Fast Cat Trial” (a form of lure coursing) where Ellis earned his FCAT title.
As a very young child in the 1960s, I regularly saw images on the nightly news of Black people being knocked down with fire hoses and police wielding batons, accompanied by teeth-bared and lunging German Shepherd Dogs – dogs who were sometimes even let loose to terrorize and attack civil rights protestors. Those images haunt me to this day.
However, we can go even further back than that. Dogs were an integral tool in the implementation and management of the institution of slavery in this country, from their presence and usage on slave ships during the middle passage, to the shores and plantations where dogs were used as tools of intimidation and bred and trained to track, attack, and even kill runaway slaves.
These experiences have undoubtedly led to a multigenerational fear and avoidance of dogs in many Black families. Even within my own family, I have relatives with such a real and present fear of dogs that they refuse to visit my home (I have never had fewer than two dogs, and today I have five: two Dalmatians, a Pharaoh Hound, a long-haired Chihuahua and a Yorkie).
In poor neighborhoods in many cities, dogs often play a role as a household’s protection againstcrime. In neighborhoods where dogs like this are common, children are uniformly warned against approaching dogs – any dogs.
Given all this, it makes sense that it has been a bit of a longer and tougher road for dogs to be welcomed and thought of as viable and close members of African American families.
Race and Pet Ownership in the U.S.
Statistics vary according to their source, but every survey or study we were able to find confirmed one thing: Black Americans are far less likely to be dog owners than Americans of other races.
In 2006, the Pew Research Center published a study that asked people of various races whether they owned pets, and if so, what kind? Of the white households that owned pets, 45% reported owning a dog. Of the Black households that owned pets, only 20% reported owning a dog.
It’s much easier to find statistics regarding “pet” ownership than “dog” ownership.A 2018 poll conducted by Branded Research, Inc., asked 14,755 participants about “pet” ownership.The majority – 66% – reported owning a pet of some kind. About 70% of Caucasian participants said they owned at least one pet; only 44% of Black participants said they were pet owners.
The 2017-2018 American Veterinary Medical Association’s “Pet Ownership & Demographics Sourcebook” shows similar numbers: “Pet ownership differs among racial and ethnic groups. The highest rate of pet ownership overall in 2016 was seen among white households (64.7%), with Latino/Hispanic (61.4%) households next. The lowest rate was found among Black/African-American households (36.9%).”
INCREASING THE VISIBILITY OF BLACK TRAINERS
I often ask other trainers how they got into dog training. For many, it wasn’t until they attended a dog-training class with their own dog (as in my own experience) or had the opportunity to hire a professional dog trainer to help them with their dog, that they considered entering the profession.
Laurie and her Dalmatian, William, working toward a “coach dog” title.
This is why I’d like to suggest that the more trainers there are who are people of color, the more people of color could see that dog training might be a good career choice for them! Also, I suspect that many more Black and brown people would engage the services of a professional dog trainer if there were more Black and brown dog trainers!
As a dog trainer, what can I do to help make my profession more inclusive and diverse? I have a few ideas:
1. Extra effort must be made to usher in newcomers from diverse populations. That means seeking and recruiting clients, staff, interns, and working students from different races, cultures, and nationalities.
2. We need to create and foster an environment that is nurturing and welcoming to everyone. Learning about cultural differences so we can better gain an understanding of and communicate with racial and cultural minorities is a good start.
3. I encourage all trainers to examine their own training programs, looking for possible barriers to diversity within our marketing and outreach, staff, communication style, and educational materials. This includes acknowledging possible biases and/or lack of sensitivities within ourselves and others around us and taking steps, no matter how small, to do better. To change, you must want to change.
4. Trainers should apply the same principles and be just as outspoken about our commitment to the humane, fair, and compassionate treatment of our fellow human beings as we are for dogs.
5. Let it be known that you fervently stand up against racism, discrimination, and bigotry, both within our industry and society at large. Our community mirrors society at large and is not exempt.
BE WELCOMING
My hat will always be off to those “ladies of the club,” who helped draw me into dog training some 35 years ago. Honestly, they were a gruff old bunch of heavy-handed women (with dogs and people), rough around the edges, and definitely entrenched in old-fashioned dog-training methods.
In regard to inclusivity, however, those women were way ahead of their time. They welcomed me with open arms when they didn’t have to. If it weren’t for them, I might have missed out on one of my greatest passions in life. Let’s work together to make sure other dog enthusiasts who look like me don’t miss out on theirs.
Canine education specialist, dog behavior counselor, and trainer Laurie C. Williams is the owner of Pup ‘N Iron Canine Fitness & Learning Center in Fredericksburg, Virginia.
Some counter-surfing dogs are after the one human-food item that they find irresistible - and reliably stocked in the same place on the counter at all times, like bread or butter near the toaster. Other dogs will settle for any molecules of edible items they can find. If this describes your dog, be extra careful, because dogs like this are prone to overdosing on medication, sugar-free gum or hard candies (xylitol is deadly for dogs), or other dangerous food-like substances.
One of the hardest canine behaviors for some dog owners to understand (or forgive) is counter-surfing – when your dog helps himself to some edible item that you or another household human left unattended. The behavior isn’t just limited to counters; some dogs help themselves to any food left on tables, desks, coffee tables, or any other unguarded surface. Some dogs specialize in finding any food you have hidden in your car!
COUNTER SURVEILLANCE
Smart dog owners understand that canids are naturally “opportunistic eaters” – they are genetically programmed to eat food when they see or find it. Of course, that doesn’t mean we should just let them help themselves to anything in the house that they can find! Dogs are genetically programmed to do a lot of things we don’t just let them do.
However, it does mean that we have to scrupulously manage our dog’s environment, in hopes that they never learn the joy of counter-surfing in the first place, but also so that if they already have, we can reprogram the learning (i.e., modify the behavior).
Management is pretty simple. It just means never leaving unattended food anywhere your dog can get it. Alternatively, you can restrain or put your dog away (closed in another room, behind a baby gate, tethered, or crated) if you must leave food out.
If you do this starting from puppyhood, so your dog never gets an opportunity to abscond with the deli tray or butter dish on the counter, there’s a good chance he won’t decide to leap onto counters when he reaches adulthood.
Still, it’s not a good idea to take good behavior for granted, or frequently present your dog with unnecessarily hard-to-ignore temptations.
Our two dogs have never counter-surfed; they are both small (under 35 pounds) and have reasonably good house manners, so we trust that our food is safe on the kitchen counter or dining room table (even though they are both quite capable of jumping that high, if they wanted to). I wouldn’t dream, however, of leaving food on our coffee table and walking out of the room; there’s no point in tempting fate!
If you choose to manage your dog, rather than keeping the counters reliably free of food, make good use of our usual list of management tools to prevent your dog from having access to food on counters and tables: Doors, baby gates, crates, exercise pens, leashes, tethers, and (last but least, as it has the best chance of failure due to human error) direct supervision.
Not Guilty
Some dogs seem incorrigible about helping themselves to any food they can find in the house – and some humans get hopping mad about it. “I’ve punished him many times for this,” they say. “He knows he’s not supposed to do it. He only does it when I’m not in the room, and he always looks guilty afterward. So clearly he knows better!”
The thing is, he really doesn’t know better. What he does know is that bad things happen (you get angry, or perhaps even a little violent) if he takes food off the counter when you are there. However, nothing bad happens if he takes yummy stuff off the counter when you aren’t there, so it’s okay – and safe – to do it then.
Generally, by the time you discover his latest transgression and punish him for it (we don’t recommend this), the punishment is too far removed from his action; he won’t associate the punishment with his taking the food. All he really knows is that sometimes you are grumpy when you enter the kitchen (or wherever the food had been).
So what about those guilty looks? If your dog doesn’t know he did a bad thing, why does he look guilty?
In 2009, dog cognition scientist Alexandra Horowitz, Ph.D., author of Inside of a Dog: What Dogs See, Smell, and Know (Scribner, 2009) and Being a Dog: Following the Dog Into a World of Smell (Scribner, 2016), tried to answer that question with a study, “Disambiguating the ‘Guilty Look.’”
Horowitz set up a situation where the owner would put a treat where their dog could reach it, tell the dog to leave it alone, and leave the room. When the owner returned, Horowitz sometimes reported to the owner that the dog had eaten the treat even if he hadn’t (the researchers removed the food from the plate). In these instances, the owners most frequently described their dogs as looking guilty, even though, unbeknownst to them, the dog had not taken the treat. Additionally, if the owners scolded the dogs, the dogs frequently looked “guilty” – whether they had eaten the treat or not. In fact, Horowitz also found that when scolded, the most exaggerated guilty looks were frequently offered by the dogs who had not eaten the treat!
The behavior and expression that owners often think is an indication of guilt – a hunched, lowered posture, ears back, eyes averted, sometimes accompanied by a submissive grin – is actually appeasement behavior; it indicates that the dog is fearful. It means he has read your body language, understands that you are upset, and is trying to appease you so you don’t take it out on him.
If your dog’s counter-surfing and your anger about it is separated in time by more than several seconds, he has no idea why you are angry, but he doesn’t want your wrath descending on him. Even if you aren’t overtly angry, he can tell when you are upset about something, so he offers body language intended to deflect your emotions.
Note: While the dog’s behavior in the counter-surfing scenarios described here are not an indication of guilt, that does not mean dogs cannot feel guilt. We don’t know that yet. It’s possible that they can. But this isn’t it.
COUNTER INTELLIGENCE: MODIFICATION
My own unproven and untested theory, based on anecdotal evidence alone, is that the truly dedicated counter-surfers tend to be smart, confident dogs with resilient personalities. Some are truly masters of the art of taking food – practically from under your very nose, without you ever noticing. You have to admire ninja skills like that! You might even be in the kitchen with your dog and you think you’re doing a good job of managing, but you turn your back for a second and oops! The holiday ham has been swiped from the counter.
There is certainly value in modifying counter-surfing behavior, especially if you have one of those expert surfers, or if management won’t be consistent in your household; perhaps you care for an elderly parent with dementia, or have distracted, spontaneous children roaming your home. When scrupulous management isn’t possible, by all means, use behavior modification!
Here are some useful training tools you can teach your counter-surfing canine:
* Mat training. Teach your dog that her place in the kitchen is on her mat, conveniently placed in the corner. Cue her to go to her mat as needed, and then watch for her to start going to her mat on her own, without a cue. When this happens, be sure to reinforce her happily and generously! (For more detail about teaching this behavior, see “Useful Matters,” WDJ January 2020.)
Work to increase the duration of time that you want her to stay on the mat, until she will stay there happily for long periods, with long pauses between reinforcers. Continue to reinforce her on her mat in the kitchen (or wherever food is present) to keep the behavior strong.
* Leave It. A well-trained, well-timed, cheerful “Leave it!” cue can work wonders, especially if it’s delivered right at the moment when you see your dog eyeing the turkey sandwich that one of the kids left on the coffee table.
I teach that “Leave it” means “forever,” so if you do have to leave the kitchen for a brief moment, your “Leave it” cue can help ensure the safety of any unattended food – but don’t count on it for more than a few seconds!
Start by saying “Leave it!” and putting a treat under your foot, then waiting for your dog to stop trying to get it out from under your shoe. The instant she stops, “mark” the moment with a signal, such as the click of a clicker or the word “Yes!” and give her a treat. Continue using the marker (click or “Yes!”) and giving her a treat every few seconds, in random durations (but not too long), as long as she doesn’t go back to the shoe. If she does try to get the treat again, just wait until she stops, then mark/treat again.
It’s a fun behavior to teach! You are setting up your dog to make the right choice, then reinforcing her when she does. It’s one of those rewarding-for-the-human positive-training moments where you get to see the light bulb come on, when your dog looks at the treat and then deliberately looks away. (For more instruction on teaching this behavior, see “Leaving for Good,” June 2018.)
*Walk Away. The “Leave it” cue tells your dog not to eat whatever she is coveting; in contrast, the “Walk Away” moves her promptly away from the food that she’s eyeing on the counter or table. In many cases, this is more effective, because it tells your dog what to do (and reinforces her for doing it) instead of just telling her what not to do.
Being able to teach your dog to move away from something when asked is an invaluable tool, both for your dog’s safety and for your sanity. It has become one of my favorite behaviors to teach and use.
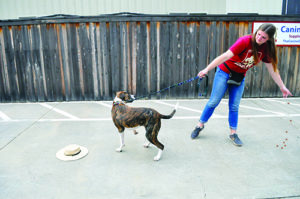
We start teaching this behavior by tossing treats for our dog to chase and eat. When he thoroughly understands the “game” of watching to see where you toss the treats so he can pursue and eat them, you present him with a novel but neutral (uninteresting) item that may draw his attention for a moment. When he moves toward the item to investigate it with a sniff, you cue “Walk Away!” and run away, tossing treats behind him, so he whips a U-turn and pursues the treats.
There are more steps and more practice required for a reliable “Walk Away!” behavior, but you get the idea. For detailed instructions on teaching this behavior to your dog, see “Walk Away!” in the September 2018 issue.
BEWARE THE GREMLIN: INTERMITTENT REINFORCEMENT
Note: The leash here looks a little tight. Don’t pull the dog away from the novel item. After a couple iterations, when he hears the cue, he should be anticipating the treats and start turning and running away from the item with you.
In behavior science terms, you “extinguish” your dog’s counter-surfing behavior by not leaving any food on the counter for him to find – ever – thus removing all possible reinforcement. Behaviors that aren’t reinforced in some way eventually go away. But if your dog happens to score a sandwich or a savory pie while you are trying to extinguish the food-seeking behavior – even just once! – the behavior will be so strongly reinforced that it will be difficult to extinguish again.
So, if you really want to extinguish your dog’s counter-surfing behavior, your management has to be flawless. If your dog has access to a goodie on the counter every now and then, she will continue to search for random prizes that she can snatch when no one is looking. And each time she does, she’ll become even more convinced that the counter will eventually pay off. The behavior will become even more durable, and she will keep scouting the surface of the counter even longer.
Think about this: Let’s say you’re walking to work and you happen to glance at some pretty marigolds in a street-side planter. To your surprise and delight, you find a $100 bill tucked under the leaves of the plant. Want to bet you’ll check the planter again the next day? And the next?
If, four days later, you happen to find another $100 bill, you’re for sure going to keep checking the planter every time you go by, for a long time. Finding another bill in 20 or 30 days will only convince you to keep looking, even if there are very long gaps between finding one $100 bill and the next. In fact, you’d probably keep looking even if you “just” found a $20 bill!
COUNTER CLAIM: ALL FIXED?
Some dogs are more strongly motivated by the prospect of finding unattended food than others. You may never be able to turn your back on these dogs and expect to see snacks where you left them – so don’t leave snacks unattended! Management is that simple.
You’ve invested extensive time and energy into managing and modifying your dog’s behavior. He no longer snags food off the kitchen counter when you turn your back. In fact, he’s very good about relaxing on his mat in the corner when you are in the kitchen preparing food, and you’re very good about continuing to reinforce him for that. Congrats!
Can we say he’s “fixed” now? Is it okay to let your guard down and leave food on the counter even when you’re not there?
With some dogs, perhaps; but for most, probably not.
Some dogs have very strong food-seeking behaviors. For example, as most animal-care professionals are aware (and most owners realized early in their Labrador experience), Labrador Retrievers are notorious chow-hounds. It’s actually suspected of being a genetically inherited trait! In 2016, researchers found a gene believed to be responsible for the Labrador’s well-known magnetic attraction to food.
Your counter-surfing Lab – or any other dog with strong food-accessing behaviors – is likely to need management for the rest of his life, even after an excellent modification program.
Think back to that planter with the marigolds and the occasional $100 bills. If you went months without finding any more money, you’d probably stop checking every day – but you might still take a peek under the flowers every once in a while. And if at some point you found more money – even just a $5 bill – you’d likely go back to checking that planter regularly again, right?
When we modify behavior, the old behavioral response (neuron pathway) doesn’t go away; it just gets overlaid by the new behavioral response. If something happens to trigger the old response, the behavior can (and often does) quickly pop back up (this is called a spontaneous recovery).
EVEN TRAINERS’ DOGS STRUGGLE WITH THIS
In my Cognition Academy, we sometimes conduct a “Leave It Test” with trainers and their relatively well-trained dogs. The trainers place a bowl of food on the floor and tell their dogs to “Leave it!” Often, as long as the trainer faces her dog and watches, most of the dogs are very reliable about abstaining from eating the food.
Amusingly, however, if the trainers cover their eyes, turn their backs to their dogs, or step behind a barrier, more than 90% of the dogs will help themselves to the food within 10 minutes. Most eat the food within 60 seconds or less!
If your dog has a history of getting reinforcement for counter-surfing, and you’ve put effort into modifying his behavior so he’s far less likely to help himself to available food, keep up reasonable management protocols as well. Don’t waste all that effort by tempting him into transgression – just don’t. If you do – and he fails, it’s your fault, not his.
Author Pat Miller, CBCC-KA, CPDT‑KA, is WDJ’s Training Editor. She and her husband live in Fairplay, Maryland, site of her Peaceable Paws training center. Miller is also the author of many books on dog-friendly training. See page 24 for book purchasing and contact information.
If you have an anxious dog, check this out: Studies have shown that changing the gut's microbiome can cause changes in behavior. Now pet food companies and others are working to find probiotics that can specifically reduce canine anxiety.
The gut’s primary job is complicated and critical – extracting nutrients from food and moving waste products out of the body – it’s a marvel of engineering. In recent decades, though, we’ve learned that the gut is even more complex and amazing than we previously knew: Researchers have discovered that the bacteria and fungi living in the gut can affect our behavior – or, more significantly to WDJ readers, our dogs’ behavior!
GUT FEELINGS
The populations of bacteria, viruses, fungi, and microfauna that live on the canine (and human and rodent) body are known as the microbiome. You and your dog host multiple different environments with different populations of tiny beings living on you: on the skin, in the mouth, in the vagina if you’ve got one, and in the gut.
The gut is a sort of tube running through you, and lining that tube is a dynamic ecosystem of various bacteria, helping digest your food, producing nutrients that you need, and, it turns out, affecting how you feel.
Evidence for a relationship between the gut and behavioral health is strong. Inflammatory bowel disease in humans is associated with anxiety and depression. Autism is associated with gut issues, as are many psychiatric illnesses. Antibiotics can kill off many of the bugs in our gut, and when they do, the risk of developing an anxiety disorder increases. Gut infections can also increase the risk of anxiety disorders. We know that the gut microbiome can affect the stress response, and that this relationship goes both ways – the stress response can also affect the bugs in our gut.
Normal, non-pathological personality traits also seem to change in concert with our gut bacteria. A 2020 study looked at 655 people who filled out online questionnaires and sent in fecal samples. They found decreased gut diversity in participants who reported having high stress levels and those who described themselves as “more conscientious.” Researchers also found increased gut diversity in people with larger social networks. They also identified specific bacterial species associated with people having particular personality traits.
These studies show correlations, that gut and behavioral health go hand in hand. But we still don’t know how this relationship works. Does anxiety cause gut dysfunction? Or does gut dysfunction cause anxiety?
Studies in laboratory rodents show that fecal transplants (populating one mouse’s gut with the contents of another mouse’s gut) can change the recipient’s behavior to match that of the donor.
In one study, researchers stressed mice until their behavior changed to demonstrate anxiety. Then they gave an unstressed population of mice fecal transplants from these anxious donor mice. The previously unstressed population began displaying anxiety behaviors, apparently due only to the transplant of bacteria from stressed mice. Fascinating!
GUT REACTION
Okay, okay! Let’s discuss what matters most to us dog owners: Can we alter the bacterial populations in our dogs’ guts to change their behavior?
We already commonly alter bacterial populations in dogs to promote gut health, either by giving carefully curated commercial probiotic supplements or less carefully curated supplements in the form of foods like yogurt, kefir, or kraut. Could we give probiotics that have not just gut health benefits, but behavioral health benefits, too?
Multiple studies have addressed this question in humans and laboratory rodents. Because a single study is limited in what it can tell us – it’s affected by the exact methods the researchers use, as well as a healthy helping of chance – the best evidence we have is a meta-analysis, a study that summarizes the findings of many other, smaller studies.
A 2018 meta-analysis by Reis et al. looked at a number of studies on the effects of probiotics on behavior in both humans (14 studies) and laboratory rodents (22 studies), and this summary study provides us with our best evidence about whether probiotics really can change behavior.
This meta-analysis pooled the results of all the laboratory animal studies and analyzed them together to see what the overall results were. Overall, probiotics did seem to work to change behavior in mice, but not rats, and then only in mice who were in some way unhealthy or stressed. (Some studies did show effects in rats or unstressed mice, but the overall results suggested that those studies showed effects only by chance.) As for humans, probiotics did not seem to have an effect in us either.
The researchers had some insights into why studies in rats and humans might have shown no effect (or at least no consistent one), while studies in mice did:
* There may be a baseline of anxiety below which probiotics aren’t going to do much for you – you’re already behaviorally healthy. Surprisingly, none of the human studies included subjects who were actually suffering from anxiety!
* Measuring changes in the feelings of humans is difficult, requiring self-report tests, which are notoriously unreliable. Possibly, the humans taking probiotics did start to feel better but weren’t aware of it. In fact, studies suggest that when you’re coming out of depression or ongoing anxiety, you may start to have measurable improvements before you are consciously aware of them. Measuring changes in behavior in laboratory rodents is more objective, however, and therefore may have been more sensitive.
* Probiotics take time to work. Studies may not run long enough to see real changes; increased time equates to increased expense. Only half of the studies included in this meta-analysis lasted for at least eight weeks. Benefits in humans may have been seen in longer-duration studies.
* Dose may matter. The doses of probiotics given to mice, rats, and humans weren’t all that different, but when the massive differences in size of those species are taken into account, they differed wildly. Since the smallest animals showed the clearest effects, it may be that increasing dose makes probiotics more effective in larger animals.
* The researchers suggested that it’s possible that we need to give humans doses dozens or hundreds of times higher than what we are currently dosing! This suggests that doses in dogs may be low as well.
Decreasing Anxiety: Successful Probiotic Species
Ries et al., 2018, described the efficacy of specific bacterial species in their meta-analysis. Only Lactobacillus rhamnosus showed an effect (in mice) in a pooled analysis. It was sometimes effective in humans (but not in a pooled analysis). Other species that worked in some studies, but not in a pooled analysis, included:
•L. helveticus
•B. adolescentis
•B. longum (strains R0175 and NCC3001)
•L. rhamnosus combined with B. longum
Note: One bacterial species, L. casei, actually appeared to increase anxiety.
MARKET THAT HUNCH!
In January 2019, the first probiotic marketed for behavioral change in dogs, Calming Care, was released by Purina. It contains B. longum, strain BL999. (It also has liver in it, and my dogs report that it tastes very good; they lick it right up.) Calming Care is the only behavioral probiotic that has been tested in dogs, though many probiotics for gut (not behavioral) health are on the market.
Calming Care was tested by Purina, but the study was not published in a peer-reviewed journal. Summaries are available, but the detailed methods are not, meaning the specific methods used to test the probiotic aren’t public. This means the study’s results, in classic researcher-ese, are “difficult to interpret” – in other words, something could be confounding the results.
Here’s what we do know: The study involved 24 anxious Labrador Retrievers. For six weeks, dogs were given either B. longum BL999 (i.e., Calming Care) or a placebo; they were then tested for anxiety-like behaviors, heart rate, heart rate variability, and salivary cortisol. (The specifics of the behavior tests are not available.) The dogs were taken off the supplement for three weeks, after which the two groups were switched, and each group received the other treatment (probiotics or placebo) for another six weeks. Both groups were tested a second time. The results were impressive:
* 22/24 treated dogs showed significant reduction in barking, jumping, spinning, and pacing compared to their behavior on placebo.
* 20/24 treated dogs had smaller increases in salivary cortisol (a hormone that is elevated in response to stress) when they exercised and when they were exposed to anxiety inducing stimuli compared to their behavior on placebo.
* 20/24 treated dogs had increased heart rate variability (which is a sign of decreased stress) compared to the behavior on placebo.
Behavioral Buyer Aware
Untangling the differences between various behavioral supplements marketed for dogs can be challenging. Basic categories include:
•Behavioral probiotic: At present, Calming Care is the only behavioral probiotic marketed for dogs.
•Gut probiotics: Many probiotics are marketed solely for canine gut health. They may have behavioral benefits; they just haven’t been tested for that. Some examples are Fortiflora, Proviable, and Vetri Mega Probiotic.
•Nutraceuticals: Some food-based supplements (such as Solliquin and Composure) are marketed for behavioral health. These are not probiotics; they work through different mechanisms.
•Complex supplements: Some supplements contain both probiotics and nutraceuticals and are marketed for behavioral health. One example, Calm K9, is marketed for behavioral health due to the nutraceuticals it contains. It also contains some probiotics, but not the strains that have been shown to have behavioral effects. Therefore, it is best considered a nutraceutical combined with a gut health probiotic.
REAL WORLD USE
These numbers are very good – surprisingly good in light of the results seen in the meta-analysis discussed earlier. Two vets who prescribe Calming Care for their canine patients reported to me that it seemed to help about half the dogs they tried it on. However, they warned that while it’s worth trying, its effect is not as powerful as a prescription medication in a dog with significant anxiety.
There’s a gap between Purina’s research results and the experience of the two clinicians I know – a gap that could be explained in a few ways. The difference could be accounted for by the objective testing performed by Purina’s researchers, as compared to the owner reports used by the veterinarians. It’s possible that all the Labradors in the Purina study had a biologically similar form of anxiety that responds well to probiotics, but that is seen in only half of the anxious dogs in the real world. Possibly there was a problem with Purina’s study that made its results look better than they really were. The real question is, will Calming Care help your dog?
Probiotics are very safe and unlikely to have negative effects, so it’s worth trying to find out. Purina recommends a trial of at least six weeks before deciding whether the supplement works, but it’s worth running your trial for at least eight weeks.
Some owners want to try behavioral probiotics but don’t want to use Calming Care; some dogs are allergic to liver (one of its ingredients). There are many probiotics marketed for reducing human anxiety; I recommend working with your vet to select one of them. Your best bet will be to pick one containing B. longum (tested in dogs) and/or L. rhamnosus (tested in mice and humans), and not containing L. casei (may increase anxiety).
NO GUTS NO GLORY
Behavioral probiotics can provide a helpful adjunct to behavioral medication, as they did for my anxious dog, whose behavior noticeably improved on Calming Care. Or they can provide a mild effect in dogs who are not on medication. Remember, again, that dogs with serious anxiety issues deserve a visit to a veterinarian who specializes in behavior to discuss medication, as probiotics alone won’t be powerful enough to give them relief.
Our understanding of how the gut microbiome influences behavior is in its infancy. Perhaps in future years we’ll be able to assess a dog’s gut microbiome, predict how it’s influencing their behavior, and tailor a specific probiotic cocktail to push them in the right direction. For now, we’re mostly wandering in the dark.
However, probiotics are very safe to use and can be something to try when you’re looking for a supplement to help blunt your dog’s anxiety.
Jessica Hekman, DVM, Ph.D., is a researcher at the Karlsson Lab at the Eli and Edythe L. Broad Institute of MIT and Harvard, studying the genetics of canine behavior. She also teaches online webinars and courses about canine genetics.
Study References and Resources
Johnson, Katerina V-A. “Gut microbiome composition and diversity are related to human personality traits.” Human Microbiome Journal 15 (2020): 100069. sciencedirect.com/science/article/pii/S2452231719300181
Li, Nannan, et al. “Fecal microbiota transplantation from chronic unpredictable mild stress mice donors affects anxiety-like and depression-like behavior in recipient mice via the gut microbiota-inflammation-brain axis.” Stress 22.5 (2019): 592-602. tandfonline.com/doi/abs/10.1080/10253890.2019.1617267
Reis, Daniel J., Ilardi, Stephen S., and Punt, Stephanie EW. “The anxiolytic effect of probiotics: A systematic review and meta-analysis of the clinical and preclinical literature.” PloS one 13.6 (2018): e0199041. journals.plos.org/plosone/article?id=10.1371/journal.pone.0199041
Trudelle-Schwarz McGowan, R. “Tapping into those ‘Gut Feelings’: Impact of BL999 (Bifidobacterium longum) on anxiety in dogs.” ACVB Symposium 2018. purinaproplanvets.com/media/521317/086602_vet1900-0918_cc_abstract.pdf
Looking for a veterinarian to help you with behavioral medication for your dog? Check out the American College of Veterinary Behaviorists (dacvb.org/search/) or the American Veterinary Society of Animal Behavior (avsab.org/animal-behavior-consultant-directory-search/). Both include practitioners who will do online consults if there is no one in your area.
About five years ago, we ran an article about “counter surfing” – the euphemism for the act of dogs taking any food they can find on your kitchen counters – and I couldn’t find a picture of a dog “caught in the act.” That might be because, usually, if we spot a dog eating our dinner or licking the butter dish on the counter, we don’t take a photo of it. Instead, we interrupt the behavior and redirect the dog to another activity. Wait – that’s the right thing to do. Most of us probably just yell, “WHAT DO YOU THINK YOU’RE DOING?!” But I digress.
At the time I needed the photo, my son’s dog, Cole, was staying with me; my son was somewhere else on the planet, at one of his athletic competitions somewhere. Cole is always happy to play the training game with me, so I taught him to stand on his hind legs with his front paws on a butcher block table, near a nice roast beef sandwich. Then I took pictures of him doing it.
The photos looked a lot like a dog who was counter-surfing – only Cole looked cheerful and expectant, instead of a dog who had gotten yelled at for “stealing food.” This is because he hadn’t been yelled at; he was receiving treats and praise after every few pictures I took!
When my son got back from wherever he had gone and asked for a report on the activities Cole enjoyed in his absence, I told him about how helpful Cole had been, modeling for WDJ again. My son was rather unamused. “Mom!” he scolded. “If he starts taking food off counters and tables, I’m going to be so mad! And why didn’t you use your own dog, anyway?”
I didn’t use my own dog for these photos, because Otto wouldn’t dream of putting his paws on the counter; it would have taken me weeks of training to get him to look even slightly convincing as a counter-surfer. (Also, Woody wasn’t born yet.) Until recently, Otto has never once taken food from the counter, kitchen table, or even a carelessly uncovered kitchen garbage can. It never occurred to him – until recently, when he started displaying a little senior dementia, or old dog privilege, or whatever you call it when a dog helps himself to the burrito on the coffee table right in front of you. Um, Otto?
Anyway, I was thinking about all this because our Training Editor, Pat Miller, has written a great article about counter-surfing in this issue (see page 6), and I came across those pictures of sweet Cole. I called my son to ask, “Remember when I used Cole as a model for a dog who is counter-surfing? And you were so mad? Did he ever counter-surf after that?”
In the April 2020 issue, we published an article by WDJ Training Editor Pat Miller, CCBC-KA, CPDT-KA, about fostering dogs and puppies. Pat has often fostered dogs during her long career in both animal shelters and as a professional dog trainer, and she’s also the author of a great book on the topic, How to Foster Dogs: From Homeless to Homeward Bound.
In both the article we published and her book, Pat mentions some of the potential hazards of fostering for the foster provider, and offers questions that a person should ask before agreeing to foster for an organization that is new to them. I had to pull out that article, and review those questions in light of the experience that one of my friends is having right now as a foster provider for an organization that both of us were only vaguely familiar with. The part I wanted to review was this question, among a list of questions that Pat recommends a potential foster provider asks before taking a dog to foster:
* How does the adoption process work? Are you, the foster parent, allowed to be a part of that process? (The answer to this one should be “yes.”) Are potential adopters carefully screened? Do you get veto power if you think the prospective family is not appropriate for your foster? Are the dogs adopted directly from your home, or do they have to go back to a shelter or kennel?
There aren’t necessarily right or wrong answers to these questions – just answers that will help you decide if this is an organization you can work with.
I’ve been fostering for the same organization for a long time, my local shelter. I know and trust the manager of the shelter well, and she knows and trusts me. When I foster a litter of puppies for the shelter, I generally raise them to a certain age, and then they go to the shelter to get adopted; I don’t have any say in who gets to adopt them. I could have input, but by and large, I trust the shelter’s own screening process to ensure they all go to qualified homes. If I were more involved, it would just muck up and delay the process.
But when I foster an adolescent dog or a senior dog or a dog with health or behavior issues, I invariably have the dog for a longer period of time, and form some opinions about the kind of home and person where that dog should be placed in order to thrive and shine. In these cases, I almost always either promote the dog to my own network of friends (and their friends) and work to make sure that any prospective adopter is really suited to the dog and vice versa, or I work closely with the shelter to meet any potential adopter they find for the dog, and discuss what I know and have experienced about the dog with them.
A great foster provider
My good friend is currently fostering a dog with special medical needs. This is what we know: The dog, a little over a year old, came into the rescue with a broken leg. She had a limb-saving surgery that failed and needed to be repeated. She was briefly in a foster home that turned out to be unsuitable; she is young and playful and there was another young and playful dog in the household, and they wanted to play. The risk of her reinjuring the leg and necessitating the removal of the leg was high. So that foster person asked my friend if she could foster the dog post-surgery until she was healed and ready for placement. My friend agreed, as she has experience with rehabbing her own dog following ACL surgery and is currently working from home.
The dog is very sweet. She’s also very energetic and wants nothing more to do than run and play. She had to spend the first few weeks under the influence of calming medications and went outdoors only on a leash. She weighs around 50 pounds and is strong, and knows nothing about good leash manners (or much else), so my friend has been using a harness to walk her, and has been teaching her some basic good manners: to not pull, to wait at doors, sit and down on cue, etc.
My friend has also been working from home, so she can see how bored and restless the dog is, and she has endeavored to give the dog lots of enriching games and food puzzles to play with. She freezes bits of hot dog and cheese in blocks of ice and lets her enjoy them in a playpen on her shady lawn. She moves the playpen from one location to another during the day, giving the dog changes of scenery – because if she’s left outside for very long by herself, she barks and barks. My friend serves the dog all her meals in Kongs and slow feeders, for enrichment and stimulation.
And, of course, my friend has gotten very attached to the dog – but from the get-go, she has been steeling her heart against the idea of adopting the dog herself. She has an older dog who has had multiple lameness issues for years, and she misses having an utterly sound, healthy dog to take on long walks and hikes. She doesn’t want to hasten her own dog’s death, of course, but she also has been looking forward to the day she can adopt a young, 100% sound dog without medical issues or concerns.
So my friend has had the dog for over two months; she’s healed! She hasn’t heard one word from the rescue group, which is strange, but it sure seems like it’s time to make contact. My friend calls the person who recruited her for the fostering task, who is a co-founder of a local nonprofit animal rescue group, and who, presumably, was the legal owner of the dog. She was saying, hello! The dog is doing great, and what’s the plan for finding her a home?
Whoops! That person told my friend that it was another local group who really owns the dog. Oh boy. Okay.
A not-so-great rescue group
My friend calls that group – and it seems to be a minor surprise to them that the dog still exists. Okay, there is a pandemic going on; everyone is a bit stressed. Once they recover, they say someone will get back to my friend. There was someone a while back who was interested in the dog….
When my friend reports this to me, we are both perplexed. If the rescue group had someone who was interested in the dog months ago, why wasn’t that person hosting the dog during rehab? Maybe they work outside of the home and couldn’t provide enough supervision…. But then, why wouldn’t that person want to visit the dog during rehab? Or call and ask how she was doing occasionally? We are sort of mystified, and, of course, concerned.
The next day, a person calls my friend and says she met the dog some months back, when the dog first came into rescue, and she’s interested in adopting the dog. She starts asking my friend about the dog, and my friend describes her: She’s young, sweet, friendly, smart – and she needs some training. She is still learning not to pull on the leash … and the potential adopter starts telling her that this won’t be a problem; the dog obviously just needs some training with a choke chain or pinch collar. My friend is like, “Um, no, that’s really not necessary, it’s not severe or anything; I’m just telling you that she’s a young dog without training, and because she’s only been in physical recovery mode, I haven’t been doing that training. I’ve only been managing her behavior so she doesn’t get the zoomies and start running around!” The adopter insists that there are correction collars that will stop pulling without hurting the dog.
The discussion sort of sputters to a halt. Then the potential adopter asks how the dog is with other dogs. My friend explains that’s she’s super playful and wants to play with any other dogs she meets – and the potential adopter says, “Well, she’ll have to learn to stop that; I have a very grouchy little dog who will tell her what’s what!” Oh man, another sinkhole of a conversation stopper.
My friend asks the potential adopter more about herself; where will she keep the dog? The person explains that she works all day out of the house, so the dog will be either indoors all day or outdoors all day… and at this, my friend is officially depressed. This does not sound at all like a great home for this dog! And now my friend is saying, “If this is the dog’s only option, maybe I should keep her!”
But those two things shouldn’t be the dog’s only option! A good rescue group would have been checking in on the dog’s progress, and either would either promote her as a special-needs dog in search of a very particular kind of home (lots of supervision, other friendly and playful dogs or perhaps no other dogs, someone with the experience or willingness to teach her basic behaviors without resorting to punishment-based techniques) or at least have a plan to promote her. Instead, it seemed like they just made a call to someone who had expressed a minor interest in her, hoping to just solve the custody issue by palming off the dog to anyone. Ugh.
My friend called the group again, to try to find out who, exactly, is the person in charge of this dog’s case, so she could have a discussion about the plan going forward – and got a runaround. The person in charge is too busy to talk; the person she can talk to is fine with the placement with the choke-chain lady. Or, my friend can keep the dog. Whatever.
Ugh again. I feel terrible for my friend; she’s invested a lot of time and loving care into this dog, and was hoping for the dog’s story to end with a great adoption into a suitable home. Instead, she’s being torn between taking on another not-100% sound dog, for another decade-plus of more-extensive-than-normal medical needs, and just handing the dog over to a home that she’s not particularly well suited for. At the moment, the whole thing feels like a disaster. It’s great that the rescue group found the money for the dog’s medical treatment, presumably saving her life (or at least her leg), but their follow-through has been dismal.
Moral of the story
I was only peripherally involved in all this; while I know all the parties involved, I don’t know any of them except my friend very well. I probably would have been more proactive at communicating with the person who delivered the dog to my door in the first place, to determine the “chain of command,” as it were, before so much time had gone by – and I feel really bad that I didn’t inquire and encourage my friend to learn more about this earlier on in the fostering process. I’ve been distracted and preoccupied, too! All I can say is, if you are considering fostering:
Before you take on a dog, know exactly who you are dealing with and who is ultimately in charge of your foster dog’s case – and what the plan will be to find the dog a home.
I don’t know how all this is going to end; the rescue group asked my friend to keep the dog for a few more weeks before their veterinarian will clear her for unsupervised activity. I just really hope a more suitable adopter will come along.
If you’ve fostered before, do you have a most-important bit of advice for other potential foster providers? Any cautionary tales of your own?
One of the most common skin diseases that develop in dogs is atopic dermatitis. Most of these cases are caused by allergies to substances in the environment. Dog owners are aware of the possibility that their dogs may have environmental allergies to plant pollen and dust or dust mites, but may be completely unaware of one more very significant environmental allergen that can cause ill effect on susceptible dogs: mold.
Molds are a type of multicellular fungi that are present almost everywhere in the environment including the air; favored surfaces include wood, leaves and plants, air ducts, soil, and basements. They thrive in moist, damp, and humid environments, multiplying through microscopic spores that disseminate through the air. Because dogs tend to explore environments – especially with their noses – they can be at increased risk for coming into contact with and inhaling mold spores.
Molds are usually harmless in small quantities, but they can cause problems if a dog is sensitive to them and suffers an allergic reaction. An allergic reaction occurs when the dog’s immune system responds to a substance with a state of over-reactivity or hypersensitivity. If the allergy becomes chronic, it can become uncomfortable and even painful; if not treated, it can lead to the development of more severe health issues.
Symptoms of mold allergies in dogs
Dogs allergic to mold typically develop a year-round skin problem. If they are allergic to mold, the symptoms may wax and wane with atmospheric humidity (which allows molds to reproduce at a faster rate) but will be present to some extent year-round, because the offending allergen is present all the time, not just seasonally like some pollens. This allergy is most likely to develop in dogs between the ages of 6 months and 3 years, however, dogs can develop an allergy at any time during their lifetime.
Mold allergies tend to manifest as a skin condition. Symptoms may include scratching (often persistent), inflamed and irritated skin; dry scaly skin, localized or generalized hair loss, chewing/licking (especially the paws); chronic ear infections. It is also possible, but uncommon, for molds to cause respiratory symptoms such as coughing, sneezing, wheezing, labored breathing, discharge from nose and/or eyes, and even loss of appetite and lethargy in more severe cases. Dogs with mold allergies are also frequently affected by other inhalant allergens, such as mites.
Diagnosis
Mold allergies cannot be distinguished from other types of allergies without allergy testing, but your veterinarian may first want to perform a thorough exam, obtain a history, and perform other diagnostics to determine if the presenting condition is caused by or complicated by an infection or another disease that resembles atopic dermatitis.
Allergy testing in dogs typically takes one of two forms: intradermal skin testing or blood serum testing. Intradermal allergy testing is considered the gold standard for the diagnosis of atopic dermatitis and involves injecting small quantities of 40-60 different types of allergens into the dog’s skin, typically performed under general anesthesia by a veterinary dermatologist. A visible swelling will occur at the injection site if a dog has a reaction to the allergen, allowing determination of which allergens are triggering atopic dermatitis. Blood testing can be performed in a general veterinary practice; a blood sample is drawn from the dog and submitted to a testing laboratory. The lab searches for the presence of antibodies to allergens that are known to contribute to atopic dermatitis. The results of these tests can be used to formulate an allergen-specific immunotherapy based on the offending allergens.
Management and treatment of mold allergies
The treatment of allergies, including those caused by molds, usually involves two steps: get control and keep control. This frequently requires using one or more therapies, often in combination with one another; these include, but are not limited to, corticosteroids, antihistamines, ATOPICA® (cyclosporine capsules), and Cytopoint® (Lokivetmab).
Allergen immunotherapy, also known as desensitization or hyposensitization, consists of administering gradually increasing quantities and strengths of relevant allergens, either by subcutaneous injection or sublingual drops. The goal of this treatment is to help build tolerance to the allergens by tempering the immune response. This custom immune-therapy regimen can take up to 12 months before a response is observed. But the commitment may be well worth it as it may not only prevent the current allergies from worsening but also help prevent new allergies from developing.
Dogs suffering from allergies often develop secondary recurrent ear and skin infections. The inflamed skin can be susceptible to bacterial and yeast infections, which in themselves can lead to even more scratching. Targeted topical antimicrobial therapy shampoos and sprays containing chlorhexidine, miconazole, and/or ketoconazole may be recommended, as well as ear cleansers and treatments. In severe cases, oral systemic treatments with drugs such as ketoconazole, itraconazole, or terbinafine may be necessary.
Environmental therapy
Reducing the mold levels in your dog’s environment can help mitigate exposure and thereby reduce allergy symptoms. Unfortunately, because mold is all over, completely avoiding contact is not possible. Ideally, keep your dog (and his bed!) out of damp basements or garages; frequent baths or wipe-downs with a damp microfiber cloth can help remove mold spores that fall on his skin and coat. Inspect your dog’s favorite places, especially under his bedding. Large mold infestations in the home can usually be seen or smelled. If mold is present, these areas should be cleaned and treated appropriately. Depending on the location, extent, and type of mold, this may need to be done by a professional service.
Because a mold allergy is environmental and environmental allergens are everywhere, complete alleviation of the condition is not usually possible and most dogs will require lifelong treatment. But it can be successfully managed, resulting in a happier and more comfortable dog.
My sister and her husband used to live down the street from a fire station. At least 10 times a day (often many more), they would hear sirens from fire trucks leaving the station, responding to fires and medical emergencies. Their little dogs would howl every time they heard a siren, which, in these “work from home” times, would have been a huge distraction. But my sister and her husband thought it was cute! They enjoyed the little dog howls; they also had to keep their windows closed at all times, to keep the noise from bothering the neighbors. When I was visiting them, I thought it was mainly a pain in the rear, having our conversations interrupted every hour or so!
Today, they live in a semi-rural neighborhood. If they hear a fire engine, it’s a real cause for concern, not a prompt for a fun little “singing session.” So sometimes my sister starts a session herself. It doesn’t take much, just one or two howls, and the dogs all immediately get to their feet and join in.
Here’s the funny thing: When my senior dog Otto stays with them (when I’m out of town i.e., not much any more), he joins in with the little dogs, adding his big deep voice to the chorus of little voices. I keep telling my sister to try to get this on video, because at my house, Otto will NOT join in! And I have no idea why! If he’s outside when a fire truck or ambulance goes by, he will howl for a moment or two – but not if I’m near him. He will grow animated, like he’d like to howl, but he won’t do it. It’s so strange to me! I’ve never admonished him for howling, I would think it’s cute, too! But he just won’t do it in front of me!
Otto is sticking to his no-howling-at-home standard
My son and his girlfriend drove up here last weekend for a socially distant visit. I cleaned my detached home-office thoroughly and put mattresses on the floor for them, and gave them their own bathroom to use, and we ate meals and hung out outside together. They spent the days canoeing and playing disc golf at a course in town, relaxing, while my son’s hound dog Cole and his girlfriend’s parents’ dog, Bailey, stayed with me and my dogs. One evening after dinner, we were having the dogs show off their tricks for various bits and pieces of leftover dinner, and my son mentioned that Cole now knew how to howl on cue as a trick – and that little Bailey, a terrier-mix, would join in very earnestly. We turned on the camera to capture the action, and I hoped Otto might join in.
Nope. He wagged his tail and paced and looked like he wanted to join in, but held to his “no howling at home” standard. The big surprise was Woody, who did join the fun, in a surprisingly high-pitched tone. I would have thought such a big, big-chested dog would be more of a bass, or at least a baritone. He’s nearly a mezzo-soprano!
Now I want to practice, and see if I can put the behavior on cue, too, for one or both dogs. (For video of our one-time howling fest, see the Whole Dog Journal’s Instagram page, dogsofwholedogjournal.) What’s your stance on howling? Cute? Or annoying? Can your dog do it on cue? If so, share a video on our Facebook page! I’ll put a post there, asking for your contributions.
These days, thanks to coronavirus, more and more restaurants are offering outdoor dining, and many are allowing dogs to accompany their humans, as some traditional outdoor restaurants have for years. You may have seen some very well-behaved dogs lying quietly at the feet of their humans as they dined outside Panera Bread and other eateries, and wondered “How do I get my dog to do that?” Here’s how.
Start teaching your dog to be a good dining companion at home
The first step is to get your canine pal to lie quietly at your feet while you eat in the comfort of your own home. Mat training is great for this. Start by reinforcing your dog for lying on a portable mat, rug or dog bed when you’re not eating.
When she is solid with this behavior, generalize it by moving the mat to your eating area. When she can do at least 10-15 minutes of duration on her mat while you sit nearby at the table reading a book or typing on your computer, add the eating part – short snacks at first, gradually increasing your food consumption to full meals. Ideally, your dog will just take a snooze while she waits. If not, it may help to give her a long-lasting chew of some type to keep her happy while you eat.
You do want to remember to occasionally reinforce your dog for staying on her mat, but you don’t want to feed her from your place at the table, as this may encourage begging or demand behaviors. Instead, have her stay on her mat while you get up, walk away from her, get a treat from a counter or shelf (or even from your pocket), and feed it to her as you approach from her non-table side. This way she won’t have expectations of getting treats from you while you are seated and eating.
Now it’s time to take the show on the road. For purposes of this article, we are assuming that your dog is already comfortable and reasonably well-behaved in public. If not, you’ll need to back up and start there. You do not want to try to eat at a restaurant with an ill-behaved dog! (Please note: It is never a good idea to take dogs who are reactive or have aggressive behaviors to public eating places.)
Start by making several trips to the outdoor restaurant(s) of your choice, and do some good manners training practice outside the eating area. Take your dog’s mat along, and practice her mat behavior there as well.
When she can do well with “Mat” outside the eating zone, you’re ready for the real thing. Visit your restaurant of choice, enter with your dog and her mat (and a long-lasting chew, if needed). Select an out-of-the-way table so you’re not smack in the middle of the traffic pattern, invite your dog to lie down on her mat, and take your seat.
It should go without saying that you never let your dog approach, bother or otherwise interfere with the dining experience of other customers. If they ask if they can pet your dog, that’s up to you. If your dog might not handle it well, or you don’t want to disrupt her mat tranquility, just say sorry, but no.
Be ready to leave at any time if your dog tells you she can’t handle it. (Let your waitress know in advance that this might happen and you’re not running out on the bill, you’ll be right back to pay. Then stash your dog in the car –running, with the air conditioning on, while you dash back to pay.)
Dine alone at first, so you aren’t distracted by companions and can give your full attention to your dog and her training program. Start again with light snacks so you can keep your eating time short, and as she demonstrates to you over several visits that she’s ready for more, work your way up to a full-course meal with your friends.
To provide the best experiences, we use technologies like cookies to store and/or access device information. Consenting to these technologies will allow us to process data such as browsing behavior or unique IDs on this site. Not consenting or withdrawing consent, may adversely affect certain features and functions.
Functional
Always active
The technical storage or access is strictly necessary for the legitimate purpose of enabling the use of a specific service explicitly requested by the subscriber or user, or for the sole purpose of carrying out the transmission of a communication over an electronic communications network.
Preferences
The technical storage or access is necessary for the legitimate purpose of storing preferences that are not requested by the subscriber or user.
Statistics
The technical storage or access that is used exclusively for statistical purposes.The technical storage or access that is used exclusively for anonymous statistical purposes. Without a subpoena, voluntary compliance on the part of your Internet Service Provider, or additional records from a third party, information stored or retrieved for this purpose alone cannot usually be used to identify you.
Marketing
The technical storage or access is required to create user profiles to send advertising, or to track the user on a website or across several websites for similar marketing purposes.
This website uses cookies and other tracking technologies to offer you a better experience, personalize content and ads, and analyze our site traffic. Before proceeding, you agree to our Terms and that you’ve read our Privacy Policy. Update Settings
Functional
Always active
The technical storage or access is strictly necessary for the legitimate purpose of enabling the use of a specific service explicitly requested by the subscriber or user, or for the sole purpose of carrying out the transmission of a communication over an electronic communications network.
Preferences
The technical storage or access is necessary for the legitimate purpose of storing preferences that are not requested by the subscriber or user.
Statistics
The technical storage or access that is used exclusively for statistical purposes.The technical storage or access that is used exclusively for anonymous statistical purposes. Without a subpoena, voluntary compliance on the part of your Internet Service Provider, or additional records from a third party, information stored or retrieved for this purpose alone cannot usually be used to identify you.
Marketing
The technical storage or access is required to create user profiles to send advertising, or to track the user on a website or across several websites for similar marketing purposes.