Credit: Juana María Gonzalez Santos | Damedeeso/Dreamstime
Should dogs eat avocado? Not really. Avocados contain persin, which is a fungicidal toxin. It is a poison for horses and birds. Avocados hold the highest concentrations of persin in their leaves, thick skin, and pits, making those parts of the fruit toxic to dogs as well.
The avocado flesh, which is what most of us eat, contains lower levels of persin, so a few thin slices of fresh avocado may be fine for your dog, depending on the dog’s size, of course, and whether he has a food allergy to it. But, why do you want to take the chance? Limit your dog’s consumption of avocado to a slice or two, but that’s it. Too much avocado can cause gastrointestinal upset in dogs (and people), including vomiting and/or diarrhea, and you could wind up with a big veterinary bill.
Whole Avocados Are Extra Risky
Never give your dog a whole avocado. If there are avocado trees in your area, don’t let your avocado-eating dog scarf them down unsupervised. In addition to the persin, avocado pits present a serious choking hazard to dogs, and some dogs do try to chew or swallow them.
Is Avocado Healthy for Dogs?
One medium-sized avocado contains roughly 320 calories and 29 grams of fat. That’s a lot of calories for a dog and, because of the fat content – yes, even the “good” fat – too much could trigger pancreatitis.
Commercial Dog Foods
A few pet foods contain avocado oil and/or avocado meal. Neither avocado oil nor avocado meal (dried and ground avocado) contain persin, and both are safe for dogs, if your dog tolerates it. As with any new food, watch your dog’s response over a few days or weeks to determine if an avocado-based dog food is right for your dog. If you see diarrhea, vomiting, itching, or any other adverse response, switch back to a food he has previously tolerated well.
I know, I know: we are first and foremost supposed to support our local pet supply store. Believe me, if I had one in my town, I would not be writing these words. The closest independent pet supply store is 30 miles from me, and believe me, when I go to that town for any reason at all, I also go to that store and buy stuff. (Shout-out to my friends at Trailblazer Pet Supply!)
In my town, we have a chain pet supply store, and I was super glad when they opened a store here a few years ago; it meant that there were at least a few foods I could pick up there, and at least a few toys, leashes, and other items that meet my standards for safety and quality.
When I want really cool, top-quality stuff made by U.S. manufacturers, I go to the independent stores. And I mean, any independent pet supply store I see open in any town in any state I travel to. My family members all groan when they see me spot a “pet supply” sign when we are on vacation, because they know we are going to pull over and they are going to have to amuse themselves for at least a half-hour while I walk the aisles and chat with the employees. (Independent store owners all stock different, unique stuff that grabbed them at one or two of the huge annual pet supply trade shows, and I think of them as curators; almost every independent store offers something that I’ve never seen before.)
But, guys, when I open the dog food container and all of a sudden it’s incredibly low, or I’m feeding a starving mama and her nine growing puppies and going through food at an unpredictably fast rate and I’ve been crazy-busy putting the magazine to bed and haven’t so much as taken a shower for a couple of days, being able to punch up my favorite online store and order food and have it on my porch in two days – you guys, that’s a blessing.
Mama is not keeping up with the demand, and I just ordered five pounds of milk-replacing formula to get us through the next couple of weeks. And the dry puppy food I like to soften in formula and feed to the growing pups is not one I can get in my very close chain store, OR my favorite independent store 30 miles away. Yes, I could have them order it, and wait a week, and drive a half-hour over there and a half-hour back… but no, placing an online order is just too easy. And when you are feeding four big dogs – Otto, Woody, my tenant’s dog (I don’t know exactly how this happened, but here we are…) and the foster mom – food goes much faster than my fractured attention span can keep up.
I imagine that everyone who works or volunteers in animal rescue, or human social services, gets overwhelmed at times with what seems to be a relentless tide of innocents in need of help. Intellectually, I know that there are FAR fewer unwanted pets being brought to animal shelters and fewer animals being in euthanized in shelters than when I was a young person, and yet at times the sheer volume of dogs I’m aware of who are in need of rescue, fostering, transportation, and medical help is just crushing.
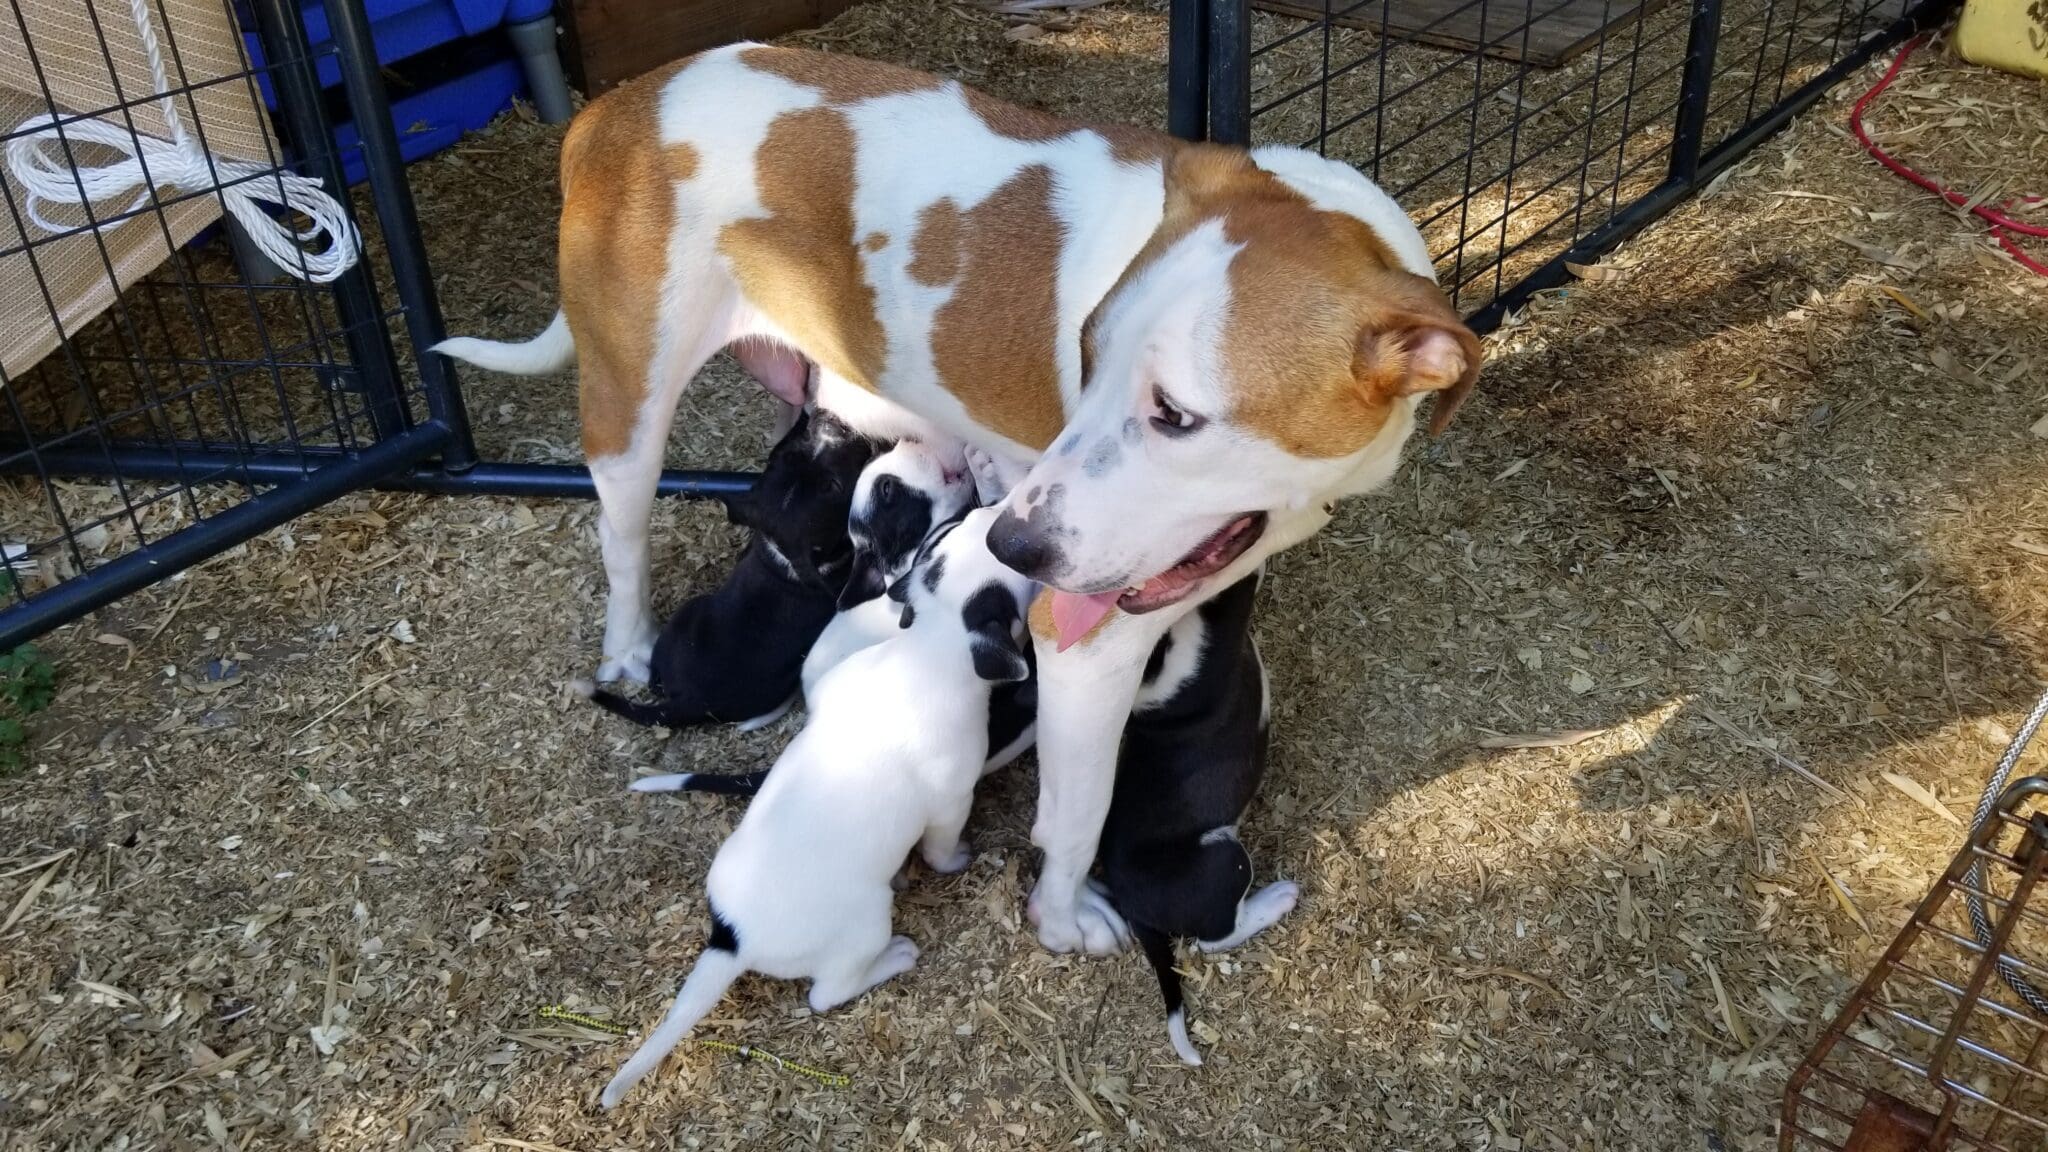
I’m fostering a mama dog and her nine puppies. They were surrendered to my local shelter when the pups were about a week old. I’m glad someone brought them all to the shelter; they could have as easily drowned the puppies or dumped the whole bunch in the woods. The shelter was able to improve their chances immeasurably: They were all treated for the hideous flea infestation they had, as well as the intestinal worms AND a lovely case of coccidiosis. The very-thin mama started to put a little weight on immediately. And, in a couple of months, they will be well-started in housetraining and basic manners, well-started on life-saving vaccinations, get spayed/neutered and microchipped, and will be adopted to screened, qualified homes. Things are looking up – even though they were set back a tad by the kennel cough they picked up in the week they were at the shelter being treated for coccidia, before they came to my house for fostering. With good home care and treatment, we will pull them all through this, no problem.
But I can’t help but think: Who failed to spay the mama dog in the first place – or at the very least, failed to contain her so she couldn’t get pregnant? Who failed to seek out treatment for what had to have been several months of diarrhea caused by a coccidia infection? Or even as little as a flea preventative? Why do people who don’t care for their pets HAVE pets?
And I’m far from the only one. Friends from all over are dealing with similarly depressing situations. One friend who runs a doggie daycare has DOZENS of hounds in foster care in her facility. Another friend who fosters for her local shelter is in despair over the city government’s recent decision to award the shelter-management contract to a new organization, one without a track record of any kind, despite the current management’s accomplishment of achieving the best adoption rate in that shelter’s history. Another friend has been fostering a special-needs dog for over a year, and has been steadily improving this dog’s health and behavior while seeking an appropriate home for the dog – an admittedly difficult task, as the dog shouldn’t be kept with any other dogs or cats – but without a single lead.
On some days, like today, I am just a little overwhelmed by it all.
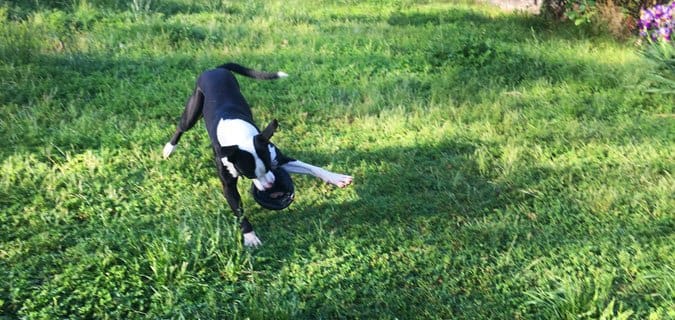
The best cure for this? Little bits of good news. Facebook photos of a former hard-to-place foster dog, depicted sleeping sprawled out on a beautiful sofa (indicating a loving owner and comfortable living situation) and romping in a grassy field with new toys in his mouth. Positive emailed reports from owners of the last puppies I fostered, who are now thriving in homes all over the state. And, just now, a few minutes spent sitting in a pen full of puppies, kissing their little heads and smelling puppy breath as they lick my nose and cheeks, and feeling those little tails wagging furiously. That will have to do for now.
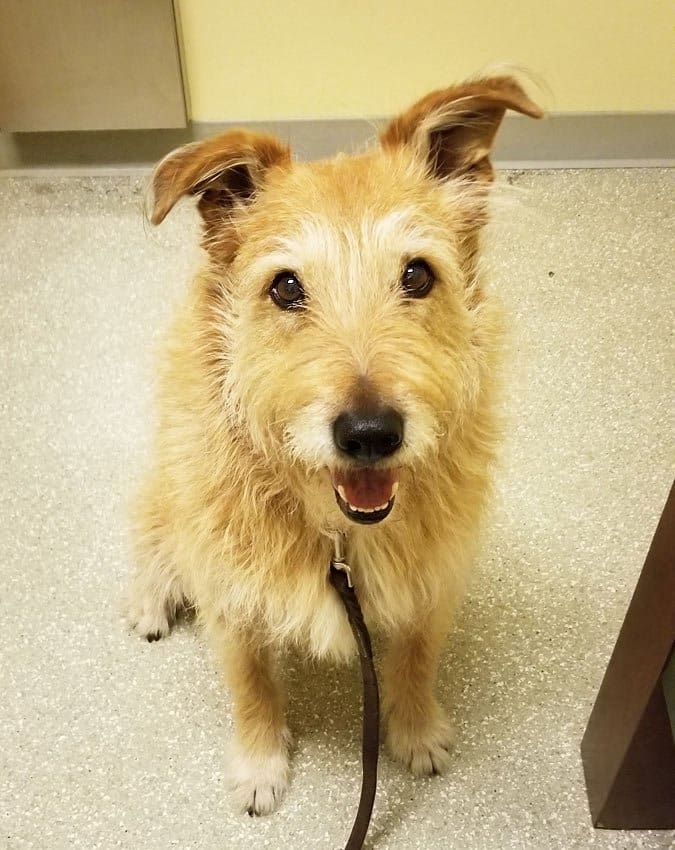
My large mixed-breed dog, Otto, will be 11 years old in November. He is big-bodied, much thicker through the middle than my younger dog, Woody. And I have lost count of the number of middle-aged and senior dogs I know who have been lost to splenic tumors – dogs who seemed absolutely fine one day, and then hideously sick the next, and euthanized a few hours later due to a tumor that suddenly grew enough to rupture, or cause some other fatal problem in the dog’s abdomen.
Yes, I’m paranoid. Thankfully, I can afford the pet insurance that enables me to ask and pay for the advanced diagnostic tests to put my mind at ease that, at least so far, Otto is as healthy as he can be, and he is not hiding a potentially lethal mass somewhere in his thick body.
First, I had to make an appointment with a veterinary hospital where a board-certified internist whom I like very much practices – but not just any appointment. I left a message saying I knew it would likely take longer and require special consideration in scheduling, but that I wanted to make an appointment for Otto to have a senior dog wellness exam, as well as blood and urine tests (wellness panel, including complete blood count and chemistry, plus a test for tick-borne diseases, plus urinalysis), radiographs of his whole chest and abdomen, and an abdominal ultrasound – and I wanted to be with him the whole time.
Ordinarily, this clinic would ask the owner to leave the dog in either the morning or afternoon, and come back for him some hours later, so they could move him from station to station in the treatment area of the hospital as there was room and personnel available. He might be put into a cage to wait for various bits of time in between. I know, because this is how a similar visit was handled two years ago at the same practice – a visit that Otto came back from reeking of what a friend used to euphemistically refer to as “butt juice” (Otto emptied his anal glands in fear at some point).
For some dogs, it’s being handled by strangers that scares them about the veterinary hospital experience. For some dogs, it’s the restraint and discomfort of the procedures that they are subjected to. For some, it might be getting put into a cage or the smells – and of course, for some dogs, it’s the whole enchilada. I swear that for Otto, it’s mainly about being rushed along slippery floors! He likes meeting people, he doesn’t mind restraint (he loves hugging of all kinds), he’s fairly stoic about pain (needles and such), and he is comfortable in all types of crates and cages. But if you rush him even a teeny bit over a slippery floor, he starts panting and shaking and his legs go all wobbly and he turns into a hysterical old lady with legs like Bambi on ice!
I have done my very best to build a relationship with the veterinarian who would be doing the exam and ultrasound, and she is the medical director of this large practice (which turns into an emergency hospital after hours and on weekends). So she knows me, and knows that I am not a hysterical old lady myself, won’t take up more time than is necessary to help move Otto through the stations, won’t ask about any other dog or procedure I see taking place in the treatment area, and won’t ask her a million unrelated questions about Otto or my other dog – in other words, she knows I will be respectful of her time, given that I will be asking for more of her time than usual. So, when I left my request for this sort of appointment with her scheduler (a different person than the hospital’s usual scheduler), I got a call back a day later with details for an appointment about 10 days later. I was warned that emergencies could affect the timing of all the tests; I might have to wait with Otto for any amount of time if the ultrasound or x-ray equipment was needed for an emergency case. Of course!
Before we walked into the hospital, I sprayed Otto’s feet with a rosin-based spray, to help give him a little more traction on the floor, and while I’ve not seen this help him deal any differently with our floors at home, I do think the added stickiness gave him a little confidence in the clinic – that, and not being hurried at all. I let him have a fairly long leash and pick his own path more or less alongside me as we walked up to the front counter to check in, and then over to a seat in the waiting area. I smiled and answered politely when a lady with a cat in a crate on the other side of the waiting area kept trying to engage me in conversation, but kept my focus and attention on Otto, asking him to repeat his best-known tricks while we waited, to keep him distracted and happy: sit, stand, down, back up, high five, and his theatrical favorite, “bang!” (He gives a very realistic groan when he “dies” and lies flat.)
I was instructed not to feed Otto the morning of the appointment, so his stomach would be empty; it helps during the ultrasound, to see surrounding structures. So, I was super stingy with the treats I fed Otto in the waiting area; I gave him just one nugget of Stella and Chewy’s “Meal Mixers” for about every 10th behavior. The nuggets are puffed up like popcorn, not dense like dried meat; if you smush one between your fingers, you can see that each one is comprised of a pretty small amount of meat. Fortunately, Otto is used to working long chains of behavior in between treats, and he’s happy with praise and snuggles in between treats. (Woody is more motivated by food, and gets annoyed by petting while he’s working.) So he ate only a little while we waited.
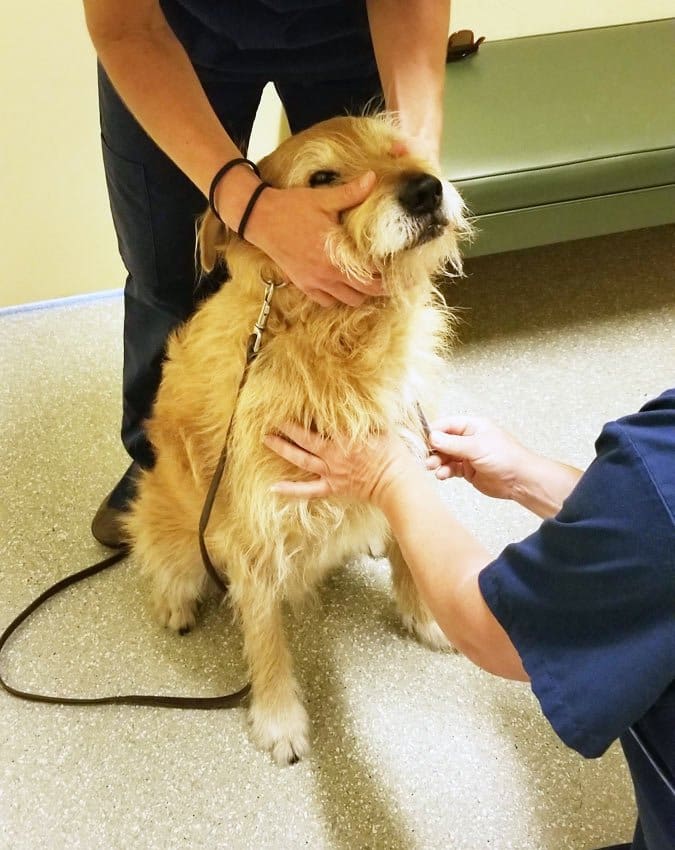
Then a technician led us to an exam room, and I talked to her about Otto’s current health: good, but he is getting a tad stiffer upon rising and slightly protective of himself when jumping into and out of the car. She said they would start off with taking a blood sample for the blood tests, and I reiterated my wish to be with Otto at all times; could they take the sample in the exam room? She said that would be no problem. And, in fact, it wasn’t a problem. Another technician came in to hold Otto, and he greeted her warmly, and snuggled into her restraint; again, Otto likes being hugged. He was calm when the other tech drew blood from a vein in his neck, and happy for a treat when it was over.
While we waited for the room with the ultrasound equipment to be ready, I used my phone to show the technician a video of Otto at our old house, where he used to display all sorts of weird behaviors whenever I removed the carpet runners I usually had positioned the length of the hall. For some reason, his slippery-floor phobia was absolutely worse in the hall than any other place in the house – an eccentricity that has continued in our new house, which has the same flooring in the living room as the bedrooms and the hall, but he avoids the hall like the plague. Perhaps it’s the closed-in feeling, the lack of options for picking his own path? I don’t know – but I wanted to show the technician that it’s not just at the vet, and I’m not exaggerating: he really does get stressed out about slippery floors, and it’s one of the reasons I’m so protective of what goes on “in the back” at the vet. The technician thought the video was hilarious and sad. “Poor Otto!” she exclaimed, and assured me that we would let him pick the pace and path into the ultrasound room and elsewhere in the hospital. Mission accomplished.
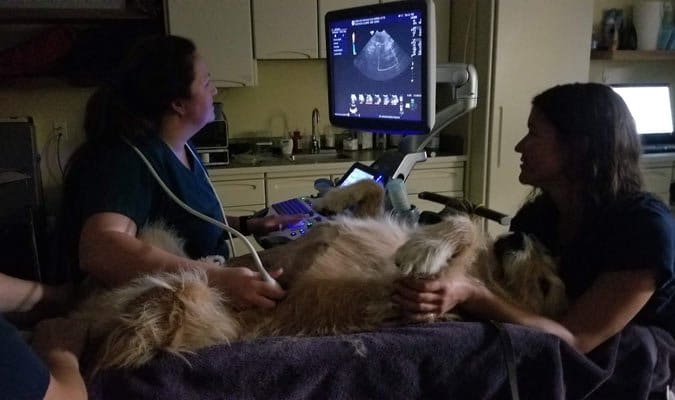
Abdominal ultrasounds are performed with the dog lying on his back in a V-shaped, padded cradle. The cradle is secured to the top of an examination table that can be lowered and raised with an electric motor. Two technicians lifted Otto and sort of rolled him over into the cradle on his back, while I stood at his head and rubbed his chest, telling him what a good boy he was. I stayed there while the one technician shaved his tummy and the other lightly held his hind legs; once the doctor came in to perform the ultrasound, the second technician held his front legs while I alternated between taking pictures and rubbing his chest. At no time did he struggle or get over-concerned with the procedure. And the veterinarian saw absolutely no worrisome abnormalities.
After that, the veterinarian examined Otto (eyes, ears, mouth, abdomen, etc.) while the techs went to prepare the x-ray machine. I wasn’t allowed to stay in this area during the x-rays, which makes sense, but did walk Otto into the room and reassure him when I handed his leash over to the technician, and told him to “wait.”
About 10 minutes later, one of the technicians and the vet brought a very happy-looking Otto to me in the waiting room – no butt-juice aroma this time, hurray! I fed him a huge handful of the Stella and Chewy’s food while listening to the vet: Again, she saw no abnormalities on Otto’s radiographs, though they would be sent to a radiologist for a more thorough look, and she would call me the next day with results from the blood and urine tests.
Today I got that call: All his blood tests came back in normal ranges, negative for heartworm, the tick titers were all negative, and his urine looked good except it was slightly more dilute than she’d like to see. She asked me to capture a sample first thing in the morning, and bring that in for comparison, which I’ll do tomorrow, to make sure that Otto’s kidneys are capable of concentrating his urine properly.
All in all, I am breathing a huge sigh of relief. We got through a major appointment without scaring him and aggravating his fear of floors, and my older guy is as healthy as I can hope for at the moment.
While some first aid may be possible in the event of a foxtail wound, in almost all cases you should get your dog to a veterinarian as soon as possible. Delaying treatment allows the foxtail to do further damage; avoiding foxtail treatment altogether could lead to your dog developing a chronic illness or could even lead to death.
SYMPTOMS: Squinting, discharge, an eye glued shut.
FIRST AID: Some trail first-aid advocates suggest removing a visible foxtail in the dog’s third eyelid by hand, by using blunt tweezers, or with a damp Q-Tip. However, you risk not removing it completely or driving it deeper. Instead, keep the dog from pawing at the eye and take her immediately to the vet – ideally to a veterinary opthalmologist.
TREATMENT: With a calm dog, the vet will use a numbing agent on the eye and remove the foxtail. A panicked or excitable dog may need sedation.
FIRST AID: Squirting mineral oil into the ear to soften the awn is a common recommendation. But Dr. Randy Acker, author of Field Guide to Dog First Aid: Emergency Care for the Outdoor Dog, cautions against it; if the eardrum has been damaged, the oil will do more harm than good. Get to a vet as quickly as possible.
TREATMENT: The vet examines the ear with an otoscope and uses alligator forceps to extract the foxtail. Sedation may be necessary.
Foxtails in the Nose
RISK: Chronic irritation, infections, tissue damage; may migrate into brain.
SYMPTOMS: Violent, explosive, serial sneezing. There may be a slight bloody dischage.
FIRST AID: None. Get to a vet as soon as possible.
TREATMENT: The dog must be sedated, and a topical anesthetic may be needed to numb the inside of the dog’s nose.
Using a rhinoscope, the veterinarian will visually inspect the area and extract the awn using alligator forceps.
Foxtails in the Mouth or Throat
RISKS: Damage to periodontal pockets, the tongue, or throat; infection; can be inhaled into lung.
SYMPTOMS: Hacking, gagging, difficulty swallowing when eating or drinking.
FIRST AID: If the foxtail is visible, you may pull it out by hand or with blunt tweezers. Feeding the dog bread may force the seed to move through the throat and into the stomach. In any case, see a vet for follow-up.
TREATMENT: The vet will anesthetize the dog and remove any foxtails.
Foxtails in Your Dog’s Paws
RISKS: Abscesses, infections.
SYMPTOMS: Continual licking of the foot or pad, bumpy swelling between the toes, or a small hole.
FIRST AID: If you can see the foxtail, you can try to remove it by hand or by using blunt-tipped tweezers. For embedded foxtails, soaking the paw (plain, warm water, 15 minutes, two to three times a day for three days) may promote the formation of an abscess that will eventually burst and expel the awn. If this happens, continue soaking in antiseptic water for several days.
A veterinary checkup is necessary if the foxtail is not expelled or if you see bumps forming in other areas of the paw or leg – a sign that the foxtail is migrating. Follow up with your vet in any case.
TREATMENT: The vet will locate and remove the foxtail.
Foxtails Under the Skin
RISKS: Infections, irritation, migration through the body; if it penetrates the body wall, it may injure a vital organ or cause secondary infection and abscesses.
SYMPTOMS: A hard bump or lump; may include a small hole in its center.
FIRST AID: None.
TREATMENT: The vet will surgically explore for the foxtail and remove it when found.
A full report on how to introduce new dogs to your pack exists here. In addition to the instructions and precautions discussed in that article, here are some additional things you can do to increase your potential for successful introductions between dogs.
Here are some general suggestions on how to introduce dogs to each other:
1. Exercise the dogs before initiating introductions. Happily tired dogs are more likely to interact well than those who are bursting with energy.
2. Have tools within easy reach in case you need to interupt an aggressive interaction (for more on breaking up dog fights, see “How to Safely Break Up a Dog Fight“.
3. Be sure to remove toys and other high value chew objects from the introduction area to minimize potential for guarding incidents.
4. Use extra caution when introducing a puppy to adult dogs to avoid physical injury or psychological trauma to your pup. While many adult dogs recognize the importance of being gentle with baby dogs, some do not. Some will play too roughly, and some will be actively aggressive. A bad experience with an overly exuberant playmate or an aggressive dog can have a significant negative influence on a pup’s future social behavior.
5. Be careful, too, when introducing a new dog to senior members of your pack, especially if the new dog is an adolescent or a puppy. Protect your senior dog from being physically damaged—bumped, bruised, body-slammed, or knocked over by a rambunctious pup. Keep your pup on leash in the presence of Granny or use a baby gate to keep them separated until he learns to modulate his behavior around your fragile, sometimes grumpy senior. Your geriatric dogs shouldn’t have to defend themselves from the overwhelming attention of fractious youngsters.
6. Consider size. Jean Donaldson, director of the San Francisco SPCA’s Academy for Dog Trainers, recommends no more than a 25-pound difference in size between dogs in a household or play group. More than that, she warns, and you risk predatory drift, where the larger dog suddenly perceives a small running dog as a prey object, such as a bunny or squirrel, and shifts from play to food-acquisition mode, sometimes with tragic results. Know that if you choose to introduce a new dog to a situation where there is a large size disparity, you may be taking additional risks with your dogs’ safety during introductions and thereafter.
7. Be sure to reinforce both/all dogs for calm, appropriate behavior in each other’s presence. Your reinforcers should be calming: treats, massage, and verbal praise are good choices; tug and fetch are not. You can use tethers, if necessary, to create calm, and follow Norwegian dog trainer Turid Rugaas’ suggestions to have dogs approach each other in a curving line rather than directly, allowing them to sniff the ground and do other displacement and appeasement behaviors such as looking away, as they choose.
Note: Turid Rugaas coined the term “calming signals” for many of the social behaviors dogs display when interacting with each other and with us. You can learn more about her work through her book, On Talking Terms With Dogs: Calming Signals, and her “Calming Signals” DVD.
Pat Miller, CBCC-KA, CPDT-KA, is Whole Dog Journal’s Training Editor. Miller lives in Hagerstown, Maryland, site of her Peaceable Paws training center. Pat is also the author of The Power of Positive Dog Training and Positive Perspectives: Love Your Dog, Train Your Dog.
This Elizabethan-type collar (the Foreyy Recovery Pet Cone) is a more comfortable example of the many alternatives to the classic clinic-issued “cone” that are now available in pet supply stores and online.
Dogs are naturally curious, physical, and exuberant, and while we love this about them, these characteristics can also lead to unintentional injuries. These can run the gamut from very minor to severe and life-threatening. How do you know the difference? When is it time to consult a veterinarian and when can you treat a dog’s wound at home? Here are some steps for assessing wounds and treating them.
1. Keep in mind that wounds are painful!
Even though your dog may have never snapped at you or bitten before, tender injuries can make even the most docile, sweet-natured dog snap or bite. Whenever handling an injured pet, make sure that someone restrains the dog properly while you examine and investigate the injury or wound for treatment.
2. All bite wounds should be evaluated by a veterinarian.
If your dog scuffles with another dog, cat, or a wild animal, immediate care with a vet is needed. This is true for several reasons:
First, animal teeth drive bacteria deep into wounds, even if they are only small punctures. Antibiotics are generally warranted any time that a dog is bitten by another animal.
Second, your dog might need to receive a rabies booster, particularly if he was bitten by a stray dog or cat or wild animal.
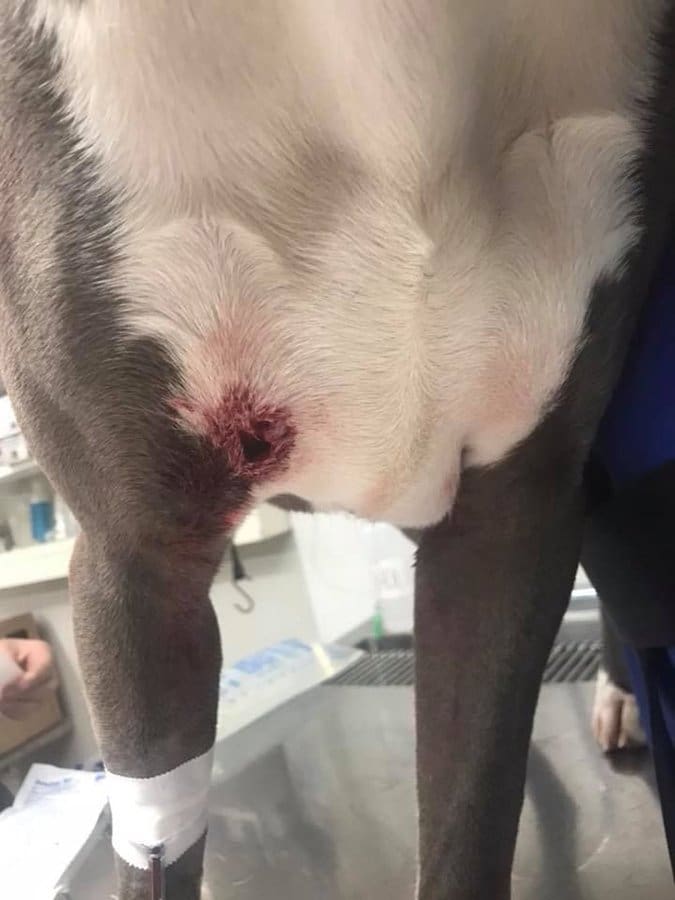
This doesn’t look like a very serious injury, does it? Despite the fact that the dog is standing and the wound looks small, it IS a serious injury: it’s a gunshot wound! A dog with any puncture wound of unknown cause or origin should be seen by a veterinarian as soon as possible.
Finally, bite wounds are often referred to as “tip of the iceberg” injuries. Though the external wounds may not look severe, there can be underlying trauma to the muscles and other tissues (particularly in the case of a smaller dog being grabbed and shaken), or even internal bleeding.
3. Any punctures that have an unknown source should be treated by a veterinarian.
Puncture wounds can represent several types of injuries including gunshot wounds, bites from other animals, or foreign-body penetration. It is not uncommon for a stick or other sharp object to penetrate a wound and become lodged within it. Though the wound may look small from the outside, foreign material trapped in the wound can lead to delayed or lack of healing, localized infection, and/or tetanus.
4. A veterinarian should treat a dog’ wounds if they are over an inch long, occurs on the chest or the abdomen, is contaminated, or has jagged edges.
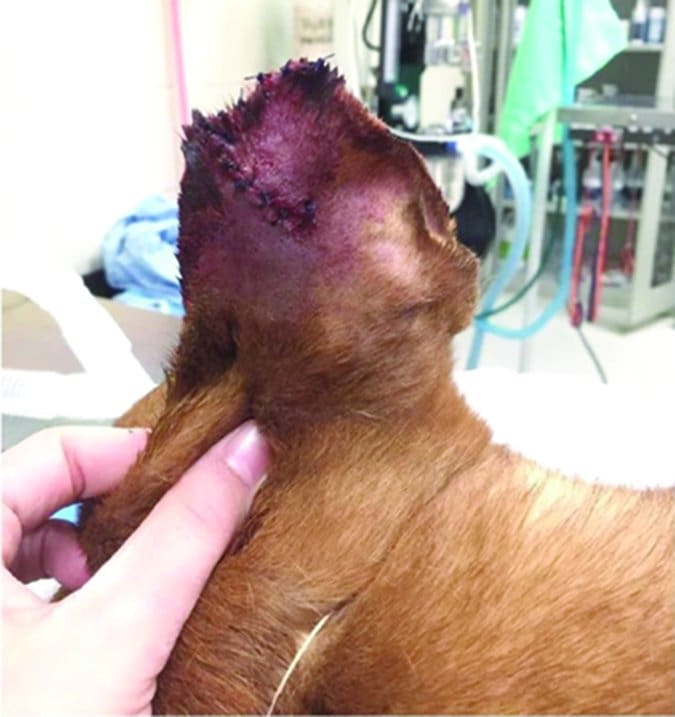
These wounds look clean along the edges, but they involve most of the cranial ear pinna, an area that is rich with muscular, nervous, and vascular contributions; the dog will benefit from veterinary attention.
It is difficult or impossible to treat a dog’s wounds at home or to deeply clean a wound without risking injury to yourself or traumatizing the wound. It is also important to note that wounds on the body (thorax or abdomen) can be more severe than they initially appear and always need to be addressed by a veterinarian, whereas wounds on the face (away from the eyes) or small, superficial wounds on the limbs may do just fine with at-home management.
5. Use hydrogen peroxide to treat a dog’s wound only once, if at all.
Hydrogen peroxide can be used initially on a wound to decontaminate it, but it should not be used repeatedly – and, truth be told, there are better ways to clean a wound. Hydrogen peroxide on a dog wound is extremely irritating to tissue. It can impede healing if used repetitively. If you do use it on a wound, use only after the initial cleaning and do not repeat.
Avoid alcohol on wounds, as the sudden, sharp stinging may provoke an otherwise well-behaved dog to snap or bite.
6. If the wound seems relatively minor (less than an inch long with clean edges), here’s how to treat dog wounds yourself:
You can clean gently with a warm wet washcloth and apply a thin layer of triple antibiotic ointment to the wound. If your pet licks the wound, use an Elizabethan collar (aka “cone”) or cone alternative to prevent self-trauma. You can also lightly wrap the wounds.
The ear looks much better after debridement (removal of damaged tissue) and suture placement.
It is imperative that you are careful when wrapping. As an emergency-room veterinarian, I saw many complications related to improper bandaging of a dog’s wound.
To make a safe bandage, you should use three layers. Start with a sterile dressing square over the wound. Over that, you can place two or three layers of a cotton-gauze wrapping. The last layer should be a stretchy wrap such as PetFlex. Before placing it, unroll the stretch wrap to remove some of the tension and then rewind it. This will help prevent overly tight application. Place two to three layers over the cotton. You should be able to insert two fingers under all edges of the bandage. If you cannot, the bandage should be removed and re-wrapped.
Bandages that are too tight can lead to decreased blood flow to the limb below, as well as decreased blood flow to the wound itself. This will slow healing.
It is also imperative that a dog’s wounds receive oxygen to heal. Change the bandage every 12 to 24 hours. If the wound appears to be healing well after 72 hours, you can remove the bandage.
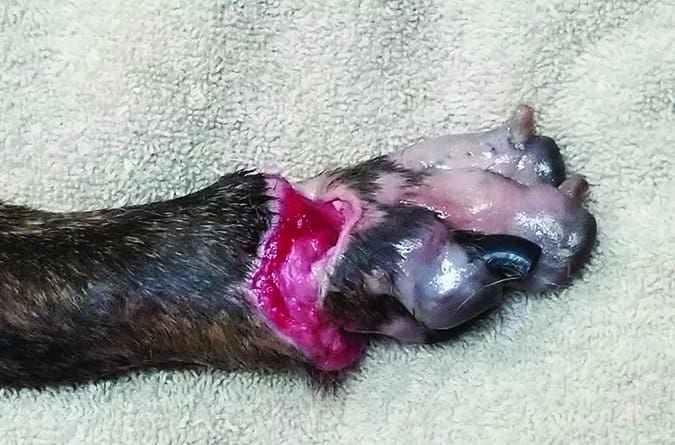
These wounds are a result of improper bandage placement. As you can see, complications from incorrect bandaging can be severe. The original wound on this foot was bandaged for several days by the owner. The dog was seen at a veterinarian’s office after the bandage became wet and had an odor.
Any wound, whether being managed at home or by your veterinarian, should be monitored for sudden changes. Acute redness, swelling, or discomfort, or discharge that is thick, foul-smelling, or copious merits an immediate trip to the vet.
Is Your Dog Licking the Wounds?
Wounds go through several phases of healing, and just like with our own wounds, each phase can cause the dog to feel a variety of sensations. These can include itching, burning, pain, and a tight, pulling sensation as the skin knits back together. Dogs will frequently lick or chew healing wounds in an effort to alleviate these feelings of discomfort, but all that moisture and pressure can increase the damage to the wounds themselves (especially if there are stitches or staples present) and promote infection.
If your dog tries to lick his wound, it’s important to use an Elizabethan collar or some alternative product to prevent him from further traumatizing the area. “Cones” can be bulky and annoying to your dog, and though most dogs will adapt to wearing one relatively quickly, there are many lighter and/or more comfortable options. For a wide selection of products that might suit your dog better, see “Best Dog Cone Alternatives“.
Whatever product you use, be patient, and keep it on your dog until the wound is healed and/or your dog is no longer paying any attention to it.
Better Safe Than Sorry
It is important to remember that when in doubt, all but the most superficial wounds should be evaluated by a veterinarian. Wounds can seem misleadingly slight, belying significant tissue trauma beneath. Hopefully, your visit with the veterinarian will be a quick evaluation, wound cleaning, and some prescription medications. If not, though, the sooner a wound is evaluated, the better the chances for healing and recovery.
A dog with a classic and advanced presentation of tetanus may display "rictus sardonicus" (sardonic grin), with his ears and lips pulled tightly back and bulging eyes.
Your canine companion is walking calmly with you one minute, and the next, a rabbit! Off streaks your dog, ignoring your calls and bent on chasing the rabbit. Unfortunately for him, he doesn’t notice the rusty old wire fence stretching across the landscape and runs right through it. Abashed, he returns to you with superficial wounds from the barbed wire on his legs and face. Your mind races: Do dogs get tetanus? Should your dog get a tetanus shot now?
Yes: Dogs can get tetanus. But, no, you couldn’t get him a tetanus vaccine even if you wanted to.
Fortunately, tetanus is relatively rare in dogs. Horses and humans are more susceptible to tetanus, while cats are highly resistant. Dogs fall somewhere in the middle of this spectrum – but it does happen. As an emergency veterinarian, I have personally seen two cases of tetanus in dogs and read of several others.
The disease arises from the bacteria Clostridium tetani, which is introduced into the body via wounds. C. tetani is naturally present in some soils. Despite what many people think, C. tetani is not a particular hazard of rusty metal; it’s the dirt on rusty metal – as well as metal that is not at all rusty! – that carries C. tetani into a wound.
Another surprise is that the bacteria itself is not the problem. Rather, the tetanus malady is caused by a neurotoxin (“tetanospasmin”) that is produced by the bacteria after it is introduced to an oxygen-deprived setting (as in puncture wounds) and it begins to reproduce. The toxin binds to tissue in the nervous system and causes the classic signs of tetanus. In dogs, these signs include painful muscle contractions and stiffness or rigidity of the limb nearest the site of infection. This can progress to generalized signs that include r
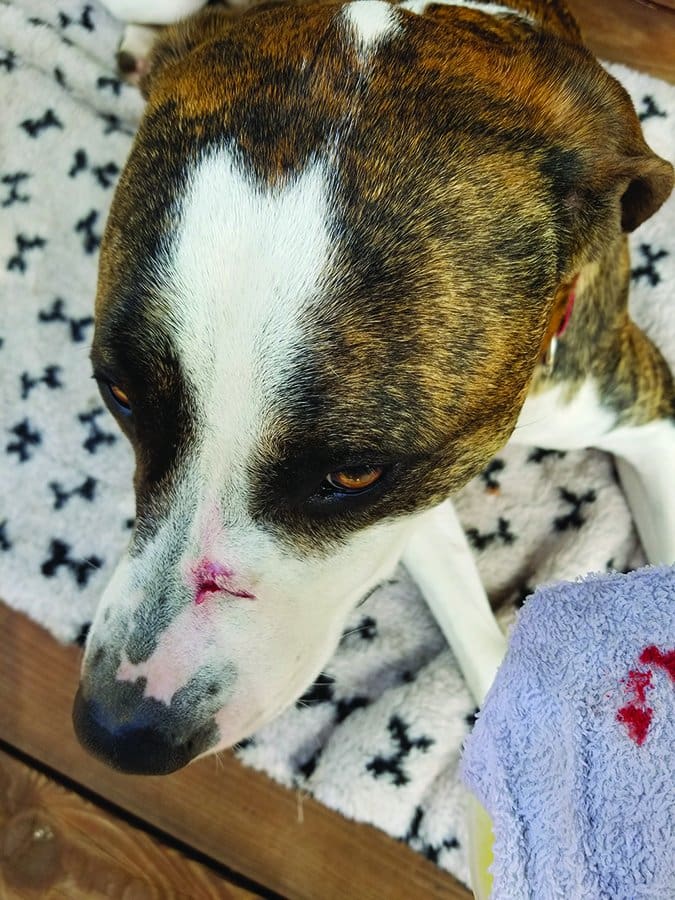
In humans, we associate tetanus with wounds from rusty metal, which is why WDJ Editor Nancy Kerns was concerned when her dog Woody cut his nose on rusty barbed wire. But the tetanus bacteria is introduced into canine wounds from soil, underlining the need to clean your dog’s wounds – and watch puncture wounds especially carefully for any sign of infection.
igidity in all four limbs known as the “sawhorse stance.” The more classic presentation of tetanus is a dog with rictus sardonicus (“sardonic grin”). The ears are pulled tightly back, as are the lips. The eyes bulge, and the dog appears to be grinning.
Treatment for tetanus consists mainly of general supportive care while the dog’s nervous system recovers from the damage caused by exposure to the neurotoxin. Dogs with generalized tetanus cannot walk. They require attentive nursing care with soft bedding, frequent rotation to avoid decubital ulcers (“bed sores”), hand feeding or feeding by a nasogastric or gastric tube, assistance with expressing their bladder, and minimal stimulation. Recovery can take weeks or even months, but if they are provided with excellent nursing care, many dogs will survive.
Tetanus Prevention for Dogs
So, back to your furry friend and his barbed wire injuries. He has wounds on his nose from rusty metal. Now what? Shouldn’t he receive a tetanus vaccine?
As it turns out, he can’t! There are multiple FDA-approved tetanus toxoid vaccines for humans, horses, and sheep. Unfortunately, there are none for dogs. Since tetanus is relatively rare in dogs, the sales of a tetanus toxoid vaccine for dogs would likely never pay off the expense of its development by a pharmaceutical company, so it’s no surprise that it hasn’t yet been developed. Money aside, there are also ethical considerations to vaccine development: To study whether a toxoid vaccine works in dogs, researchers would be required to infect dogs with tetanus and then treat them. The infection and resulting illness, treatment, and possible side effects of the vaccines would cause significant suffering and some deaths in the research animals. On balance, the endeavor hasn’t yet appealed to any vaccine developer.
Since there is not a readily available vaccine against tetanus for your dog, how can you protect your dog from the condition?
Bites and puncture wounds are at special risk of developing tetanus; bring these to your vet!
Next, monitor your dog carefully after he sustains any open wound. If you notice stiffness at the site of the injury, do not wait to have your dog seen by a veterinarian. The more quickly tetanus is detected and treated, the better your dog’s prognosis will be.
Perhaps you’re thinking about taking your adolescent out-of-control dog, or your dog with significant behavior issues, to a board-and-train (B&T) facility, where they will work with her for a few short weeks and hand her back all perfect. Right? Wait a minute. What sounds like a perfect solution to your dog’s behavior and training challenges is fraught with danger. Remember that something that sounds too good to be true, often is.
Don’t get me wrong. There are certainly some fantastic B&T professionals who can indeed help you with your dog when you feel like you’ve hit a wall. It’s just that they are few and far between while the scary ones seem to be everywhere.
When you leave your dog in someone else’s hands and walk away, you are taking a significant risk that they will do bad things to your dog when you are no longer there to intervene. There is virtually no regulation in the dog-training industry in the United States, and even so-called “positive trainers” can do bad things to your dog when you aren’t there.
The Bad and the Ugly of the Dog Training World
There are a variety of B&T trainers who fall into the “bad and ugly” category. They are:
The Criminal Scammers. A tragic news article caught my eye recently about a B&T provider who was refusing to answer phone calls from worried owners. When authorities were called in, they found dead and other seriously neglected dogs on the premises. (And this isn’t the first time I’ve seen this happen.)
The Shock Jocks. These are B&T providers who are proud of the fact that they use shock collars along with other pain-causing tools and physical force and punishment to “dominate” their clients’ dogs. They insist that dogs need to know who is boss, and the only way to achieve this is with the use of force.
If there is one good thing about these folks, it’s that you can spot them a mile away and know immediately that you would never leave your beloved dog in their hands.
Balancing Act. Then there are the so-called “balanced trainers” who profess to using positive reinforcement as a first resort, but who are willing to use pain, force, and coercion when they feel a dog “needs” it. These trainers can be very good at talking you into thinking that force is sometimes necessary as a backup plan. (It’s not.) Some are even convinced they can use a shock collar as “positive reinforcement.” (It’s not. Ever.) Also, knowing they are willing to use those tools and methods, you will have no idea how much they are getting used when you’re not there to supervise.
Positive Pretenders. These are the really sneaky ones. They claim to be “positive” when in fact they aren’t. Sometimes they think they are positive because they give the dog a treat after they jerk on the collar – or because they are less punitive than they used to be. Some trainers say they are “positive,” but they don’t ever use food or treats as reinforcers. Food is considered a “primary reinforcer” – valuable to most dogs. If a trainer never uses treats, she is needlessly foregoing the most powerful reinforcer in the force-free training toolbox. She will likely be less successful and/or use coercion in her training. Trainers who pretend to be force-free are not likely to do anything overtly forceful in your presence. This is why you need to get good referrals from trusted friends and professionals and do your own research, too (more on that below).
Signs of a Good Board and Train Facility
If you are in a situation where you feel compelled to pursue a B&T option for your dog, it is critically important that you do in-depth research before agreeing to allow someone to work with your dog.
The following are due-diligence tips from well-respected trainers who offer Board & Train services themselves:
Leslie Clifton, CPDT-KA, CPCT, PMCT, is a force-free trainer who offers limited B&T services in Putnam County, Florida.
Christine Danker, CPDT-KA, KPA-CTP, PMCT3, of Albany County, New York, is a force-free trainer who has had considerable experience with B&T services.
1. Find a trainer who uses only reward-based methods.
Preferably this is a trainer referred to you by another training professional you trust, or a trusted friend who has had already used this service and is satisfied.
2. Check out the trainer’s website.
Look for professional certifications that support force-free training. Look for incongruities, such as trainers who call themselves “positive” but photos on their websites show dogs in prong collars, choke chains, and/or shock collars. Not a good choice. Instead, find a trainer who walks the walk as well as she talks the talk.
3. Visit the place where your dog will be staying.
Is it safely and securely fenced? Double fencing is ideal, with fence in good repair, and latches in good working condition. Some trainers have B&T dogs live in their own homes, with their own canine and human family members. (These trainers generally take a very limited number of B&T clients, sometimes only their own already-existing clients.) If your dog will be kenneled, are the kennels clean and well-maintained, with appropriate climate controls?
4. Verify what kinds of tools and methods the trainers use.
Confirm these in writing in your B&T contract. Flat collars, martingales, harnesses, treats, praise, and toys: all good. Any mention of “e-collars” or one of the many euphemisms for “shock” (such as “e-touch,” “stim,” “remote,” and “tickle”) should send you running for the door. If more than one trainer will be working with your dog, confirm that each trainer shares your philosophy of force-free handling and training.
5. Ask how many dogs the trainer takes at a time.
When you visit the property, make sure the number of dogs present seems reasonable for the facilities and number of trainers available to work with the dogs.
6. Inquire if your dog will be taken off premises, and if so, for what reason(s)?
Emergency vet visits, yes. Group play at the dog park or dog-pack walks should be a definite no. Will your dog be transported safely in a crate? If your dog needs veterinary care, will the trainer take your dog to your own vet, or to hers? (Yours is preferred, of course, but distance may be too great if you are traveling far to find an excellent B&T facility.)
7. Ask what skills will be worked on, and again, confirm the methods that will be used.
Have the trainer give a demonstration but be ready to assertively interrupt if she begins to use any coercive methods, such as leash jerks, a loud voice, or physically forcing the dog into position.
8. Look at the dogs currently in the trainer’s care.
Do they appear happy and relaxed? Quiet does not always mean stress-free; they may be intimidated. Look for dogs to move happily toward the trainer. Dogs who move slowly and/or with a lowered body posture and/or lowered head can indicate fear, deference, or appeasement. These are sometimes a sign that aversives are being used in training and other interactions with the dogs.
If dogs are barking and jumping at kennel fences and kennel doors, how does the trainer handle the situation? There should be no yelling, squirt bottles, penny cans, or other aversives used to quiet barking dogs. Rather, puzzle toys and other environmental enrichment tools should be in place to help keep dogs quiet, as well as management (physical barriers to reduce stimulation).
9. Ask for references from previous clients.
Contact and interview those clients in detail, asking specific questions about their dogs’ behavior before and after the training,and what tools and methods were used. Ask, too, what they loved about the trainer and her results, as well as anything that they were less than happy with.
Protective Board and Train Paperwork
If all looks good and you are ready to proceed, ask to see the provider’s intake forms. Ideally, the provider wants a lot of information about your dog! There should be rigorous intake forms, including a dog behavior questionnaire, a pet profile and medical history, a board and train contract, and a veterinary release form (should your dog become ill).
– Make clear that you are to be contacted immediately if your dog becomes ill; include this in your contract.
– Be prepared to sign a contract that states exactly where the dog will stay, what skills will be trained, what tools and methods will be used, and how the dog will interact (if at all) with other dogs on the premises.
Ask for the following to be included in the contract: that you will be sent daily updates and photos, that follow-up training notes and videos will be provided, and that emails or phone calls will be returned if you have questions, both during your dog’s stay and after she comes home. If the trainer doesn’t offer a contract, or these specifics are not included, ask for it to be created.
– Understand that you will still need to work with your dog when she comes home.
B&T can’t fix everything! Follow-up lessons with the owner should be part of the package and included in the contract.
– Insist on writing “owner visitations” into the contract.
You want to ensure your right to drop by the facility at any time, to protect your dog from the criminal scammers, if your dog is going to be at B&T for more than a week or two.
– Call in the authorities if even one of your visits is refused.
Remember that B&T professionals can’t just wave a magic wand and fix your dog forever. If they could, they would all be millionaires! They can help manage and retrain behavioral challenges, but you are still responsible for managing and training your dog. They can teach you how to live successfully with your dog, but you’ll still need to work with your dog yourself.
Because your dog likely has a prior history of being reinforced for the unwanted behaviors at home, she may well try them again, even if she learned new good-manners behaviors at the B&T. Make sure your B&T trainer gives you good information on how to help her generalize the desired behaviors to your home environment and is willing to continue giving you guidance along the way.
Trainers Comment on “Board and Train” Experiences
We asked several trainers how they feel about board and train practices. Here are some of their comments:
A friend of mine who is involved with rescue wanted to send one of their rescue dogs to a B&T that was recommended by someone and was purportedly “positive.” She sent me the link and the first thing I looked at was the photo gallery. I asked her to tell me what was wrong with the pictures. She didn’t understand; she didn’t see anything wrong. I told her to take another look; every single dog was wearing a choke collar!
Also, in a Q and A section about their dog training program, they said, “Our training techniques are all very humane. Every trainer at [Name Redacted]’s Dog Training Company is here because they love dogs … they are our passion. Therefore, we have found over years of dog-training experience that the most effective training method is positive reinforcement – not food or treats!”
This is obviously not a true positive-training facility.
I just started to offer B&T and I take only one puppy at a time, so it’s super small scale. But I wanted to offer an alternative to the local boot camps that take puppies at 16 weeks, kennel them, shock them to teach sit, then send them home as temporarily obedient zombies.
I keep the puppies in my home, living as part of my family, not only so I can love and care for them the way their own family would, but also so they get experience in a home environment. I send them home happy, socialized, loved, and well-mannered for the family environment in which they will live, using toys, play, and meals to teach. I video their training and play sessions and send daily video to the family. I wish I could take 100 puppies!
I’ve had a couple of dogs with issues from B&T. One was a client’s dog, a huge Rottie. I was supposed to work with her on aggression issues and general obedience. On my first day training her, I was reviewing the cues she supposedly already knew. When I asked her to “down” she growled at me and ran across the room. She repeated this behavior twice more.
I asked the owners if they could explain why she did this. They could not – but about two years earlier they had sent her to a B&T. She didn’t know the “down” behavior before, nor would she “down” on cue when she came back, but ever since she’d come back, whenever they would ask her to down she behaved in just this way – so, of course, they had quit asking her.
I feel certain she had been forced into a “down” at the B&T and the growling was a sign of her fear about this. So instead of asking her to down, I simply started “capturing” the behavior (this is when a handler rewards the dog every time she happens to perform the behavior, until she does the behavior on purpose in order to get the reward; then and only then does the handler add a cue). Within a few sessions, she would down with no growl, because she really liked hotdogs!
I’ve had only one board and train experience in my eight-plus years as a professional trainer. A young family was overwhelmed with an extremely energetic and intelligent Lab puppy. Mom, Dad, and three young kids were busy with careers, school, and sports, and barely had a moment left over for puppy training and exercise. The puppy spent long hours in a kennel and was a tornado of desperation and impulsive needs.
After half a dozen in-home training/coaching sessions, the family knew they needed more help and asked if I would board and train their puppy while they traveled for vacation. The puppy initially spent two weeks with us, then another week later during the summer when the family traveled again. During her time with me, the puppy was an all-star pupil. She was eager to learn and made meteoric progress.
When her family returned from their travels and picked her up, she went home with a “straight A” report card, an hour of in-home instruction in management and training games, and a detailed, written list of all her tricks and the signals to cue them. I could not have been more proud of the puppy or my efforts with her.
A few weeks later, I returned to their home for a follow-up session and found that the puppy had reverted to all of the fractious behaviors she practiced before our board and train project. The family had not changed their approach with her at all, and we were back to square one. It was beyond discouraging.
Soon after, the mom suffered a broken leg, dad was at wits’ end, the kids were very disenchanted, and the puppy was back in the kennel much of the time. The mom asked whether I would consider adopting the puppy. Daisy has been with us ever since and is now a model of happy, self-controlled, good manners and cooperation.
I’d probably never do B&T again. The more experience I accumulate in training and behavior modification, the clearer it is to me that there’s no substitute for a family or individual being able to understand their dog’s physical and mental needs and to build a skill-set for positive-reinforcement training. Training a dog is not the same as installing an app on a smart phone or changing the tires on a car. Good training means helping the family and the dog build a relationship based on good information, skills, and mutual trust; it takes commitment that board and train can’t replace.
Author Pat Miller, CBCC-KA, CPDT‑KA, is WDJ’s Training Editor. She and her husband Paul live in Fairplay, Maryland, site of her Peaceable Paws training center. Miller is also the author of many books on positive training. Her newest is Beware of the Dog: Positive Solutions for Aggressive Behavior in Dogs.
We switched to a new veterinarian last year. We made the change on a good friend’s recommendation and could not be happier. Our new vet is thorough, compassionate, smart as a whip, and an outstanding diagnostician. Her staff members are also competent and welcoming. An additional virtue of this clinic is the topic of this article. Our new veterinarian’s standard policy is that owners remain with their dogs and cats for physical examinations and for all health-care procedures that good veterinary practice allows.
Here is an example: Last summer, one of our Goldens, Cooper, developed an ear hematoma. I was away, so my husband, Mike, took Cooper to the clinic.
After an initial examination (conducted with Mike holding and talking to Coop throughout), our veterinarian recommended a relatively new approach to hematoma treatment, in which the site is drained with a large-gauge needle and an anti-inflammatory agent is injected directly into the remaining pocket. It is an outpatient procedure, does not require anesthesia, and is less invasive than traditional treatment protocols. But because it is a sterile procedure, Cooper would need to be treated in the clinic’s pre-surgery room.
Fortunately – amazingly – the vet told Mike that the pre-surgery room has a large observation window, so Mike could watch as Cooper was being treated, if he so desired.
Mike did so desire. As Coop looked back at him through the window (wagging his tail the entire time), Mike witnessed both the procedure and the gentle way in which Cooper was handled and spoken to throughout treatment. After the procedure, the veterinary technician (Cooper’s new best friend), brought Cooper back out to Mike, and they were good to go.
Again, for emphasis: Throughout the entire examination and treatment, Cooper was either with Mike (for weighing, examination, and diagnosis) or Mike could see him through the window (during treatment).
All About Animals
Being in the Room Should Be Standard Procedure
As many dog folks know, this level of transparency and owner involvement is no longer standard practice at many veterinary clinics. It is quite common today for clinics to require that owners relinquish their dog to a staff person while still in the waiting room. All physical examinations, vaccinations, and treatments are then conducted out of sight of the owner in a treatment room and the dog is returned to the owner at the end of the appointment.
I am going to be blunt; I have a strong opinion about this. There is absolutely no chance that I would allow any of my dogs to be taken “into the back” at a veterinary clinic for anything short of surgery. Our new vet does go above and beyond with her clinic’s degree of owner involvement, but we have never been clients at a clinic that required our dogs to be taken away from us for examinations.
Just as I assume that parents would not accept such a policy from their child’s pediatrician, I would not expect owners to agree to be excluded from their dog’s veterinary examination. Yet, this is not only standard protocol in many clinics, but also a requirement of some for acceptance as a client.
Yeah, that’s not going to happen to any of my dogs. I am my dogs’ advocate as well as their source of comfort and security. Our dogs trust us to have their backs and at no time is this more important than when they are nervous or frightened, a common state of mind of many dogs during veterinary visits.
Until recently, this was a matter of opinion. However, a new study, conducted at the National Veterinary School of Alfort in France, examined whether a dog’s stress level during a veterinary examination was influenced by having their owner present and providing comfort*.
*Source: Csoltova E, Martineau M, Boissy A, Gilbert C. “Behavioral and physiological reactions in dogs to a veterinary examination: Owner-dog interactions improve canine well-being.” Physiology & Behavior 2017; 177:270-281.
The Study
The objectives of the study were to measure dogs’ physiological and behavioral responses to a standard veterinary examination and to determine if having the owner present and providing comfort reduced the dog’s level of stress.
A group of 33 healthy dogs and their owners were enrolled. The dogs were at least six months of age and all had previous experience at a veterinary clinic. Heart rate, rectal temperature, ocular (eye) surface temperature, salivary cortisol, and stress-related behaviors were recorded before, during, and after a physical examination conducted in a clinic setting in two distinct conditions:
1. Contact: The owner stood next to the examination table at the dog’s side and comforted the dog by gently petting and talking to him or her quietly.
2. Non-contact: The owner was in the room, but did not interact with the dog and sat quietly in a chair located about 10 feet away from the exam table.
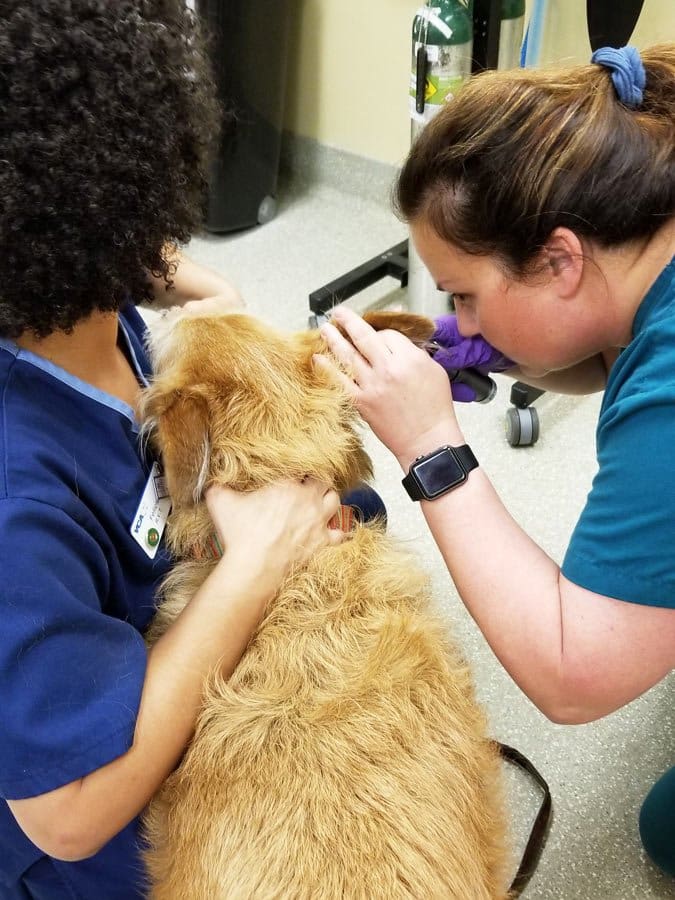
A balanced, crossover design was used. This means that each dog experienced two visits (timed one to two weeks apart) and was subjected to both conditions. To control for an “order effect,” the sequence of the conditions varied and was randomly assigned. Examinations lasted about five minutes and included mild restraint, examination of the dog’s eyes, ears, mouth, and teeth; palpation of the lymph nodes and abdomen; manipulation of joints; and heart and lung examination with a stethoscope.
Results
Unsurprisingly, veterinary visits are stressful to dogs:
Waiting Room Stress
All of the dogs experienced at least a low-level of stress during the pre-examination period in the waiting room. As they waited, many of the dogs showed frequent yawning, which is considered to be a displacement behavior during periods of emotional conflict. Some of the dogs also whined and vocalized.
Examination Stress
The researchers found that all of the dogs, whether or not their owner was comforting them, showed a measurable stress response during the veterinary examination. Heart rate, ocular temperature, and lip-licking all increased during the examination period.
Owner Being There
When owners stood close to their dogs and provided comfort by talking to and petting them, the dogs’ heart rates and ocular temperatures decreased when compared with the condition in which owners were not interacting with their dogs. Both of these changes are associated with a decrease in stress. Dogs also attempted to jump off of the examining table less frequently when their owner was providing them with comfort than when the owner was not comforting them.
The authors conclude: “The well-being of dogs during veterinary visits may be improved by affiliative owner-dog interactions.”
Up On My Soapbox
I know, these results are a no-brainer for many dog folks: Veterinary visits are stressful to dogs and being present to comfort and reassure our dogs reduces their fear and stress.
Unfortunately, in my view, this study did not go far enough, since it did not study the condition that I am most interested in learning about: when dogs are taken away from their owners and examined out of the owner’s presence.
Interestingly, the argument that is made to support this practice at the clinics that insist upon it is that they remove dogs from their owners because the presence of the owner can cause the dog to be more stressed, not less so. Well, at the very least, these results provide evidence against that excuse.
And – an excuse it truly is. Perhaps this sounds harsh (remember, I am standing on a soapbox!), but my belief is that these policies are in place more for the convenience of the clinic than for the benefit of the dogs. No doubt, reducing client interactions in an examination room is more expedient and efficient (for the clinic).
And, there is also that pesky issue of transparency. An owner who does not have the opportunity to witness how her dog is handled, spoken to, examined, or treated cannot question or criticize. There is really no other way to say this: The risk of owner displeasure and complaints is reduced by not having owners present while dogs are being examined and treated.
So, personally, I am happy to see these results, as they can be used as evidence when responding to a clinic that insists it is less stressful for dogs to be removed from their owner during examinations and routine procedures. Petting and talking to our dogs when they are upset during a veterinary visit reduces their stress. We have the data. (Not to put too fine a point on it, but these results also provide more ammunition to combat the still-present [and false] belief that calming a fearful dog “reinforces fear.” I address that particular issue in more depth in my book, Dog Smart).
Hopefully, we will see a follow-up study that examines dogs’ responses to “no owner present” policies. Regardless, the data that we currently have encourage us to stay with our dogs during veterinary visits and examinations. It is quite simple really: Just. Be. There. Insist upon it.
Linda P. Case is the owner of AutumnGold Consulting & Dog Training Center in Mahomet, Illinois. Linda is the author of Dog Food Logic, has a new book, Dog Smart, and writes The Science Dog blog.
Recently, I posted an apology of sorts on the WDJ blog site explaining that, while WDJ isn’t by any stretch just about my dogs, several articles in the June issue actually might be. Which came first? The articles or my doggie disasters? A little of both!
One of our newest contributing authors is a veterinarian who practiced emergency medicine for more than nine years. She’s been the impetus for our recent rash of articles about various ways to prevent canine health emergencies, and how to behave if you, despite your best efforts, end up dealing with one anyway. (Speaking of rashes – perhaps I should ask Dr. Ashe to write about that?)
Shortly after she proposed to write something for us about assessing and treating wounds, my impulsive young dog, Woody, had a run-in (run-through?) with some rusty barbed wire, and ended up with gashes on the bridge of his nose and one foreleg. Mind you, when this happened, he was still sporting staples from his previous fetch-related wounds! And now, rusty wire? Suddenly my mind was racing: Do dogs get tetanus? Do dogs get tetanus shots? Should I go get Woody a tetanus shot?
Then it struck me: I wonder how many others don’t know the answers to these questions? I asked Dr. Ashe to include answers to all these questions in her articles, “How to Treat Dog Wounds“, and “Can Dogs Get Tetanus?“. If you do, you will be treated to a photo of Woody’s latest scar-in-the-making. (He’s going to look like a fighting dog in no time. Oy!)
Another one of our new contributing author/veterinarians, Dr. Kyle Grusling, offered to write about next-step diagnostic tests for dogs. I have to admit that I wanted to read the article she wrote before making an appointment for my 10-year-old dog, Otto, to have some of these very diagnostics – not as a follow-up to earlier tests, but just as an extra precaution for a large, senior dog. If Otto ever gets cancer or some other serious condition, I want to know as early as possible so I can have the best chance of treating and beating anything that ails him.
Finally, after attending the annual conference of the International Association of Animal Behavior Consultants in Boston in April, where I learned all about Fear Free veterinary practices, I’ve decided I’m not going to have abdominal ultrasounds or abdominal radiographs done on Otto anywhere except a Fear Free veterinary clinic that allows me to be with him, or within his view. One of the last times he was at the vet he got so scared “in the back” that he released his anal glands. I’m just not going to let that happen again. For more information about the practice of taking dogs “in the back” for examination, tests, and treatment at veterinary clinics, read Linda Case’s article, “Veterinary Visits: It’s Important to Be There for Your Dog“.
To provide the best experiences, we use technologies like cookies to store and/or access device information. Consenting to these technologies will allow us to process data such as browsing behavior or unique IDs on this site. Not consenting or withdrawing consent, may adversely affect certain features and functions.
Functional
Always active
The technical storage or access is strictly necessary for the legitimate purpose of enabling the use of a specific service explicitly requested by the subscriber or user, or for the sole purpose of carrying out the transmission of a communication over an electronic communications network.
Preferences
The technical storage or access is necessary for the legitimate purpose of storing preferences that are not requested by the subscriber or user.
Statistics
The technical storage or access that is used exclusively for statistical purposes.The technical storage or access that is used exclusively for anonymous statistical purposes. Without a subpoena, voluntary compliance on the part of your Internet Service Provider, or additional records from a third party, information stored or retrieved for this purpose alone cannot usually be used to identify you.
Marketing
The technical storage or access is required to create user profiles to send advertising, or to track the user on a website or across several websites for similar marketing purposes.
This website uses cookies and other tracking technologies to offer you a better experience, personalize content and ads, and analyze our site traffic. Before proceeding, you agree to our Terms and that you’ve read our Privacy Policy. Update Settings
Functional
Always active
The technical storage or access is strictly necessary for the legitimate purpose of enabling the use of a specific service explicitly requested by the subscriber or user, or for the sole purpose of carrying out the transmission of a communication over an electronic communications network.
Preferences
The technical storage or access is necessary for the legitimate purpose of storing preferences that are not requested by the subscriber or user.
Statistics
The technical storage or access that is used exclusively for statistical purposes.The technical storage or access that is used exclusively for anonymous statistical purposes. Without a subpoena, voluntary compliance on the part of your Internet Service Provider, or additional records from a third party, information stored or retrieved for this purpose alone cannot usually be used to identify you.
Marketing
The technical storage or access is required to create user profiles to send advertising, or to track the user on a website or across several websites for similar marketing purposes.