Unless you are present and paying close attention to your dog, you may not even notice him having a focal seizure. Possible symptoms include staring into space and not responding to external stimuli (such as you calling his name or talking to him). Photo by sanjagrujic, Getty Images
Watching your dog have a seizure can be a frightening experience. Time stands still in that moment and you feel helpless – but there is something you can do. Seizures in dogs can have many different causes or triggers, so having your dog evaluated by his veterinarian can help find the problem and thus, appropriate treatments available for this condition. Even “idiopathic” seizures – ones whose cause can’t be determined – can be treated.
What is a seizure?
A seizure is a period of abnormal electrical activity in the brain. This activity between brain cells can cause loss of consciousness, paddling of the limbs, and involuntary urination and defecation.
If the abnormal electrical activity is limited to only one small part of the brain, signs of a “focal seizure” may be observed; these include staring off into space and not responding to external stimuli, an involuntary jaw movement that looks like a dog is chewing gum, and/or tremors.
Seizures can last a few seconds up to several minutes or more. Any seizure lasting more than five minutes requires immediate veterinary intervention to stop the seizure.
What causes seizures in dogs?
Causes of seizures in dogs can be broadly classified into two categories: intracranial (problem inside the brain) and extracranial (problem outside the brain). The list of extracranial causes is much longer and more extensive than the list of intracranial causes.
Intracranial Causes of Seizures
Intracranial causes of seizures can be thought of as structural problems of the brain. This means that the brain is temporarily or permanently altered in some way. Causes can include.
Infection of the brain or meninges (linings around the brain). This includes canine distemper virus, rabies, the fungus Cryptococcus, and the protozoal parasites Neospora caninum and Toxoplasma gondii. Canine distemper tends to affect young puppies but can also affect adult dogs who have not been vaccinated for this virus. The other organisms can affect dogs and puppies of any age.
Congenital abnormalities such as hydrocephalus. This abnormality is something that a dog is born with, so seizures in these cases typically start in young puppies.
Brain tumors, either a single tumor that originates in the brain or multiple tumors that have spread from another location in the body. Brain tumors can be seen at any age but are more likely to be seen in older dogs.
Recent head trauma, such as a skull fracture or concussion.
Degeneration of brain cells caused by exposure to a neurotoxin, such as lead, mercury, toxins produced by blue-green algae, and many others.
Extracranial Causes of Seizures
The brain is a very sensitive organ that requires a tightly controlled environment. When there is a problem in the body that alters the brain’s environment, the otherwise normal brain becomes reactive to the change. This reaction often manifests as a seizure. Causes include:
Hypoglycemia (low blood sugar). This is one of the first things your veterinarian will check for if your dog is actively having a seizure. There are many causes of hypoglycemia, including liver disease, pancreatic tumors, insulin overdose in diabetic dogs, and ingestion of a product containing xylitol. It can also be seen in young puppies that are not eating well, particularly small and toy breed puppies.
Hyperkalemia (high potassium). The most common causes of hyperkalemia in dogs are kidney failure, stones in the urinary system that obstruct a dog’s ability to urinate, and hypoadrenocorticism (Addison’s disease).
Hypocalcemia (low calcium). This can be seen in kidney failure, eclampsia in female dogs that are nursing puppies, and dogs with pancreatitis.
Hypoxemia (low oxygen concentration in blood). This can be caused by any condition that impairs a dog’s ability to breathe or to circulate blood effectively, such as pneumonia or a heart condition.
Liver shunt (also known as a portosystemic shunt). A liver shunt is an abnormal blood vessel that allows blood returning from the gastrointestinal system to bypass the liver. Since the liver is responsible for metabolizing proteins that are absorbed by the small intestine, this means that some of these proteins are able to reach the brain before they are processed. Most shunts are congenital, but liver failure can cause the formation of shunts.
A high body temperature can be caused by infection, heat stroke, and prolonged seizure activity. Experiencing a seizure that lasts longer than five minutes can increase body temperature and cause more seizures, regardless of the original cause for the seizure activity.
Seizures with an extracranial cause typically resolve once the underlying problem is found and treated.
Idiopathic epilepsy
Idiopathic epilepsy affects young dogs between the ages of 6 months and 6 years. The cause of idiopathic epilepsy is unknown. It is a diagnosis of exclusion, meaning that other causes of seizures must be ruled out before making this diagnosis.
Any breed of dog can be affected by idiopathic epilepsy. However, it is diagnosed more often in Collies, Bassett Hounds, Cocker Spaniels, Labrador Retrievers, and Golden Retrievers.
Identifying the cause
If your dog is experiencing seizures, have your dog assessed by a veterinarian as soon as possible. Your veterinarian will want complete bloodwork, a urinalysis, and x-rays of the chest and abdomen. She may also want to check your dog’s blood pressure and order additional tests based on what she finds on the initial diagnostics. Your dog may be referred to a veterinary neurologist for an MRI of his brain if an extracranial cause of his seizures can not be found.
There are many causes of seizures in dogs. But seizures can be effectively managed or resolved in most cases when the underlying cause is properly diagnosed.
When is a seizure not a seizure?
Seizures can range widely in severity, from brief periods of tremors to complete loss of consciousness and paddling of the limbs. But there are two other conditions that can look like seizure activity but are not seizures. These conditions are syncope and vestibular events. Here’s how to tell the difference:
Seizures may be preceded by a pre-ictal phase, also known as an aura. Dogs experiencing an aura may be whiny and restless and may either hide or be clingy. After the seizure has occurred, dogs will experience a post-ictal phase. During this phase, dogs may be confused or disoriented and they may either be restless or extremely sleepy.
Syncope is a brief fainting spell. Dogs that experience an episode of syncope will fall to one side and lose consciousness for a few seconds. There is no warning that syncope is about to take place. Once a dog regains consciousness, they stand up and act like nothing happened to them.
A vestibular event is characterized by a sudden loss of balance, uncoordinated gait, head tilt, and abnormal jerking movement of the eyes. This abnormal eye movement is called nystagmus. Like syncope, there is no warning that a vestibular event is about to take place. Depending on the underlying cause, recovery from a vestibular event can take days to weeks.
If you are not sure what type of event your dog is experiencing, take a video of your dog while the event is occurring, and share the video with your veterinarian as soon as you are able.
Applying heat to an arthritic dog’s joints can be as simple as warming a moist towel in the microwave and wrapping him in it or letting him lay on it. Human heating pads can be set too high if you aren’t careful. If it feels hot to you, it’s too hot for your dog. Credit: nicpo | Getty Images
Can heat therapy give your dog arthritis pain relief? Yes. A specialized dog heating pad for arthritis can bring some benefits, and it may feel good for your dog on a cold day too.
For long-standing chronic pain, heat can provide both relief and healing to your arthritic dog. And heat doesn’t just feel good to your dog’s aching joints, it also increases blood flow. Muscle spasms often respond to warmth and stiff joints loosen up. Applying heat to your dog can help your dog get the most out of rehab or stretching warmup routines.
Veterinary physiotherapy and rehabilitation expert Dr. Marianne Dorn, of England, says heat therapy enhances local tissue oxygenation and metabolism, reduces muscle spasm, and increases connective tissue extensibility and the pain threshold (Companion Animal Vol 20, No 11).
Acute Injury? Chill
For an acute injury, cold therapy is usually best to reduce inflammation. For example, if your senior Labrador aggravates an old stifle injury consider cold compresses for the first 24 hours. Cold therapy is also the best option for up to 72 hours post-surgery.
Cautions With a Dog Heating Pad for Arthritis
Be careful when applying heat or having your dog stay on a heating pad. You can inadvertently overheat the area and cause further trauma. Heating pads made specifically for pets have heat settings favorable to a dog’s needs. A human heating pad can be set too high, and overdoing the heat is especially a concern with an older dog, injured dog, or a very young pup.
Always check your dog frequently to assess the dog’s comfort. It’s often best to have a layer like a towel between your dog and the heating pad. Generally, 30 minutes is the maximum time to apply heat to your dog, although he could benefit in from 10 minutes or so.
Warm Moist Towels
An inexpensive heating “pad” can be made at home by putting a damp towel in the microwave. Remember, when you take it out, if it is hot to your touch, it will be too hot for your dog. The warm, moist towel can be applied directly to a stiff joint. The same is true for corn or rice bags—don’t let the dog eat them!—or a hot water bottle. Warm therapy is excellent for your dog’s arthritis pain, but the key is warm, not hot.
If your dog is fearful and prone to biting strangers, or has any trait that might make him considered unadoptable in a shelter, your have a greater-than-average responsibility to make arrangements for his care in case of your death – even more so if your health is not good or you are in your senior years. Photo by Dahl, Per, Getty Images
I was volunteering at my local animal shelter one day when the loudspeaker in the kennel area blared, “Kennel attendant for a dog adoption tour, please.” I went to the lobby and was introduced to a couple who, I’m guessing, were in their mid- to late 70s. I was told that they were there to meet a couple of the younger German Shepherd Dogs we had on the adoption row.
My expression probably froze for a moment, but then I put a smile on. “We have a bunch of German Shepherds and GSD-mixes right now,” I told them. “But every single one of them is a big, untrained adolescent! Are you sure you want to deal with such a big, bouncy dog?” I said it with as light a tone as I could muster, but I was concerned. These people did not look particularly strong or agile.
The husband barely acknowledged me, but the wife smiled and said, “Oh yes. We’ve had nothing but German Shepherds our whole lives. We love the breed, and want to help one who needs a home.”
I showed them the various candidates in the adoption kennels, and then a shelter employee took over, taking various dogs to meet them in the big runs outside. I left soon after, so I don’t know which – if any – of the big, strong dogs we had available for adoption they took home. But I’ve thought about the encounter many times over the past few years. It struck me as very unwise, and not particularly self-aware, that the couple would be seeking the same sort of dog they had owned throughout their younger years. I’m super experienced with stressed, large, untrained dogs who haven’t gotten out of their tiny kennels for a week, and, at 20 years younger than the couple, even I get knocked around a fair amount by those dogs in the first sessions we spend together. Even on the occasions when I’ve taken a big rowdy adolescent dog home to foster, it can take weeks or even months to teach them to control their exuberant bodies in the face of exciting stimuli.
When I admitted, a year ago, that one of the reasons I was hesitating over the decision of whether to adopt my youngest dog, Boone, when he was an adorable but thick-legged, big-pawed foster puppy of completely unknown parentage, this encounter with the senior couple was on my mind. I’ll be 60 years old this year – and, with luck, will be 75 or so when the puppy is a senior dog. I had to think about it long and hard: Did I really want to age into my retirement years with another dog who might mature into 70 or more pounds? (Of course, I did adopt that adorable puppy – and, fortunately, it looks like he will top out at about 50 pounds. I can still lift 50 pounds fairly easily, so if he’s ever sick or needs to be lifted in and out of the car, after ACL surgery, say, I can do that!)
Managing the physical size and exercise needs of a big dog is not the only potential challenge for older people adopting a dog. It’s tough to think about, but it’s a reality that people in their senior years are more prone to illnesses or injuries that render them unable to care for their dogs than younger adopters. If you inquire at your local shelter, I will bet folding money that they can point out several dogs who are there solely because their owners passed away without making arrangements for someone else to take the dogs in. In my opinion, it’s irresponsible and selfish to adopt dogs without having a backup plan – and perhaps even money set aside – for our dogs in case of our deaths.
The worst-case scenarios involve dogs whose owners died without making “in case of my death” arrangements for them, and who are completely unprepared for life in any other home. At the shelter, I’ve cared for several dogs who had never been off their property or been touched by humans other than their original (now deceased) owners. The shock and grief experienced by these dogs is awful to witness – and made worse by the fact that, in their shocked and shut-down state, it’s difficult to find someone who will give them another chance at a happy life and adopt them.
Don’t get me wrong: I can’t imagine living without a dog, ever. And I am not saying that we shouldn’t have dogs in our senior years, or even our very last days. I’m just saying that we owe the dogs we take responsibility for the same care and consideration that an owner of any age should have for their dogs. We need to have a solid plan in place for who will take them in the event of our deaths – and perhaps even a backup plan in case the first plan falls through. And we need to be able to fully care for, exercise, and train them, so that, if we are suddenly called away from this earth, our beloved dogs are healthy, socialized to others, and well behaved, so they will be welcome and cherished, not unhappy burdens, to their new owners.
The decision to get another dog is all too often an impulsive one. It’s wise to take time to con-sider how the addition of another dog to the family will affect the entire household, and its budget. Photo by davit85, Getty Images.
Currently tempted by a photo of an irresistibly cute face in an “adoptable dogs” post online? There are several factors that play into the correct answer for the question of, “Should I get another dog?” Here are the boxes to check if you’re thinking of adding another) dog to yours:
Current Dogs: Is your present canine family peaceful? Do they all get along well, and would they welcome another dog into the group? If the answers are yes, check this box.
Human Family Members: Will all the human members of your family welcome another dog? If yes, check!
Time: Adding another dog means finding time for individual attention and training for yet one more canine. If your family members are willing to do this, check!
Space: Is there room for another crate in the bedroom? Another dog bed in the living room? Another food bowl in the kitchen? Another dog in the car? If yes, check!
Finances: Estimates on the annual cost of caring for a dog average somewhere between $1500 and $10,000. Do you have room in your budget for another dog? If yes, check!
Laws: Many communities have laws regulating the maximum number of dogs allowed at a residence. If adopting another dog means you’re still within the legal limit, check!
If you’ve checked all the boxes above, then the answer for you just might be “one more than we have now.” But beware! Some people discover after they get another dog that the right answer to “how many is too many?” was “one more than we have now.” Make sure you’re ready for the added group dynamics, and commitments of time and money – and adopt carefully! See “Selecting Your Next Dog or Puppy.”
Does your reactive dog have trouble getting along with other dogs? It is possible, through behavioral training, to change how your dog feels about others. Photo by Elena Popova, Getty Images
In the dog world, the word “socialization” is usually meant to describe the process of preparing a young puppy to be comfortable in the wider world—and feeling relaxed around other dogs. But what if your dog is already an adult, and is displaying big feelings about fellow canines, barking and lunging at them? Is it possible to socialize an adult dog who is reactive to other dogs?
Technically, we can’t “socialize” an older dog—that ship sailed before he lost his baby teeth!—but we can help him feel more relaxed around his fellow canines. It can take a lot longer at this age, though, and it requires a solid plan.
Please note that this can be a nuanced, time-consuming effort. It would be a wise investment to enlist the help of a great force-free local trainer for an initial consult and for key moments along the progression.
What Is a Reactive Dog?
Reactivity is often confused with aggression. However, reactive dogs are simply dogs who become overly aroused by common daily stimuli. Reactive behaviors can include aggression, but reactivity may also manifest as over-excitement, frustration, or fear that goes beyond a normal level for the situation.
The First Step in Reactive Dog Training: Keep Dog Under Threshold
The first phase of this canine makeover involves arranging your dog’s environment so that there will be no canine exposures that make him feel the need to (over)react.
It doesn’t really matter whether your dog is reactive because of over-excitement, frustration, or fear – we are going to prevent him from getting close enough to other dogs to react to them. This is what we call keeping your dog “under threshold,” and it is critical to the success of this project.
Why is it important to keep your dog “under threshold”? Every time your dog barks and lunges at a dog, he’s practicing behavior that we’re trying to extinguish. The more your dog practices a reactive response, the more deeply that neural pathway (dog sees other dog, dog barks and lunges) becomes worn into his brain; it becomes the most-traveled path through the woods. We need to change that. We need that undesired pathway to become overgrown, while we create a nice new calm alternative path.
If your regular walk is filled with other folks walking their dogs, and your dog “goes crazy” almost every time he sees or passes those other dogs, he’s practicing the behavior (and feeling the feelings) that we want to eliminate. If you want to eliminate your dog’s over-reaction to other dogs, you can’t keep gritting your teeth and putting up with the embarrassing reactivity. Those “practice sessions” of unwanted behaviors must stop!
To create that much-needed, calm new pathway in your dog’s brain, we want to set things up so that your dog only experiences other dogs at a distance where he can remain under threshold. When he’s calm, he’s able to learn from you. Here’s what you can do to get the distance from other dogs that your dog needs:
Change the timing of your walks. Shift your walks to when few dogs are out. (There’s a reason Annie Phenix’s classic book on dog reactivity is called The Midnight Dog Walkers.)
Change the location of your walks. If your neighborhood is dog-filled, drive to a park.
Keep to wide open spaces. If your park has a narrow path where you might be forced into passing another dog at close range, don’t take that path.
Be vigilant. Be constantly aware of your surroundings. Keep an eye for other dogs out on walks and be ready to cross the street, change direction, walk up a driveway, use bushes or cars to create a visual barrier between your dog and any other dogs.
Don’t go anywhere that you might encounter off-leash dogs. Sometimes the search for wide open spaces can mean you’re risking encounters with the dreaded off-lead dogs who have no recall. Those dogs – no matter how “friendly” – destroy this training, because the main thing we’re trying to establish is that leash walks are predictably non-interactive. Do everything you can to avoid that situation.
When people become aware that their dog does not appear to be friendly to other dogs, some decide they need to “socialize” their dog immediately and head to the local dog park. Ack! That scenario is the exact opposite of what the dog needs. At the dog park, you have no control over other dogs, so you can’t give your dog the distance and predictability that would build your dog’s confidence and guarantee his safety. Don’t take a reactive dog to dog parks!
Another common mistake folks make is to punish their dog when he barks or lunges at passing canines. That yelling and yanking is wholly ineffective; those owners are only making their dog’s reactivity worse. The dog already had too-big-to-manage feelings at the sight of another dog – and after that punishment, the presence of a strange dog now means their trusted person becomes scary. That’s a recipe for more reactivity, not less. Don’t punish or admonish.
A third common mistake is to bring your own stress from past incidents to all future dog situations. If the moment you see another dog approach, your heartbeat increases, you swear under your breath, and you tighten up your leash, it will strongly influence your dog about how she should feel about other dogs. Try to relax and breathe!
“Socializing” a Reactive Dog: Helping Your Dog Form Better Associations
Now you’re ready to start building new “It’s cool, no biggie” feelings about the sight of another canine. Take your treat pouch (always!) and head to a place where you’ll see a handful of dogs at a distance you can control. A big park is a good bet. Remember that your dog needs to stay under threshold (no barking or lunging) the entire time, so err on the side of too much distance!
The goal is to teach your dog that the presence of another dog signals a predictable and positive experience: food, from you. Keep one eye on the environment and the other on your dog. When another dog (the “trigger dog”) comes into view, you produce a delicious morsel and calmly say something like, “Oh, hey, I see a dog. See the dog?”
At first, your dog may be too focused on the other dog to turn to you for a treat – although a higher-value treat may do the trick – so go ahead and put that morsel right in front of his nose. As long as the trigger dog stays in sight, keep up the calm-but-cheery patter (“Yup, that’s a dog alright!”) and the treat delivery. When the trigger dog is no longer visible, stop the flow of food.
At one time, trainers sought to keep a reactive dog from looking at other dogs; we’re not doing that. Neither are we insisting that the dog take a good long look at other dogs. We’re simply noticing together that, yep, that’s a dog over there, and nothing more intense will happen with that dog. The dog learns to take a look and then turn back to you, because noticing another dog reliably predicts that you will serve him some yummy food.
This predictability is important. Dogs, like humans, feel more comfortable when they know what’s next. Anxiety (or over-arousal) about what they may be called upon to do (like greet another dog up close) can be at the root of reactivity. That’s why it’s incredibly effective when we turn these experiences into a pattern the dog can count on: We see a dog, it’s no biggie, there’s food, and we all go on our way.
As you do this more and more, you should notice your dog becoming notably less aroused by the sight of these distant dogs. Ideally, your dog will be less likely to stare intently at other dogs, quicker to turn to you for the treat he knows is coming his way, and (after a quick glance at the other dog) more likely to keep his attention with you, because he’s learned that other dogs aren’t something he needs to pay much attention to. You are successfully creating that new neural pathway: See other dog, swivel to mom for chicken!
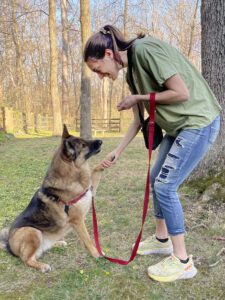
Invest in Connection
The more connected you and your dog are, the easier it will be to help your dog through these experiences. It will speed your progress immensely if your dog already tunes in to you and looks to you for guidance. Any fun, positive reinforcement-based training will develop your dog’s connection with you. Practicing food-filled, easy lessons in your kitchen on things like “touch” and “spin” may seem unrelated to this become-calm-around-dogs effort, but will make a huge difference.
The Second Step in Reactive Dog Training: Slowly Closing the Gap
You can stay right at this level if this is the extent of the improvement you need. But if your goal is to be able to easily pass strange dogs at close range, it’s time to experiment with slowly closing the distance.
Let’s say you discovered initially that, to stay under threshold, your dog needed to be 120 yards (a football field) from a Frisbee-chasing Border Collie, maybe 20 yards from a calm Labrador, and 15 feet from a napping old Beagle. Whatever those gaps are, start to slowly shrink them. Do some treat-filled training where your dog is under threshold. Can your dog happily do easy things like sit, touch, spin or whatever you work on at home? If yes, then move a little closer to the other dog. Watch your dog’s body language. Is he still under threshold? Do some more training. Take your time.
Come back the next day and the next. Is your dog easily focused on you, not needing to monitor the other dogs much? Great, move a little closer.
The easiest mistake to make here is to either get too impatient or too confident. That will cause you to move too quickly, get too close, and ruin the feeling of predictability for your dog. I know it’s boring! I know you don’t feel like you have time for this! But going slowly will pay off.
This process may take three sessions or three months. But a dog can go from a wildly barking/lunging dog to one who can walk down a city street calmly passing other leashed dogs. Can every dog do it? No – but every dog can make progress.
Walk With a Calm Dog You Know
In addition to being able to pass dogs in the street without incident, a great goal is to find a human-dog team that can become your very predictable walking partners. This can help your dog get to know a particular dog around whom he is 100% comfortable, and that, in turn, can help your dog feel a bit calmer around all dogs.
The ideal team is a human your own dog knows and likes, and a dog who is relaxed around other dogs. To complete the perfect fantasy, these folks live nearby so this can become an everyday pattern that will quickly build confidence.
The first time you try this, start by having the other human leave her dog for a moment (with someone else, or in the car) and come over to say hello to your dog. Use the Mr. Rogers Hack (see “How to Talk to Your Dog”), to let your dog know what to expect.
For example, you can use the word “friend” to indicate someone your dog has met before, and “Say hi!” to indicate that you’re going to greet someone. So in this instance, you could say, “Oh, hey, it’s our friend Linda. Say hi to our friend!” This gives your dog a heads up that this is different from your well-established no-interaction pattern when you pass strangers on a walk. He can trust that your “Hey, I see a dog! See the dog?” will still mean that you won’t be interacting with the strange dog, but “Say hi to our friend” will indicate some level of interaction with a person. Remember, your dog needs to know what to expect to feel calm and confident.
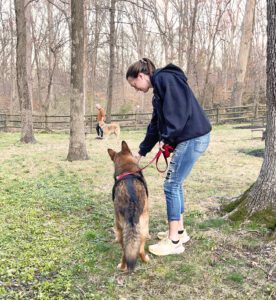
Start working in a place where you can observe other dogs and their people at a distance – far enough away that your dog doesn’t get visibly aroused or upset (stays “under threshold”). Now start changing the way your dog feels about other dogs by connecting the far-away sight of one with something wonderful: food. Photo by Kathy Callahan
Next, help the dogs see each other for the first time at a nice distance. Don’t blow the first moments by having dogs bounding out of the car before you have a chance to arrange the environment! Keep that distance – 100 feet or 10 feet, whatever your dog needs – and start walking in the same direction (not toward each other). Keep as far apart as you need to be for your dog to feel relaxed. Walking parallel (instead of with one in front) is best, because that way each dog can be subtly checking out the other dog and, ideally, becoming more comfortable as the walk goes on.
Do this right – building positive associations with the other dog by feeding treats, rewarding engagement with you to keep dogs from being fixated on each other, observing the dog’s body language as a guide so you can constantly adjust the distance between the dogs – and after 45 minutes you may have two very relaxed dogs trotting along on the same adventure.
Reactive Dog Training Takes Time and Patience
You might be tempted to let them sniff each other and even play, because you really, really want that! But – unless you have that great force-free trainer there to help you assess body language – stop yourself. Everybody tries to rush this, then a bad thing happens that may be hard to recover from.
Instead, quit while you’re ahead, and make a plan to meet again in the next few days. Do everything exactly the same way, and you’ll likely find you can move through the stages much faster. Then once you have this little walking friendship going with one dog, try starting it up with another team. You will likely find the process goes much more quickly.
Now your dog is beginning to build a history of acting calm and feeling safe in close proximity to other dogs. As long as you continue to protect and guide your dog’s dog-to-dog experiences, it will become easier and easier to keep your dog under threshold.
Can My Reactive Dog Go Play With Other Dogs Now?
I encourage you to be thrilled with that! Still looking for more? The holy grail of this journey is getting to the point that you can allow free interaction, up to and including the exuberant chasing, wrestling, mouthy nirvana that is canine play.
That’s absolutely worth working toward . . . but this is where I stop acting as your tour director. Why? Because if you have an unsocialized adult dog who has never had a chance to develop dog-to-dog communication skills, there is a risk in letting him loose with other dogs. He isn’t yet experienced in understanding and giving canine messages like “I love this!” or “I need a break.”
Does that mean you should give up? Absolutely not! While there are plenty of dogs who live wonderful lives without canine play, it sure is a nice part of life. Plus, maybe you want to be able to spend holidays with your brother’s family, which includes a playful Lab, or your neighbor is willing to pet-sit for you but she has a friendly dog.
This is when it’s critical to bring in a skilled trainer to direct the effort. An experienced professional will be able to create the right setup, find the right dog partners, read the complex and subtle canine body language, and intervene and/or redirect appropriately. After some of that help, you may find yourself happily watching your dog frolic with a friend for the first time.
Dogs who are experiencing abdominal pain from an intestinal blockage (and resulting buildup of gas in the bowel) may start striking this pose while looking uncomfortable. They are trying to find a position that relieves their belly pain. Photo by WilleeCole, Getty Images
Intestinal blockages (bowel obstructions) are common in dogs. Usually, the patients are young dogs—because they like to eat dumb stuff!
As dogs mature they tend to outgrow this eat-anything behavior, but in the meantime, we must prevent ingestion of said dumb stuff by puppy-proofing our homes, which means using crates or exercise pens to contain young dogs when can’t watch them, keeping socks and underwear picked up, garbage cans out of reach, and denying access to kids’ rooms strewn with toys, and so on.
Common Causes of Intestinal Blockages in Dogs
Ingested foreign material (cloth, plastic, wood, rocks, bones, etc.)
Tumors
Polyps
Granulomas (caused by infectious organisms like pythiosis)
Scar tissue/adhesions from prior abdominal surgery
Intussusception (bunched-up intestines)
t’s fairly easy to tell if a dog has a classic intestinal blockage: A previously happy, healthy 18-month-old dog suddenly starts vomiting everything he’s been fed. Initially, he’s still running around, playing, and happy to eat. But every time he eats, he vomits everything within a few hours.
For the first day, he may produce stool, but after a day or two of this, he will start looking like he isn’t feeling well. He will be less active and less interested in food and have decreased or no stool production. Abdominal pain may be expressed by a reluctance to lie down, posturing in a downward-dog type of yoga pose, and whining or yelping when his abdomen is touched.
At the veterinarian’s, his bloodwork is all normal, but his x-rays show huge loops of gas-distended bowel. This classic case is a slam dunk – an easy diagnosis. Usually, with immediate surgical intervention, the happy, healthy dog will be back in no time.
Unfortunately, not all cases are as clear-cut as that. Diagnosing intestinal blockages can be challenging. Symptoms can be tough to interpret, especially with partial blockages. Partial blockages occur with slow-moving foreign material, like a sock or cloth that is trying to make its way through the intestines. Polyps, tumors, granulomas, and scar tissue can also lead to partial blockages.
Partial blockages tend to cause intermittent symptoms of vomiting, loss of appetite, straining to defecate, passage of small amounts of stool, abdominal pain, and lethargy. These symptoms may come and go, and can last for a week or more with slow-moving foreign material. Partial blockages due to slowly growing masses worsen over time. With full blockages, a big hint is that there is literally nothing coming out the back end. Not so with partial blockages.
Symptoms of a Blocked Bowel in Dogs
Symptoms of a Complete Bowl Obstruction in Dogs:
Vomiting
Loss of appetite
Abdominal pain
No stool production
Lethargy
Weakness
System of a Partial Bowel Obstruction in Dogs:
Intermittent vomiting
Waxing, waning appetite
Intermittent abdominal pain
Intermittent lethargy
Straining to defecate
Low stool production
Diarrhea
Weight loss
How is an Intestinal Blockage in Dogs Diagnosed?
Interpreting symptoms of a blockage can be challenging, but ironically, it can be even more difficult to interpret the diagnostic x-rays. Many materials ingested by dogs do not show up on x-rays. Anything cloth or plastic can be difficult or impossible to see. Partial blockages don’t cause the classic gassy distention of the intestines that happens with full blockages. Your vet may recommend repeating the x-rays in 24 hours if there is a suspicion of partial or full obstruction. Looking for changes (or lack thereof) on x-rays can be informative.
Abdominal ultrasound is a useful tool when x-rays are not definitive. Foreign bodies and masses can usually be identified with this modality.
Barium swallows with serial x-rays is another diagnostic tool that can be used to diagnose intestinal foreign material and/or blockages, although this method has been largely replaced with the increasingly easy access to abdominal ultrasound. Barium studies require the dog to be repeatedly x-rayed over six to eight hours, during which a significant volume of liquid is administered to a vomiting dog, risking aspiration of barium into the lungs; abdominal ultrasound is obviously preferable.
If a definitive diagnosis cannot be made with certainty – but there is enough suspicion based on history, symptoms, and x-ray and/or ultrasound results – abdominal exploratory surgery will likely be recommended.
Surgery for Intestinal Blockage in Dogs
In an abdominal exploratory surgery, all the organs in the abdomen are fully examined, with the gastrointestinal tract being visualized and palpated from the stomach to the rectum. If foreign material is identified in the intestines, it will be removed. Some intestinal blockages require resection (removal) of a length of the intestine if the intestinal tissue has been compromised. Any masses identified may be removed if possible and biopsied.
If nothing abnormal is found, your surgeon will take biopsies of the stomach and intestines to see if some other cause for the symptoms can be identified.
Survival Rates for Canine Intestinal Blockage Surgery
If a blockage goes untreated for too long, the surgery will typically be more complex with serious post-operative complications more likely, making overall survival rates lower for these dogs. Survival rates are also generally lower for geriatric dogs, as cancerous tumors are sometimes the underlying cause for senior dogs, and their ability to heal and fight infection is lower.
Don’t Delay Treatment with a Suspected Bowel Obstruction
Keep in mind that intestinal blockages are surgical emergencies. The sooner the problem is identified and corrected the better. With full blockages, dogs are generally going to experience significant pain and become seriously ill within a day or two. The pressure from the blockage compromises the blood flow to the intestines, resulting in devitalization of tissue. As the tissue dies, it leaks toxins into the abdomen and the bloodstream.
Without prompt surgery, the intestine will rupture and the dog will die from septic peritonitis. Survival rates for dogs with long-standing (more than two to three days) intestinal blockages are much lower than for those treated right away.
If vomiting is unusual for your dog, starts suddenly and happens repeatedly, don’t wait. If it’s a blockage, the sooner your dog has surgery the better. If a blockage is ruled out, your veterinarian can prescribe medications to make your vomiting dog feel better. It’s a win-win.
Case History: A Partial Intestinal Blockage
An otherwise healthy 5-year-old dog came into the veterinary clinic with a history of several days of intermittent vomiting and not feeling well. Initial x-rays were inconclusive, showing no obvious foreign material and no gas-distended bowel. He was treated for non-specific gastroenteritis and sent home.
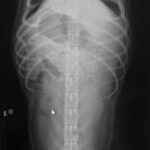
Radiographs taken early in the patient’s ordeal did not reveal a foreign object in the dog’s intestines, though it was most certainly there. The object could finally be seen in this x-ray, which was taken several days later. Upon discovery of the object, the dog was immediately prepped for surgery. Photo courtesy of Dr. Eileen Fatcheric
The dog’s owners have no idea of what this hard plastic object is, where the dog found it, or when exactly he ate it. The hole in the center of the object allowed some of the contents of the dog’s intestines to pass through it, delaying the diagnosis of the blockage. Photo courtesy of Dr. Eileen Fatcheric
Over the next week, the dog continued to vomit intermittently, had a decreased appetite and weight loss, and produced only small amounts of stool. His blood test results were all normal. Repeat x-rays were still unimpressive as far as gas distention of his bowel, but the offending foreign body could finally be seen. At surgery, a hard plastic hexagon-shaped object was removed from the small intestine where it was lodged. The hole in the center of the object allowed the contents of the intestines to pass through, thereby preventing a more easily diagnosed full blockage. He should experience a full and smooth recovery.
To prevent an initial territorial response from your longer-term canine family member, introduce your new dog or pup on neutral ground, not in your home or yard. Photo by David Leswick - D Stop on Flickr, Getty Images.
Slowly and step-by-step is how to introduce a puppy to an older dog. Adult dogs might respond to the introduction of a new puppy or dog with anything from love at first sight to an effort to ferociously drive the intruder off your property. Careful introductions will increase your chances of having a canine love affair rather than Doggie World War III.
Ideally, your dog loves other dogs and will be delighted to have a canine sibling sharing her home and humans. If so, introductions for dogs are simple:
How to Introduce a Puppy to an Older Dog
Ideally, your dog loves other dogs and will be delighted to have a canine sibling sharing her home and humans. If so, introductions for dogs are simple:
First, separately tire out both dogs
Second, let them meet on neutral ground, such as a friend’s fenced yard or a rented Sniffspot– not a dog park.
Then, have both dogs on leashes and let them hang out near each other for a bit.
Finally, if all is well, drop the leashes and let them interact. Be ready to intervene if either one seems too aroused or overwhelmed.
Note: It’s perfectly okay for your dog to do some mild snaps to tell the newcomer that he’s being obnoxious. Pups need to learn manners, and an appropriate adult dog is the best teacher!
Introducing a Puppy to an Older Dog Who Seems Concerned
If your older dog is concerned rather than happy about the new puppy, go slower. Keep them restrained in each other’s presence for at least several days as they get used to each other, and use “protected contact” for initial interactions, allowing them to sniff through a wire exercise pen or baby gate. (Don’t use a crate for this – the crated dog will feel trapped and stressed.)
If things don’t go well even with the slower approach, or you already know your dog won’t be happy about the new family member, contact a force-free behavior professional to help with introductions.
Do you think your dog is jealous of the new puppy the house? To avoid stress and jealousy, give both dogs plenty of individual time and attention, and be sure to provide your longer-term family dog with lots of time away from the young ’un – she shouldn’t have to put up with a pesky puppy 24-7!
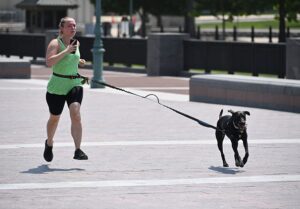
It’s critical that you pay close attention to your dog when you run with him. If he slows down or shows any reluctance to go on, you must stop running and try to determine whether there is something wrong – a scrape on his foot, a broken nail, overheating, or any other issue. Photo by tomazl, Getty Images
There are countless benefits to running with your dog: Running or jogging will help maintain your dog’s weight, improve his muscle tone, maintain a strong cardiovascular system, and build endurance. Running uphill develops rear drive. If you compete in any sort of showing or sport with your dog, he will undoubtedly become better conditioned from running than his “weekend warrior” competitors.
Running is also beneficial to your dog’s mental health. Running makes dogs happy. It allows them to explore the world through sights, sounds, and smells. They get to spend more time with you doing something fun. It allows them to release energy, making it less likely that they will vent their energy in destructive ways. This will make you happy.
Check with your vet first
Before you start running with your dog, however, he should be examined by your veterinarian and cleared to start a running program before you subject him to many miles. (If you are just beginning running yourself, it is advisable to have a physical examination by your doctor, too!)
How old should your dog be before it is physically safe to begin running together? One rule of thumb is that the dog’s bone growth plates should be closed before the dog takes part in any sort of rigorous activity. Puppy bones and muscles need sufficient time to develop fully and may be injured by beginning a structured running program too early. Some breeds and types mature more slowly than others. Owners of large dogs such as Great Danes and Scottish Deerhounds, for example, may be well advised to wait until their dogs reach the age of 1½ to 2 years. Lighter-boned dogs such as Miniature Pinschers and Whippets may be ready at 8 months to a year. Most dogs should be in the 1- to 1½-year range; check with your veterinarian for information on when your dog’s bone growth plates should be expected to close.
Training preparation
Before you begin running with your dog, you will need to train your dog to first walk, and then run with you. Your dog should already be trained to walk on leash without forging ahead and pulling you off balance, and should sit by your side when you stop at busy intersections. Teaching simple behaviors such as “slow” or “easy” when your dog pulls, or “leave it” when he spots a squirrel or rabbit, are imperative for your safety when running. Remember, unlike walking, only one of your feet is in contact with the ground when you are running, making your dog’s sudden pulls especially dangerous.
Necessary equipment
While you will need to invest in some properly fitting, quality running shoes, and perhaps some specific running attire for yourself, running gear for your dog is simple and inexpensive. All you need is a four-foot to six-foot leather or cotton web lead and a snugly fitting flat collar to keep your dog safely by your side. A flat collar, martingale collar, or head halter are all choices to consider. A harness is also an option, but the fit and quality of materials used in a dog running harness are critical, as harnesses can cause serious chafing on longer runs. Retractable leads are not recommended.
Start running with your dog slowly
Many of the same principles that apply to beginning a running program for humans apply to our dogs as well. Owners and dogs should ease gradually into a running program, beginning with alternating walking and running for brief periods (no more than 20 minutes), three times a week, gradually increasing the running. Humans and dogs new to running might begin with two minutes of running at a comfortable pace followed by two minutes of walking, for a week or two. Progress to four minutes of running, two minutes walking, then to six minutes running, two walking, until you and your dog are able to run continuously for 20 minutes comfortably, three times a week.
Begin all workouts with a warm-up period of brisk walking or easy jogging before running as well as a similar cool-down after your workout.
Rest and recovery are essential to improve the fitness of both you and your dog. When just starting out, run with your dog every other day, rather than on successive days, allowing time for muscle recovery and to avoid injury while building endurance.
After four to six weeks of training three times a week for 20 minutes, both you and your dog will have built up your strength and endurance to begin to increase your mileage. The generally accepted guideline on increasing running mileage is not to exceed a 10 percent increase (in either time or mileage) a week. As you increase your mileage, your dog’s pads will gradually toughen to handle the longer distances.
How far can your dog run?
Harnesses are more likely to chafe while running. A leash that attaches to a waist belt allows your hands to be free while running, but is more likely to cause you to fall, and can yank your dog badly if you trip. Photo by Mandel Ngan, Getty Images
As your dog’s strength and stamina increase, he will undoubtedly delight in accompanying you on longer training runs. The number of miles, minutes, or hours you eventually run with him is largely determined by the dog. Many breeds are capable of running 25 to 35 miles a week, but perhaps individual dogs within the breed are not. It is important for you to determine your dog’s limits when running. The dog’s age, size, body density, coat thickness, and temperament may affect how far your dog can safely run. Dogs, like humans, have physical and mental differences that influence performance. By observing your dog’s behavior it is simple to figure out your dog’s comfortable running distance.
The signs that your dog is tiring are often subtle, and his devotion to you may cause him to run longer or farther than he would on his own. It is up to you to recognize these subtle signs and to stop your run as soon as you become aware of them. If your dog is panting excessively, breathing fast and hard, lagging behind the length of the lead, or showing signs of lameness, it is time to abandon your training run. Be particularly aware of the behavior of the older dog when running. These veterans have not lost their enthusiasm, but just as older human athletes, they need to slow down a bit and need more time for rest and recovery.
Rules to Run By
Check the condition of your dog’s collar and leash before beginning a run. Replace frayed or cracked collars and leashes to ensure your dog’s safety.
Both you and your dog should run with identification in case of emergency. Check your dog’s tags regularly to make sure the writing is still legible.
Wear clothing that is visible to motorists, especially at night, duck, and dawn. Reflective running apparel is available for both you and your dog. Your choices include reflective leashes, collars, and vests, as well as flashing collars and flashing lights.
Begin your workouts with a warm-up (brisk walk or easy jog) and end with a cool-down to lower heart rates gradually.
Run facing traffic (a universal rule of running). Your leashed dog should run on your left side, away from traffic.
Make sure both you and your dog remain hydrated. On longer and warmer runs, carry water or plan your route to include several water stops.
Be conscious of your surroundings, including road conditions, traffic, other people, and other animals, to avoid injury and unpleasant or dangerous confrontations. No wearing headphones!
Don’t bring your dog when it’s hot, highly humid, or freezing. Dogs do not tolerate heat and humidity as well as humans and can easily suffer from heatstroke when running during the summer months. Prolonged exposure to frigid temperatures may lead to frostbite of unprotected areas (ears, paws, scrotum, and tail are particularly vulnerable) – and the chemicals, salt, and sand used to melt snow and ice on streets and sidewalks may irritate your dog’s feet. Always inspect your dog’s paws at the end of a run and wash off his feet, legs, and underside to remove any chemicals or salt that could be harmful to your dog if swallowed.
Pay attention to the surfaces you are asking your dog to run barefoot on! Running in cities and towns guarantees lots of miles on paved roads that will toughen your dog’s pads. Be careful not to do too much running on concrete sidewalks; it is an even harder surface to run on than asphalt and will take its toll on your legs. Living in the country, you may have access to dirt roads that are kinder on feet and joints (yours and your dog’s!).
Always clean up after your dog. Carry a minimum of two poop bags – on the day you bring just one, your dog will almost certainly poop twice.
Be aware of your dog’s behavior at all times. Watch for irregularities in gait, breathing, signs of heat exhaustion, waning enthusiasm, etc. If your dog shows signs of tiring, stop running.
Have fun! Not every run has to be a serious training run. Vary your running routes often, stop to smell the roses occasionally (or the fire hydrants perhaps), walk a little, let your dog explore, and enjoy your surroundings together.
Eye drops for dogs are generally prescribed by a veterinarian for ophthalmic disease. Credit: Chalaba/500px | Getty Images
Using over-the counter human eye drops for dogs can get you in a lot of trouble. For example, Visine can cause life-threatening problems in your dog (see sidebar), and administering the wrong eye drops for the problem your dog is facing can worsen the condition.
Are Over the Counter Eye Drops Safe for Dogs?
The only safe human eye drops for dogs are saline eye drops and artificial tears. And, even then, you should discuss why you want to use them with your veterinarian before administering the drops. If you just need to flush out your dog’s eyes to remove a crusty discharge, warm tap water will do the trick. Anything else—especially if your dog is showing signs of pain like squinting, redness, or a bloody discharge—needs prompt veterinary attention.
Visine Isn't Safe for Dogs
Never use Visine eye drops in dogs! Visine contains active ingredients that constrict blood vessels to “get the red out.” These ingredients are extremely toxic in dogs, potentially causing life-threatening cardiovascular issues, as well as neurologic derangements. Visine is especially toxic if accidentally ingested by the dog. If you have this product in your home, keep it well outside your dog’s reach. If your dog chews up a bottle, call Poison Control and your veterinarian right away.
Prescription Eye Drops
Your veterinarian will prescribe prescription eye drops if your dog suffers from ophthalmic disease. Some drops are the same as human eye drops, so your veterinarian may have you fill your script at your local pharmacy. Drops don’t last as long in the eye and typically must be administered four to six times a day. If this is not possible with your schedule, ask your veterinarian if there is an ointment alternative. Most ointments are administered two to three times daily.
Antibiotic Eye Drops for Dogs
Antibiotic eye drops—triple antibiotic (neomycin/polymyxin/bacitracin), ofloxacin, tobramycin, erythromycin, gentamicin—are prescribed for bacterial conjunctivitis and corneal ulcers. Signs of bacterial conjunctivitis are redness with green or yellow discharge. Corneal ulcer signs include squinting, pain, cloudy cornea.
Steroid Eye Drops
Steroid eye drops like dexamethasone and prednisone are prescribed for allergic conjunctivitis and other inflammatory ocular conditions like uveitis. If you have steroid eye drops in your dog’s medicine cabinet from a prior issue, be aware that steroid drops are not recommended if your dog has a corneal ulcer, as they can delay healing. If your dog is squinting with a painful eye, do not use steroid drops. See your veterinarian as soon as possible.
Other Prescription Eye Drops
Non-steroidal anti-inflammatory (NSAID) eye drops such as diclofenac are frequently prescribed for dogs after cataract surgery.
Cyclosporine and tacrolimus are prescription immunosuppressive eye drops used to treat dry eye syndrome, also known as keratoconjunctivitis sicca (KCS). Signs of KCS in dogs include squinting, ocular irritation, excessive mucous accumulation, and cloudy corneas. Your veterinarian will perform a tear test to confirm the diagnosis before prescribing these drops.
For glaucoma, a disease that causes elevated intraocular (eye) pressure, prescribed eye drops for dogs include dorzolamide, timolol, and latanoprost. Signs of glaucoma in dogs include redness, squinting, pain, cloudy cornea, and an enlarged eyeball. If you suspect your dog may be suffering from glaucoma, seek treatment right away. Uncontrolled glaucoma results in blindness and, ultimately, the loss of the eye.
Most dogs don’t need a vitamin E supplement, but a significant exception are dogs on fish oil, which is given to boost joint health, immune function, and healthy skin and coat. Credit: bettphotos500 px | Getty Images
Vitamin E is good for dogs, but information about vitamin E dosages may make your head spin. Suggested dosages of vitamin E for dogs appear to be all over the place. To make matters worse, dosages may be listed in International Units (IUs) or milligrams (mgs).
Piling on to the confusion is that there are two main forms of vitamin E—natural and synthetic—and they have different potencies and, therefore, different vitamin E dosages. It’s a lot to take in, but we have the answers you need about vitamin E supplements for dogs.
What Is Vitamin E?
Vitamin E is an antioxidant, which means it helps protect cell membranes throughout the body. It is involved in fat metabolism, helps keep the immune system healthy, and improves fertility. It has benefits for your dog’s skin, coat, muscles, and vision.
Although vitamin E is safe for dogs, not every dog need a supplement. Canine vitamin E deficiency is rare, and most dogs get plenty in a complete and balanced diet. Your veterinarian can run blood tests to see if your dog is truly deficient if you’re concerned.
Signs of vitamin E deficiency include:
vision problems
painful inflammation of body fat (steatitis)
muscle inflammation or weakness
neurologic derangements
Topical Vitamin E
Topical vitamin E oil is safe to use on dogs. The ingredients should list alpha tocopherol and an oil, like virgin olive oil. You can use it on irritated or crusty skin patches, dry cracked noses, and paw pads.
Vitamin E with Fish Oil
Dogs on fish oil may benefit from adding vitamin E. The polyunsaturated fatty acids in fish oil that are so good for your dog can deplete vitamin E stores over time. The small amount of vitamin E in fish oil supplements is basically there as a preservative, usually in amounts too small to enhance levels in your dog. The most common recommendation for vitamin E supplementation in dogs receiving fish oil is 400 IU vitamin E for every 1,000 mg of fish oil.
Vitamin E Dosages for Dogs
To calculate the proper dose of vitamin E for your dog, you first need to determine which type of vitamin E is in the bottle you purchased:
The natural form of vitamin E is called d-alpha tocopherol (d-).
The synthetic form of vitamin E is called dL-alpha tocopherol (dL-).
The natural form is much more potent than the synthetic form and is the best form to use.
Next, you’ll have to do some math. Remember this: 1 mg of natural (d-) vitamin E equals 2 mg synthetic (dL-) vitamin E.
You may also need to convert IU to mg or mg to IU, which isn’t difficult:
For natural (d-) vitamin E:
IU x 0.67 = mg
mg x 1.5 = IU
For synthetic (dL-) vitamin E:
IU x 0.45 = mg
mg x 2.22 = IU
So, using these formulas, here are examples:
200 IU d-alpha tocopherol (natural vitamin E) = 134.5 mg of vitamin E
200 IU dL-alpha tocopherol (synthetic vitamin E) = 90 mg of vitamin E
Of course, that still doesn’t answer the question about how much vitamin E to give your dog, except fish oil, as mentioned above. So, in our chart below, we share a few problems that may benefit from vitamin E supplementation for your dog, with suggested dosages.
Please note these dosages are taken from respected veterinary drug formularies but are all off-label recommendations. Never give your dog a supplement of any type without first talking with your veterinarian.
Sample Vitamin E Dosages
Always talk with your veterinarian about uses and dosages before supplementing vitamin E.
Ailment
Vitamin E Dosage
Allergies
8.1 mg/kg body weight (BW) by mouth once a day
Arthritis
400 IU/dog once a day
Exocrine Pancreatic Insufficiency (EPI)
20 to 25 IU/kg BW once a day for 30 days, or 10 to 20 IU/kg BW twice a day for 4 weeks then once a week, or 100 to 400 IU/dog once a day for 4 weeks then once a week
Liver disease
10 IU/kg BW once a day or 50-400 IU/dog once a day
Ischemic dermatopathies, mange
200 to 800 IU once a day, based on the dog’s size
Scotty Cramps
125 IU/kg BW once a day
English Cocker Spaniels with Retinal Pigment Epithelial Dystrophy (RPED)
600 to 900 IU twice a day
Degenerative myelopathy
2,000 IU twice a day
Vitamin E Overdoses
Vitamin E is generally safe in dogs, with overdosage issues rarely seen. Inadvertent, acute overdose usually results in gastrointestinal upset, with vomiting and diarrhea. Chronic overdose can cause issues with decreased absorption of the other fat-soluble vitamins (A, D, and K). Dogs with low vitamin K levels given too much vitamin E may have clotting problems that result in excessive bleeding.
These adorable dogs have gotten too popular for their own good. Photo by mrs, Getty Photos
According to a news release from the American Kennel Club (AKC), more French Bulldogs were registered with the organization than any other breed of dogs in 2022. The AKC – and thus every news agency that published some version of the news release – characterized this fact in the same way they do every year: by saying the breed is now the “most popular” breed in America.
The AKC stopped releasing the numbers of dogs that the organization registers each year some years ago, so it’s impossible to know exactly how many French Bulldogs were registered last year, or how many more of them were registered than Labrador Retrievers – the breed that had the most registrations each year for the previous 31 years in a row. But Labradors tend to have large litters; five to 10 puppies is typical for a Labrador litter. French Bulldogs typically have two to four puppies (and almost always by caesarean section), so there must be a LOT of French Bulldog breeding going on.
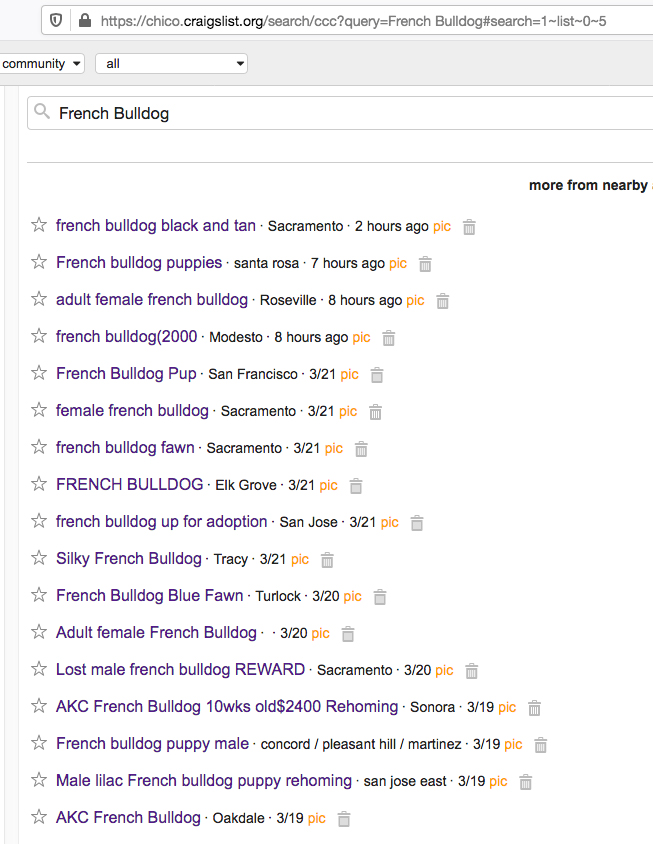
Well, now I’ve looked at Craigslist.com, which “prohibits” pet sales; according to its terms of use page, though “rehoming with small adoption fees [is] ok.” Wow! So much rehoming! And I guess I wasn’t aware of how much “small adoption fees” have gone up! Dozens and dozens of Frenchie puppies have been posted for “rehoming” in my part of the state just within the last few days, for $1,500, $2,000, $2,400! And many of them are AKC-registered, how nice!
Despite Craigslist’s supposed prohibition on selling animals through its pages, there are countless ads for French Bulldogs for “rehoming” – many of them for thousands of dollars.
Sorry for the snarking. I have to admit that I find the news about the increasing popularity of these adorable little dogs to be sad – even more so since I’ve discovered how ubiquitous their breeders are. I’m sad because I know how much suffering many of these dogs experience: French Bulldogs are prone to spinal problems (such as intervertebral disk disease – IVDD), hip dysplasia, and patella luxation; brachycephalic obstructive airway syndrome (BOAS) and heatstroke (because they can’t pant hard enough/exchange air quickly enough to cool themselves); allergies, which contribute to skin-fold dermatitis and pyoderma (due to wrinkly skin); ear infections (due to small ear canals), conjunctivitis and corneal abrasions (due to bulging eyes) – and, of course, an increased incidence of death during delivery if their cesarean section surgeries aren’t performed at the appropriate time.
All of the brachycephalic dogs have been trending toward increasingly flat faces, and the French Bulldog is no exception. The May 2023 issue of Cornell DogWatch lists the many symptoms of BOAS – frothing at the nostrils, snoring in sleep, snorting, gagging, noisy breathing, exercise and heat intolerance – that are typical for brachycephalic dogs, and details how surgery is needed to correct the anatomical defects that causes this suffering.
I’m fairly certain that few people who buy these dogs are aware of how much they should be expecting to save for veterinary bills.
The popularity of these dogs also has led to a great number them being stolen, from homes, cars (when left alone as well as in car-jackings), and from individuals. I just read an article in the New York Times about a 76-year-old man who bred and sold French Bulldogs who killed by two other men in the parking lot of a KFC in Bishopville, South Carolina; the two men arranged to meet the breeder there, purportedly to buy the French Bulldog for $2,500. They stole the dog and shot the breeder to death. It seems like this is what happens when dogs are such a valuable commodity (their small size increases their vulnerability, no doubt).
The backyard breeder business is booming for French Bulldogs. No guarantees of health, temperament, socialization, or anything else comes with your “rehoming fee” – but AKC registration is often offered.
I like the French Bulldogs I have met. They tend to be clownish and playful, and fairly undemanding of their owners. While it’s often reported that they can be difficult to train, their smaller size means that even kids or elderly people are able to walk them without too much trouble even when they pull on leash. They aren’t barky, though they can be quite vocal with cute squeaks and moans when they want something.
Dry dog food has a “best buy” or “use by” date on the bag, but once opened, you should finish feeding it within four to six weeks of the date you opened the bag. Proper storage methods make a big difference in the kibble’s quality. Credit: Grace Cary | Getty Images
Dry dog food, otherwise known as “kibble,” is known for its long shelf life, but how long does dry dog food really last? Once a bag is opened, it should be used up within four to six weeks, assuming it’s stored under optimal conditions.
Shelf Life of Nutrients
Generally, bags of unopened kibble have a shelf life of 12 to 18 months. The “best by” or “use by” date printed on the original packaging is based on the date the product was manufactured. While dry dog food doesn’t technically expire, you could consider that “use by” or “best by” date an expiration date.
Over time, some nutrients, like vitamins, start to naturally degrade. Fortunately, nutritionists are acutely aware of this. When formulating a food, nutritionists ensure that these nutrients are added in levels high enough to account for these natural losses. This ensures the food remains complete and balanced for your dog, even toward the end of the food’s shelf life. However, once opened, the kibble should be used within four to six weeks.
Storage Matters
The way you store your dog’s kibble can impact your dog’s dry food and cause it to spoil quickly. Conditions that hasten spoilage include:
Exposure to air
Sunlight
Heat
Moisture
To maximize kibble freshness, after opening a bag, store it in the bag it came in (tightly resealed) or inside an airtight container. Exposure to air, and subsequently oxygen, increases the rate of oxidation of fats within the food, causing the food to rancidify. Exposure to sunlight and heat also expedite this process, which is why kibble should always be stored in a cool, dark location.
Obviously, your dog’s dry food needs to be kept dry. Exposure to water or excess humidity can cause the food to grow mold, which can produce harmful toxins if your dog eats it. Freezing your dog’s dry food will help prevent fat rancidification, but it can lead to moisture buildup and condensation within the bag when defrosted and is therefore not recommended.
While dry dog food has a reasonably long shelf life, once opened, it’s up to you to ensure its freshness. Use proper storage methods and consider how much food your dog consumes when choosing a bag size. Select the size that will be finished within four to six weeks after opening. These practices will help to ensure your dog consistently receives fresh food every day.
To provide the best experiences, we use technologies like cookies to store and/or access device information. Consenting to these technologies will allow us to process data such as browsing behavior or unique IDs on this site. Not consenting or withdrawing consent, may adversely affect certain features and functions.
Functional
Always active
The technical storage or access is strictly necessary for the legitimate purpose of enabling the use of a specific service explicitly requested by the subscriber or user, or for the sole purpose of carrying out the transmission of a communication over an electronic communications network.
Preferences
The technical storage or access is necessary for the legitimate purpose of storing preferences that are not requested by the subscriber or user.
Statistics
The technical storage or access that is used exclusively for statistical purposes.The technical storage or access that is used exclusively for anonymous statistical purposes. Without a subpoena, voluntary compliance on the part of your Internet Service Provider, or additional records from a third party, information stored or retrieved for this purpose alone cannot usually be used to identify you.
Marketing
The technical storage or access is required to create user profiles to send advertising, or to track the user on a website or across several websites for similar marketing purposes.
This website uses cookies and other tracking technologies to offer you a better experience, personalize content and ads, and analyze our site traffic. Before proceeding, you agree to our Terms and that you’ve read our Privacy Policy. Update Settings
Functional
Always active
The technical storage or access is strictly necessary for the legitimate purpose of enabling the use of a specific service explicitly requested by the subscriber or user, or for the sole purpose of carrying out the transmission of a communication over an electronic communications network.
Preferences
The technical storage or access is necessary for the legitimate purpose of storing preferences that are not requested by the subscriber or user.
Statistics
The technical storage or access that is used exclusively for statistical purposes.The technical storage or access that is used exclusively for anonymous statistical purposes. Without a subpoena, voluntary compliance on the part of your Internet Service Provider, or additional records from a third party, information stored or retrieved for this purpose alone cannot usually be used to identify you.
Marketing
The technical storage or access is required to create user profiles to send advertising, or to track the user on a website or across several websites for similar marketing purposes.


 The more connected you and your dog are, the easier it will be to help your dog through these experiences. It will speed your progress immensely if your dog already tunes in to you and looks to you for guidance. Any fun, positive reinforcement-based training will develop your dog’s connection with you. Practicing food-filled, easy lessons in your kitchen on things like “touch” and “spin” may seem unrelated to this become-calm-around-dogs effort, but will make a huge difference.