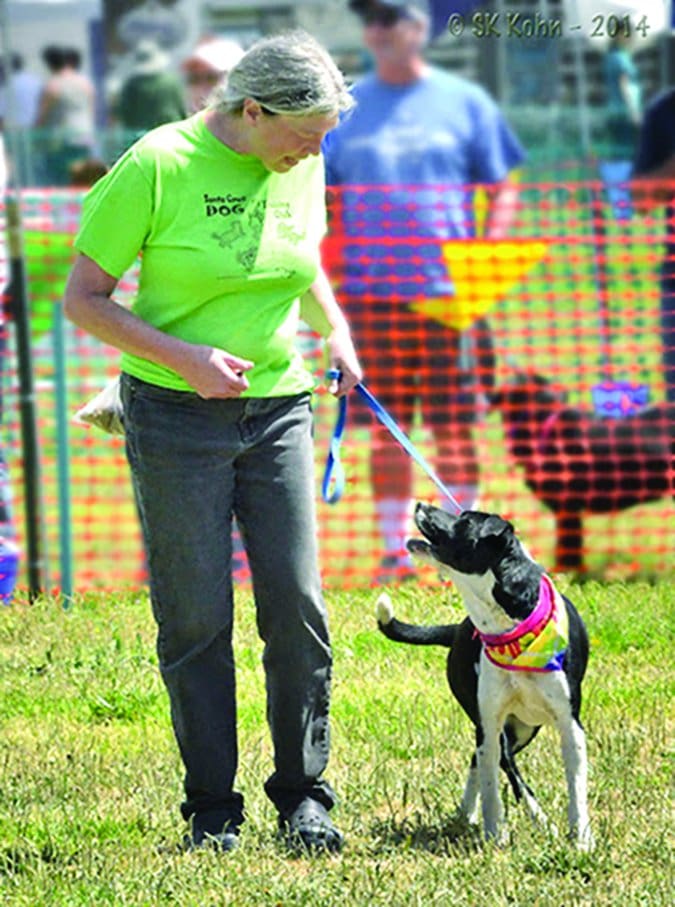
Pulled muscles and joint inflammation are as much a part of your dog’s life as your own, and they increase with age and activity. The fact is, no matter which way you turn it, strains happen. Imagine how great it would be if there was a magic garment that could soothe those strains and restore your dog to fitness. Well, you don’t have to imagine it: There is such a garment.
For initial injuries and acute pain, a veterinary diagnosis is a necessity. Your dog may need an anti-inflammatory drug to rapidly get the pain and inflammation under control. For chronic stiffness due to geriatric arthritis, a therapeutic daily dose of glucosamine to help lubricate those joints may make a difference. It may even slow the onset of joint degeneration, making supplementing sooner rather than later a smart move. Other complementary therapies for chronic issues include laser therapy (see “Hire the Lasers,” WDJ August 2013) and acupuncture (“Needle Your Dog,” November 2013). That’s because, for chronic pain issues, keeping your dog on a nonsteroidal anti-inflammatory drug (NSAID) isn’t optimal.
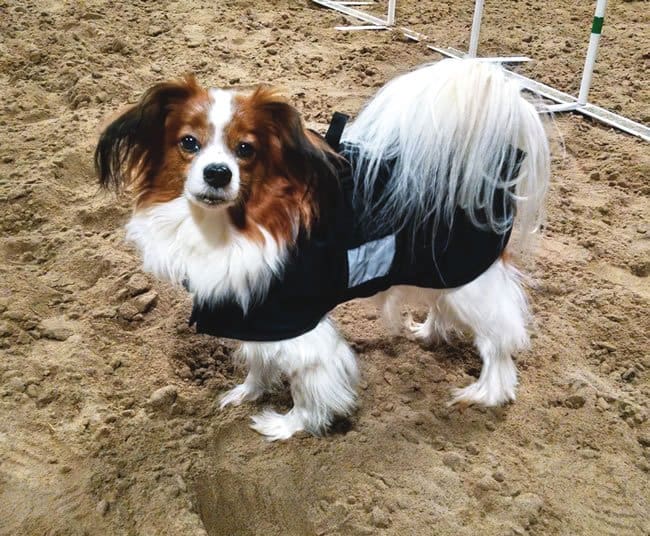
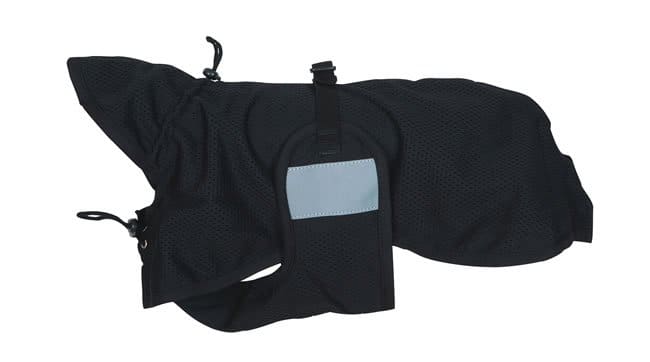
Many veterinarians will also suggest investing in a Back On Track coat, which sport-horse and performance-dog owners have long used for muscle strain from strenuous athletic activity, arthritis and muscle warm-up. These coats are so popular that if you attend a cool-weather, early-morning dog agility trial, you may think basic black is trendy in dog clothing.
In reality, the Back On Track products are established remedies for chronic inflammation and muscle health. Based on researched and documented Chinese medicine practices, these products use ceramic’s heat-reflective properties to increase circulation. The ceramic particles are infused into blanket material, which is warmed by the dog’s body heat. That heat then radiates back into the body.
This form of infrared heat radiation is proven to increase circulation, which naturally reduces inflammation, enhances healing, and relieves muscle tension.
Skeptical? Don’t be! A study from 2002 in Alternative Medicine Review looked at the ceramic-impregnated gloves for Raynaud’s syndrome in humans. People with Raynaud’s suffer from tightening of blood vessels, resulting in decreased circulation, usually in their fingers; it worsens in cold weather and can be painful. The study’s conclusions noted “significant improvement” in pain, temperature, grip, and dexterity, showing the ceramic increased circulation.
It’s actually the inside of the Back On Track blanket that contains the ceramic powder. The outer material is your choice: either a water-resistant breathable polyester or a lightweight, breathable mesh. The mesh is popular as it comfortably drapes over your dog and can be used in warmer weather and for more active dogs. Both blankets are machine washable, as the powder cannot be washed out (no dryers, though). We’ve seen dog coats in use for more than seven years.
Personal Experience with Dog Agility Problems
Draco is my 9-year-old Papillon and my first agility dog. We’ve been competing seven years and only need two qualifying scores to finish his last AKC Masters title, which is pretty good for a “first” dog. A couple of years ago, I noticed Draco was slowing down and less enthusiastic. He seemed excited at the start line, but slowed by the end of the course. In the second run of the day, he would start fast but slow down as he progressed through the course – and would even sometimes avoid obstacles.
I had my veterinarian examine him. She observed that, overall, his muscles felt tight. She mentioned that at his age we may be dealing with early arthritis, too. She said I could use pain medication to help him, but also suggested I spend more time warming him up and get a Back On Track coat first to see if it helped. I also decided to drop him to a lower jump height.
Huge improvement! Draco is back to running fast – sometimes too fast for me to control! When I get the coat out he puts his head right through the neck hole, as if he knows the coat makes him feel better. Once again, he is excited to be doing agility! In fact, last summer, I couldn’t hold him still at the start line!
Back and shoulder injuries are the most prevalent problems in agility dogs, and A-frames account for most injuries. Reluctance to tackle the A-frame is a pretty sure sign of a back problem, especially in a little dog.
When Raven, my younger Papillon, started to avoid obstacles, I had him examined, too. My vet readily detected the tight muscles in Raven’s back and showed me how to palpate them and recognize when they’re tight. I had no idea he was in so much pain, since he always gamely tried to do the courses. We used anti-inflammatory drugs to get Raven’s acute pain under control and I invested in a second Back On Track coat.
The difference in the tightness of his back muscles after wearing his coat was nothing short of amazing. I give him pain medication only for acute injuries. Although I decided to retire him from agility, as I didn’t want to risk further injury, I still have to watch him for back pain. However, with the Back On Track coat, I reach for the pain medication only for an acute episode – such as when he decided to race a visiting puppy all around our dog arena.
Using The Back on Track Blanket
Dogs do vary in their response to the blanket, and some take longer to achieve a noticeable effect than others. Nearly every dog owner reports at least a softening of tense muscles and less overall stiffness. You should gradually introduce the blanket, increasing from a couple of hours per day for several days up to overnight use. In addition, as counterintuitive as it seems, best results are found if you set up an on/off schedule for the product’s use, such as three weeks of therapy and one week off, or use it only when you notice increased stiffness or need to ensure proper warm up of your dog’s muscles for physical activity.
The blankets are available in an incredible number of sizes from toy to XXL, retailing from $79 to $109, depending on size. As is the case with any covering you place on your dog, you need to keep the ambient temperature and sun in mind when your dog is wearing the coat.
Take-Away Points
Back On Track products are no substitute for warm-up and cool-down periods or conditioning your dog for his level of work. And acute injuries can still occur and require your vet’s help. But for most chronic problems and overall muscle health, ceramic therapy is a valid choice, offering comfort to your arthritic friend and keeping your canine athlete at his peak. It’s important to know what issue your dog is battling before you invest, as Back On Track products are a bit pricey and most certainly not cure-alls. They do support muscle health and reduce pain and inflammation in the dog’s body.
Ceramic therapy’s use for chronic arthritis, circulation problems, and inflammatory muscle and bone issues is well documented. The company’s website (backontrackproducts.com) has convincing clinical studies, including images showing before/after inflammation in horses. We found several studies ourselves, including research published in February 2012 that concluded the biological effects of ceramic materials have “the potential therapeutic effects . . . may contribute to relieving inflammatory arthritis and maintaining bone health.” (You can read it for yourself at ncbi.nlm.nih.gov/pubmed/22242954.)
The company’s head office is in Sweden, and it manufactures these products for horses, dogs, and humans. The factories are in China, but the company states that an independent lab hired by the company measures each batch of ceramic textile to ensure its level of reflected heat.
Cynthia Foley is an experienced dog agility competitor. Also a lifelong horsewoman, she served as editor of Horse Journal from its inception in 1994 to 2014.
All dog lovers appreciate seeing a healthy, happy dog, running in the sun with a glistening coat.
Your dog’s skin is the largest organ in his body and is comprised of multiple layers. The inner layer protects the internal organs and blood vessels, while the outer layer sheds old cells and secretes oils into the hair follicles, providing shine and water resistance.
Although it sounds like a simple organ, it’s not. Tiny problems can get out of control, requiring long therapies to heal. And when skin problems arise, it can be difficult and time-consuming to determine exactly what caused the problem. It’s no wonder skin ailments are one of the most common reasons dogs are taken to their veterinarians.
Keeping your dog’s skin healthy is critical to his hair coat health, too. The initial symptom of many health issues is often a dull, flat coat. While this is sometimes a matter of poor grooming, it can also be caused by a health issue. A dog who constantly scratches may be battling parasites, food allergies/sensitivities, or adrenal problems, such as Cushing’s syndrome.
Dry skin is nothing to blow off. It’s not just a matter of comfort. If your dog’s skin isn’t moist and pliable, it can crack, providing an entry point for microorganisms like bacteria or fungi. Dry-skin solutions may be as simple as correcting a dietary imbalance or using a conditioner after a bath. But you need to be aware that it could also indicate a thyroid problem or a parasite infestation. A trip to the veterinarian is in order if your dog’s itching does not subside with simple topical treatments.
Fortunately, prevention goes a long way toward avoiding that vet call, so let’s move on to the 10 steps to ensure your dog’s coat is glossy, silky, and healthy:
1. Optimize Nutrition. Feeding a top-quality commercial dog food or well-formulated, home-prepared diet will ensure your dog receives the nutrients he needs. Avoid foods containing low-quality fat sources (such as plant-sourced oils or “animal fat”). If your dog is allergic to or intolerant of certain ingredients, check ingredient labels carefully each time you buy a commercial food; the manufacturer may have changed the formula and added the problematic (for your dog) ingredient.
2. Consider a Supplement – Your dog may need a little extra nutrition support in the form of the omega 3 fatty acids EPA and DHA. Adding a fish-oil supplement to your dog’s diet is the best way to provide these powerful anti-inflammatory nutrients. Only fresh oils should be used; never feed oils that smell rancid or “off.” All oils are fats and provide about 40 calories per teaspoon, so amounts should be limited, particularly in overweight dogs and those already eating a high-fat diet.
3. Establish a Regular Grooming Schedule. While long-haired dogs like Shetland Sheepdogs require more frequent brushing than short-haired Labradors, a weekly session is a good rule of thumb for most. Balance the frequency with the dog’s activity. Dogs who run through long grasses may get burrs that should be removed immediately (or he’ll chew them out!), and mud and dirt should be brushed out of their coats right away. City-dwelling dogs who walk through manicured parks usually need less attention, but watch for matting, especially in sensitive places, such as behind the ears and between the legs. Remember, too, that very young and very old dogs often do better with several shorter sessions a week rather than a single long one.
4.Choose the Right Grooming Tool. You’ll find no shortage of dog-grooming tools on the market. Your choice depends upon your dog’s coat. A shedding tool is not the right choice for a silky-haired Yorkshire Terrier, but your German Shepherd Dog may think it’s awesome. Long coats need at least an initial comb-through to remove small tangles, but a bristle brush at the end will bring out the shine and stimulate the skin. Avoid overly soft and overly hard brushes. Soft ones won’t reach the skin, while hard ones may painfully rake the skin. Your dog can help you identify the grooming tools that work for her; if she leans into it or obviously enjoys being groomed with it, keep that brush or comb. But if she runs away from you every time she sees it, keep looking for an alternative.
5. Remove Tangles Immediately. Tangled hair masses worsen with every shake of the tail. Most can be worked out with a human’s comb and a good detangling spray to soften the hair. Really bad mats must be cut out with scissors. Be extremely careful, as the skin tents up when you pull the mat and you can easily cut the skin, too. It can help to insert a comb between the mat and the skin, so you use the scissors only above the comb.
6. Bathe Your Dog. Obviously, if your dog is filthy from running through mud or swimming in a pond, he needs a bath. Otherwise, a monthly bath keeps skin healthy; over-frequent bathing can dry the skin and strip oils from the coat (see “Waterworks,” November 2014). Select a shampoo that contains a moisturizer, or use a conditioner after bathing – and rinse well! Hypoallergenic products are good choices for dogs with sensitive skin. Thoroughly dry your dog (a shammy works great!) after the bath. Spray-on conditioners and detanglers can go a long way toward extending the benefits of the bath, as they help repel dirt and mats. Never spray these products on a dirty coat, as you’ll just trap the dirt in. And a little goes a long way; don’t overdo it.
7. Check for (and control) fleas. Scrutinize your dog frequently for fleas, especially if you see him scratching or chewing himself. Swiping through his fur with a flea comb (an extremely fine-toothed comb that will trap fleas between the comb’s teeth) several times a week is a good surveillance method. Whenever your dog rolls over for tummy rubs, examine his skin for any of the jumping, biting pests. If you see a single flea, take immediate action to stop an infestation; there are sure to be more.
8. No Ring Around the Collar. A dirty collar can rub off or shorten the hair around your dog’s neck. Clean leather collars with saddle soap, a glycerin bar, or Murphy’s Oil Soap, then wipe off the excess and let dry thoroughly. Use a terry towel to do a final polish before putting it back on your dog. Nylon and hemp collars can be cleaned using dishwashing detergent and an old toothbrush; alternatively, toss them in the washing machine with a load of sturdy clothing, such as towels or jeans. If your dog is a very low flight risk, remove his collar when he’s just hanging around inside your home, giving his fur some time without chafing.
9. Maintain a Clean Place to Sleep. There is no sense in having your clean dog sleep on a dirty, greasy, and/or smelly bed. Wash your dog’s bed – or at least, the bed’s cover – at least a couple times a month. If his bed doesn’t have a removable cover, consider keeping the entire bed covered with sheets or blankets that you can wash frequently (or consider getting a new bed with a washable cover). Frequent washing will also help prevent fleas from gaining any sort of foothold (washing destroys flea eggs and flea larvae) in your home.
10. Keep Regular Vet Checks. A “well visit” is important for your dog’s overall health, and your veterinarian is trained to catch skin problems at the earliest stages. If there was ever a dog-health area where prevention is worth a pound of cure, it’s your dog’s skin.
Cynthia Foley competes in dog agility with her two beautiful Papillons.
For some dog owners, a better dry dog food is just one more step on a journey to finding the healthiest diet in the world for their dogs. Its generally accepted among dog owners that this means a home-prepared diet comprised mostly of meat. Beyond this broad description, there isnt consensus. Opinions vary about the supremacy of raw vs. cooked, using raw bones or other sources of dietary calcium, what sort of fat source is ideal, whether its advisable to include any grains or not (and if so, what kind and in what amounts), whether organic is healthier or not . . . . Name any concept in nutrition; its value and application to dogs is being debated.
So it makes sense that even when one journeys from the lofty heights of home-prepared diets, back down to the kibbled valley floor, there is debate here, too. Keep in mind that (despite my tongue-in-cheek heights-and-valley metaphor) the vast majority of dogs in this country eat dry dog food, so there are even more opinions out there about kibble than any other type of dog food.
Now, stir in a lot of scientific data and medical opinions; there have been far more nutritional studies and feeding trials conducted on kibble than any other type of canine diet.
So, if you are one of the majority of dog owners who have chosen to feed kibble but you are committed to finding and feeding the best possible kibble that exists you will probably employ more than the basic selection criteria outlined on page 6. You may want to investigate some of the following aspects of dog-food formulation, ingredient sourcing, and manufacturing. Just keep in mind that the relative value of all of these lines of investigation, and anyones ability to confirm the veracity of a companys answers, are debatable, as well.
In-depth questions for dog-food companies:
Where do your ingredients come from are any of them sourced from outside of the U.S.? Which ones: animal proteins and fats, oils, carb sources, herbs or other botanicals, vitamins and minerals? Which ingredients do you use that are so-called human grade (the legal term is edible) before they arrive at your manufacturing facility? (Once an ingredient arrives at a pet-food plant, it can no longer be legally referred to as edible which makes it difficult, if not impossible, to verify these claims.) Do you use any organic ingredients? What about genetically modified ingredients?
Where are your foods made? In your own plant, or are they made by a contract-manufacturer (also known as a co-packer)? What sort of certifications have been earned by the plant? If your products are co-packed, what sort of oversight does your company employ to ensure the ingredient sourcing and the manufacturing process are accomplished to your specifications?
What tests are employed in your manufacturing facility to ensure manufacturing accuracy and ingredient- and finished-product safety? Do you employ a test and hold system to prevent the release of products before test results have been returned? What tests are conducted, and how long are the products held before being released? If my dog has a health problem that my veterinarian thinks might be related to your food, or there is a recall of this food, who will I be able to speak to? What will your company do for me and my dog?
Be advised that some companies wont even have a person who will answer your call, or return your emailed inquiry and that is a valuable selection criterion in itself! To read the extensive list of approved dry dog food companies that meet all of the Whole Dog Journal’s selection criteria, look no further than the “Whole Dog Journal’s Approved Dry Dog Foods List 2015.“
Some companies own and operate their own manufacturing plants; some of these make only their own products, and others make their own and other companies foods, too. Still other companies, especially the smaller ones, use contract manufacturers, a.k.a., co-packers, to make their foods for them. There are benefits and challenges of both arrangements.
When a company owns and operates its own plant, it has full control of the entire food-making process: sourcing ingredients and managing their in-flow and storage; hiring, training, and managing workers; equipment maintenance and cleaning; product testing (requiring at least a minimal lab, and space and a system for retaining product samples); and so on. When things go wrong, there is no one to blame but themselves; they are in full control of the whole process. Many people feel its safest to buy products only from those companies that own and operate their own manufacturing facilities.
But owning and running a plant is unthinkably costly; few small companies can afford the expense, so they contract the services of a co-packer, and build as little or as much control or oversight of the manufacturing process into their contract as they like. Some companies leave it to the experts, taking a hands-off approach to the production of their products, while others insist on things like sourcing their own ingredients and having a company representative present for every run of their products, from start to finish.
When a food company hires a competent, ethical contract manufacturer and is educated enough to provide meaningful oversight of the services it hired, the relationship can work out well for all concerned, including you and your dogs.
Unfortunately, when something goes wrong say, a recall and sick dogs unscrupulous companies can be quick to point fingers at each other. The co-packer will say it was following the recipe and using the ingredients specified by the dog-food company. The company will say, Thats not what we told them to use! They screwed up! Lawsuits fly. Settlements happen. Consumers are none the wiser as to who actually messed up, and how. And our dogs pay the price.
You know the old expression, “It’s better to teach someone to fish than it is to give them a fish”? We’re ardent advocates of this approach. We would far rather teach a dog owner how to identify the good, better, and best dry dog foods available to her than to tell her which food is “best” for her dog. But there is one giant obstacle in the way of our teachin’ fishin’ mission.
The obstacle has to do with human nature: An awful lot of you would prefer for us to just give you a fish – that is, you’d rather we just told you which food you should buy for your dog.
It’s a compelling concept, but only if you don’t think about it very deeply. Consider this: Imagine that there was an entire grocery store that sold only dry cereal, canned stew, and frozen dinners, and each and every product in the store was a “complete and balanced” meal that contained at least the minimum amount (and perhaps a lot more) of protein, fat, carbs, vitamins, and minerals that a human needs each day. Cool, huh? Now, what if we told you that you and everyone you know – your elderly parents, your shellfish-allergic spouse, your toddler son, your lactose-intolerant daughter, your pregnant niece, your professional-athlete cousin, your obese uncle, your diabetic aunt, everyone – should eat nothing but the Wheaties, because honestly, we think it’s best. We eat Wheaties, and it’s complete and balanced, so you should, too.
That would be weird, right? But it’s the same as thinking we could tell anyone which specific food, or even which whole line of foods from any given manufacturer, is “best” for his or her dog.
Dogs are just as individual as humans. Some stay healthiest on a high-protein, lower-fat food. Some thrive on an Atkins-style, high-protein, high-fat diet. Some get the runs when they eat fish. Grain makes some of them extremely gassy. And so on.
Also, the food we like the best may not be available in your state, or in the store where it’s most convenient for you to shop. And you may not be able to afford a certain food. Not everyone can afford to pay for “the best” food on the market if there are several big dogs in their family.
So, instead of giving you fish – that is, telling you which company’s products or which specific food is “best” for your dog – we’re going to encourage you to try your hand at fishing, instead. We’re going to explain how you can tell which foods in your favorite pet-supply store, in your price range, are the products with the best potential for being good for your dog. Then we will tell you how to determine whether they are “working” for your dog. Okay? So let’s get started – to read the extensive list of approved dry dog food companies that meet all of the Whole Dog Journal’s selection criteria, look no further than the “Whole Dog Journal’s Approved Dry Dog Foods List 2015.“
I met a small dog recently who had breath that could knock you over. Because Ive had small dogs before, I knew enough to lift her lip and take a peek at her teeth. Even so, I was shocked, though not surprised, by the appearance of her teeth. That is, you could barely SEE white tooth material, for the accumulation of hard calculus tartar on her teeth. Her gums were inflamed and swollen, too.
It apparently didnt occur to anyone who knew or handled the dog that her bad breath wasnt some sort of character flaw, it was an actual health problem exacerbated by neglect. Rather, she was criticized as a fussy eater. I imagine Id be a fussy eater, too, if I was in excruciating pain from infected gums.
Small dogs, especially the ones with crowded mouths (overlapping teeth) or underbites or overbites that keep the mouth partially open at all times, are prone to more dental disease and accelerated accumulation of dental plaque. Daily brushing is highly recommended and annual exams and frequent veterinary cleaning is critical to prevent the relatively fast development of such a serious tartar build-up (the dog Im describing is only four years old!).
Shes since had her teeth cleaned and eight of them had to be extracted. Shell receive pain meds for 4 days and antibiotics for 10. Her breath is now completely inoffensive, and shes eating anything offered to her.
The experience made me check my own dogs mouths. Both of my dogs are 6 1/2 years old. Tito the Chihuahua has had one dental cleaning already, about two years ago. His breath is not at all bad, and his teeth look pretty good. I was surprised (when I took a whiff ) that my big dogs breath is not as fresh as I expected it to be, and when I lifted his lips to examine his teeth, I saw no tartar at all . . . on ONE side of his mouth! On the other, I found a rather large chunk of tartar on one of his upper molars. I think of myself as being fairly aware of whats going on with my dogs health, and completely missed this! He was examined by a veterinarian recently, too, for an annual health checkup, and she hasnt spotted it, either. Ill be taking him back in for a further exam and likely, a cleaning — this week.
How often do you check your dogs teeth? Make sure you look at the ones all the way in the back, too.
The thing that always crosses my mind at some point during a fostering experience: If I am having a difficult time coping with this behavior, how do people with little or no experience handle it? And I conclude, Well, I guess a lot of people dont handle it; thats why there are so many dogs in the shelter!
Seriously, there is always a point at which I am exhausted with the project and wishing I hadnt taken it on. With my first foster puppy, it was when his kennel cough turned into pneumonia and I found myself spending hundreds of dollars at a local emergency vet clinic on a Sunday morning to pull him through. With the next dog, it was when I realized that she actually had fairly significant separation anxiety enough to keep her barking and freaking out in a crate every time I left the room. Oh, and then, she also appeared to have some resource-guarding issues. Yikes!
The dog I am currently fostering set off a flash-fire of marital discord this morning when I spaced out and left her unsupervised in the backyard for a half hour or so. (In retrospect, I should have been thinking, Its quiet . . . too quiet!) When my husband and I stepped outside my office, we saw with dismay that about 10 feet of concrete pathway that leads to our home was absolutely buried in soil really expensive soil that had been, just a few minutes before, a raised garden bed full of winter onions. Thats it! This dog is out of here! my husband roared (before he calmed down).
Every young dog or puppy has to be civilized and trained, and the process takes a long time! Behaviors and health problems emerge that are incredibly trying, no matter how much experience a person has, or how well-equipped they are. I have a friend whose foster Aussie, after a week of subdued behavior, revealed serious obsessive/compulsive behaviors (kind of made me wonder whether he had been on unreported medication previously). I have another friend whose previously healthy and attractive foster dog developed demodectic mange. Its really difficult to find homes for dogs with either condition and equally difficult to give up on them after investing a lot of time in them.
Its incredibly rewarding to raise a dog well, to see him become well socialized and well behaved. But there are lots of low spots, too, when you despair of the destruction and the bad behavior and are tempted to think you got a dud who is never going to improve.
How do you encourage your friends with the new dog to keep going, to persevere in the face of the hard times?
It’s one of those jobs you just don’t ask a native (and lifelong) Californian to do: review dog coats. The only time I tried it, I failed; I separated the products under consideration into two categories – rain coats and warm coats – and was taken to task, rightly, for not providing a choice for dogs who have to go out in freezing rains. Because… a freezing rain? I have never experienced such a thing, much less had to walk my dog in one.
I was reminded of this recently, when I flew into Edmonton, Alberta, in order to tour the Champion Pet Food manufacturing facility north of there. I have never, ever, been somewhere so cold before – and they were having a relatively warm week for that time of year. The whole time I was there, I kept thinking, how on earth can you walk your dog in this cold? How do their paws not freeze?
Well, I guess they do; at least, the only dog I saw being walked the whole time I was there (about 36 hours) was wearing boots. I’m sure that while coyotes and wolves and even feral dogs either adapt or die in such cold, dogs who live indoors most of the time do need boots to protect their feet when being walked. The ground was just solid ice, whether frozen snow, dirt, or concrete.
On WDJ’s Facebook page a month or so ago, I linked a humorous (at least to me) YouTube video of dogs who had just been fitted with boots and were walking in them for (apparently) the first time. SO MANY people commented how cruel it is to outfit the dogs so and them laugh at them, as if boots on dogs is some great cruelty. I’m telling you, cruelty would be walking an indoor dog without boots in an Edmonton winter. Or even in Boston, say, where dogs are commonly treated to frozen sidewalks and salty slush, the better to burn any cracked paw pads that inevitably develop in cold winters.
Hey! You readers who live in incredibly cold places! How do you help your dogs cope with the cold? We’d love for you to share your favorite tips and tools.
Apologies to that rockabilly Eddie Rabbitt, but not everyone loves a rainy night. Especially if there’s thunder and lightning. Fear of thunderstorms – formally called astraphobia – is surprisingly common in dogs; some experts estimate that up to 30 percent are affected with it to some degree or another. (Most cats, apparently, couldn’t care less.) The most severely thunderstorm-phobic dogs can become intensely fearful and panicked, to the point where they become a hazard to themselves.
“I’ve seen them go right through windows, and chew through doors, drywall, even chain-link fences, breaking off their teeth and nails,” says holistic veterinarian Stephen Blake of San Diego. “They get into such a level of panic that they just aren’t thinking.”
In some cases, owners are able to trace a dog’s fear to an identifiable trigger. “Some dogs definitely have experienced something bad that makes them afraid of thunder,” says Nancy A. Dreschel, DVM, PhD, who has studied and written about thunderstorm phobia. As part of her research, Dr. Dreschel, an instructor of companion-animal science at Penn State University in University Park, Pennsylvania, met a dog who slept happily in the family room of his house – until a wood stove in the same room got struck by lightning. He was afraid of storms ever since. And can you blame him?
Often, a conditioned response like that can be reversed, Dr. Dreschel says, through counter-conditioning, that is, pairing the negative stimulus with something the dog enjoys, such as food. It’s the more ambiguous cases, where the dog just seems to develop a thunderstorm fear out of the blue, that are more challenging, because no one really understands what elicited the initial reaction, and the dogs aren’t talking.
“Some theories suggest that there is something aversive about the storm itself,” Dr. Dreschel explains, with guesses ranging from increased static electricity to changes in barometric pressure. “Perhaps there are things in the air that are uncomfortable to the dog, so his skin or his fur hurts. Maybe the storm-associated noise is actually painful to dogs; they hear things that we can’t.”
Another theory suggests that some dogs are genetically predisposed to thunderstorm sensitivity, including Golden Retrievers and some herding breeds.
Preventing Thunder Fear in Dogs
It can seem as if the recommendations for preventing these intense reactions to thunderstorms – or at least making them more manageable – are as numerous and varied as the affected dogs themselves. What most everyone can agree on this: There is no sure bet, no tried-and-true cure. What works for one dog might have zero effect on another.
Trial and error, then, is your best bet. Be open-minded and creative in how you approach this problem. Dr. Dreschel recalls that one of the dogs in her study would be terrified of storms while in the house, but, inexplicably, did just fine in the car. While she does not recommend a rain-drenched trip to the minivan for every dog – if it didn’t work, the potential toll on your upholstery could be staggering – she does applaud the spirit behind it.
“It’s a very individual thing,” she says about helping a dog through storm sensitivity. “You just have to keep trying.”
Many veterinarians and behaviorists recommend working to prevent the problem before it begins, by rewarding the dog as a puppy whenever she is exposed to the sights and sounds of a storm. Have lots of extra-special treats on hand; repeated reinforcement teaches the dog that raindrops and thunder claps mean the yummies are on their way.
To desensitize dogs who have exhibited stress behaviors during a storm, Katherine Houpt, DVM, professor emeritus at Cornell University College of Veterinary Medicine in Ithaca, New York, uses a storm-simulation CD, initially played at low volume. As a reward, “the dog gets something he never gets otherwise – for example, only salami when you do desensitization.” When the dog hears the storm sounds, teach him to go to the safe place where he will ride out the storm. (More on that below.)
In subsequent sessions, gradually increase the volume of the CD. If your dog is taking and eating the treats, then chances are he is coping well, since there is an inverse relationship between stress and appetite. If he stops taking the treats, reduce the audio level until he’s comfortable enough to eat again.
Dr. Houpt recommends adding flashing lights to the desensitization process, recalling one ingenious client who used strobe lights. But most people, she admits, aren’t that zealous. “For the lazier ones, I say play the CD whenever you feed the dog.”
The limitations of the CD storm sounds, of course, are that they are just one sliver of the experience. Dr. Dreschel recalls a storm-sensitive dog who sailed through the audio experience, “but during the first storm of the spring, he ate through a door.” That said, if the CD can desensitize the dog to at least the sound part of the thunderstorm experience, it might lower her overall anxiety – a good thing!
Create a Den Environment
Thunder-sensitive dogs benefit from having a sanctuary when storms roll through. “Provide them with a safe spot, in a basement, or in a crate,” Dr. Dreschel advises. Think about places that would offer a sense of sheltering enclosure, such as the back of a closet. Often, your dog will show you where she thinks she will be most comfortable. The feeling of being enclosed and buffered is important, so draping a crate with a heavy blanket can also help.
Not all hidey holes are equal, however. Dr. Dreschel notes that many dogs will seek out tiled rooms such as bathrooms, as well as showers, bathtubs, even that hard-to-reach space behind the toilet. “Some people have wondered if it has to do with being grounded and not statically charged,” she muses. Similarly, other experts report that dogs seem to do better in metal crates rather than plastic ones, perhaps also because of their conductivity.
Since the storm is associated with flashing lights, select a low-light or well-curtained environment, or even, ideally, a room without windows.
A word of caution: Severely phobic dogs often panic during a storm, trying to escape at any cost to themselves or their surroundings. In such cases, a crated dog can inflict great damage on himself. Conversely, whatever “den” environment you provide, situate it so the dog has access to it whenever he likes.
Use a Calming Jacket
Some owners of thunderstorm-sensitive dogs report amazing results from body-wrap products such as the Anxiety Wrap or Thundershirt, which apply gentle, steady, constant pressure, sort of like sartorial acupressure.
“The pressure wraps work for the same reason that swaddling a baby works,” Dr. Houpt explains; they provide a comforting sense of being gently held.
Dr. Houpt draws a parallel to the work of Temple Grandin, whose autism gave her insights into lower-stress livestock handling methods. “She felt that pressure calmed her, just as putting a steer in a pressure sling does.” As a young woman, Grandin designed a self-operated hydraulic “hugging machine” that would dispense therapeutic, stress-relieving pressure that triggered a sense of well-being.
Try Medication in Extreme Cases
Melatonin, an important hormone that creates an overall feeling of well-being, is high on the list of supplements to try for storm-sensitive dogs. Dr. Dreschel uses it on her own thunderstorm-phobic dog, a scruffy black mixed-breed she acquired 12 years ago, in the middle of her research.
But dogs with more severe storm reactions are perfect candidates for anti-anxiety drugs. While many owners are reluctant to medicate their anxious dogs, Dr. Dreschel notes that anti-anxiety pharmaceuticals can be incredibly useful for reducing irrational phobias.
Please note that tranquilizers sedate the dog but do not address her underlying anxiety; they can, in fact, significantly worsen the anxiety, and so are contraindicated for thunder-phobic dogs. In contrast, anti-anxiety medications can help prevent a panicked state in storm-phobic dogs.
“Dogs who are phobic can’t be distracted,” Dr. Dreschel says. “It’s like a person having a panic attack.” Drugs can lower the stress threshold, “so that maybe you can get the dog to think.” Until a dog is in that more stable state, she can’t process information well or learn to manage her stress response.
Dr. Houpt generally recommends a selective serotonin reuptake inhibitor (SSRI), such as a generic form of Prozac. These drugs work by blocking a receptor in the brain that absorbs serotonin, a neurotransmitter that is important in maintaining mood balance; this has the net effect of increasing the amount of available serotonin. A dog needs to be maintained on this drug long-term in order for it to be helpful; it’s not a “give as needed” solution.
In contrast are antidepressants such as Trazodone or alprazolam (the generic form of Xanax). These drugs may be given situationally, as needed, so the dog doesn’t have to be on meds all the time, only when a storm is coming. While many owners are hesitant to fill psychotropic prescriptions for their dogs, most are more accepting of the as-needed approach: “A storm is coming, give the dog her meds.”
This is important, because behavior experts suggest that getting the seriously phobic dog on medication sooner is better. “My pet peeve is that people wait too long” before giving the drugs, Dr. Houpt says. Similar to taking migraine medication before the head-splitting pain begins, “you don’t want to give it once the dog is terrified; if a thunderstorm is forecast, give medication now.”
Holistic Remedies for Fear of Thunder
In addition to a conventional medical approach, there are several holistic remedies that are well worth a try.
When those black clouds start gathering over a thunder-phobic dog, Dr. Blake’s first line of defense are flower essences. Distilled from the blooms of trees, shrubs, and flowering plants, these tinctures are considered very safe and can have an emotionally centering effect.
Dr. Blake uses Rescue Remedy, a combination of five essences that “are good for panic situations,” he says. “If you know there’s a storm coming, you can put four drops in the dog’s drinking water. Or you can put them in a spritz bottle with water, and when the dog starts to get antsy, mist him with it, or mist your hand and rub it on his face.”
Because flower essences are so gentle, “you can do this every few minutes, and it can reinforce the calming effect,” he says. “It takes the edge off.” Other flower essences to consider are mimulus (for dogs who are focused on the storm), aspen (for dogs who seem spooked in general) and rock rose (for panic).
Dr. Blake also has had some luck with gemmotherapy, which uses herbal extracts from the buds and emerging shoots of plants. “Lime is really good for calming and detoxing the nervous system,” he explains. “And walnut is a good one for transition.” As with flower essences, one to five drops of the tinctures can be added to the dog’s drinking water whenever needed.
More Holistic Options
Every major system of healing has an approach for dealing with acute panic and stress. In homeopathy, the remedy Dr. Blake reaches for is usually aconite, “which is very commonly used for panic attacks and fear.” Again, use the same technique for administering the white homeopathic pellets, which can be crushed and added to drinking water or a spray bottle. “You want to get it on their mucous membranes,” he says.
Essential oils are still another option. Lavender is traditionally used for calming, but Dr. Blake also likes an oil blend by Young Living called Peace & Calming that includes tangerine, orange, ylang ylang, patchouli, and blue tansy.
Dilute the oil in a carrier oil such as almond or olive oil (lavender on its own is so gentle it can be used “neat”), put a few drops on your fingers, and rub it into your dog’s ear flaps. “In Chinese medicine, the ears are the conduit to the kidneys, and kidneys are where the fear hangs out,” Dr. Blake explains. “It gets into the bloodstream quickly that way.”
From a holistic point of view, thunderstorm phobia is an indication of a deeper-seated imbalance. While these remedies can help mitigate the symptoms, Dr. Blake recommends working with a holistic or homeopathic vet to get to the source of the imbalance and correct it.
Calming Music
Dr. Blake has used classical music for a variety of behavioral issues in dogs, including separation anxiety and, of course, thunderstorm sensitivity. “Basically, you’re just trying to distract them a little bit,” he explains.
But all music isn’t equal when it comes to eliciting a therapeutic effect. The idea is to calm the dog, not excite her further. So when the Sturm und Drang begins, think Mozart, not Metallica.
For her part, Dr. Houpt recommends the Through a Dog’s Ear CDs and podcasts. The company’s classical-music selections are “psychoacoustically” designed to be easily assimilated by dogs, helping to enhance mood and active listening.
Be There for Your Dog
It sounds so very basic, but literally being there for your dog – if your schedule permits, and if the weather report is accurate enough to allow for advance planning – can go a long way toward helping her weather the emotional storm as much as the meteorological one. Your presence adds to your dog’s sense of security, which is what she needs most at this stressful time.
Dr. Dreschel reminds us that the theory that frightened dogs should not be comforted has been disproven. “When dogs are really phobic like that, you’re not reinforcing the behavior,” she says. “If they’re in that drooling, pacing mode, I’d go ahead and comfort them.” As for puppies or mildly affected dogs, who still are thinking and able to learn in the moment, “I would distract them,” she says. “And then make it positive.”
Denise Flaim of Revodana Ridgebacks in Long Island, New York, shares her home with three Ridgebacks, 11-year-old triplets, and a very patient husband.
There is a certain class of fearful dogs – those who are so afraid they don’t even trust the people who are trying to help them. These dogs can come from the streets, puppy mills, or someone’s backyard. Choosing to work with, foster, or live with a dog who is afraid of people is choosing to embark on a powerful journey. The ups and downs can be emotionally challenging, but the rewards of building a mutual trust where none existed can be an amazing experience.
Dogs may be fearful for a lot of reasons. Some dogs have a genetic predisposition for shyness or fearfulness. Some dogs are undersocialized, and to them the world can seem big and scary. Some dogs may have had traumatic experiences that led to a fearful response. For many dogs, we never really know the reason they are afraid, we just know they are.
Take Trill, for example. Trill is a mixed-breed dog who now shares her life with Evelyn Sharp, DVM, in Aptos, California. Trill was found roaming the streets with another dog. Any or all of the experiences of being lost, landing in the shelter, and getting separated from her companion could have led to a fearful response. She had recently had puppies, and the loss of those pups may have added to her stress and fear. But in Trill’s case, under-socialization and genetics were probably also in play.
At the shelter, one staff member saw some potential in Trill. A volunteer had also connected with her. Both saw some hope for Trill. They thought of Dr. Sharp because she had previously fostered dogs for the shelter, and they called to ask if the veterinarian might be up for taking in a foster dog who needed a little extra attention.
Sharp was not new to working with foster dogs who had a few issues. In fact, she’d just placed another fearful dog who looked remarkably like Trill.
When she first met Trill, Sharp saw that the dog was frightened. In fact, Trill wouldn’t come near Sharp, not even for a treat. But the dog didn’t show the slightest bit of aggressive behavior and seemed to calmly accept the presence of Dr. Sharp’s dog. Sharp concluded that a safe place and a little training would do wonders for this girl. After all, these things had worked well with her previous fosters. She agreed to take Trill home.
Trill turned out to be a greater challenge than Sharp expected – more afraid than she had originally appeared, and completely lacking in trust of humans. Dr. Sharp called me that first day and said, “I’m not sure what I’ve gotten myself into here. I think I’m going to need help.”
When Scared Dogs Escape
Building trust is complicated. Dr. Sharp did what had worked well with her previous fearful foster dogs. She brought Trill into a quiet room in her house to allow her to explore and acclimate. Sharp figured that she would show the dog where to eat and sleep, and let her explore her new surroundings. But Trill didn’t explore. That first day she hid in a corner, her eyes begging Sharp to stay away. “That was hard,” Dr. Sharp recalls. She wanted Trill to know she was safe, wanted the dog to understand that she was an ally. “But we couldn’t get there because she didn’t trust me.”
The second day, Dr. Sharp thought she saw a little improvement. Trill looked as if she was starting to check out the house. It turned out, though, that Trill was looking for a way to escape, and escape she did. She somehow opened the rear sliding door and ran into the woods surrounding Sharp’s house.
“I was so scared for her,” Dr. Sharp remembers. “I didn’t know how we would catch her. I thought she was gone for good.” Hoping for the dog’s return, and in hopes of luring Trill into a confined space where the dog might be caught, Sharp loaded her car with food and water, a familiar blanket, and clothing belonging to the person that Trill had connected with at the shelter. She placed the food inside a crate that sat on the back seat of the car. As luck would have it, Trill entered the car in the middle of the night, and went into the crate – probably for the food. But magically, the door closed behind her, and she was safely trapped.
Steps to Building a Dog’s Trust
After this turn of events, Dr. Sharp knew that building the dog’s trust and sense of safety were the most important things she could do for the young dog.
But it was turning out to be difficult. The house wasn’t big enough for Trill to find a safe spot, where she could relax without appearing to feel crowded. And she took no comfort from the resident dog and cat.
How do you build safety and trust with an animal who is this frightened? The following steps may help:
– First, let the dog be. Sometimes, scared dogs benefit more from being left alone. I offered this advice to Sharp at the time, but the idea was difficult to accept. “The concept was appalling to me,” she recalls; she wanted to keep trying to engage Trill.
But she could also see that what she was doing was not working, so she gave it a try. “When I finally stopped trying to get her to enjoy petting and touching, Trill became more interested in me.” Giving her more space and less attention worked!
– Develop a dependable structure. Sharp knew that a predictable routine had helped her animals and her previous fosters. When a dog knows when and where she will eat and sleep, when it will be time to go out, what others in the house will be doing and when, she may start to calm down. With consistency comes predictability, which can allow the stress hormones surging through a frightened dog’s body to subside. Repeated actions, done in a kind, calm, and non-confrontational manner, can also help build trust.
– Have patience. When you live with a scared dog, you will likely want her to feel safer, to change, to relax, and be happy. And in time, most dogs will, but you can’t rush the process. The change will only happen on the dog’s timetable, not yours. Be patient and wait for her to be ready to take a chance.
You will know your dog is starting to feel safer when she shows interest in you or your activities, for example, if she pokes her head out of her safe spot when you are preparing her dinner. When she is curious, looks at you with soft eyes, or starts to explore – these are signs that your previously frightened dog may be ready for a little engagement.
Making a Connection
Many (but not all) dogs enjoy being touched, and find comfort in having their chests rubbed, or receiving a soft massage behind their ears. The pleasure they receive from the physical contact can inspire the beginnings of a relationship. But Sharp found it difficult to get near Trill, much less touch her. She spooked with movement, so playing with toys wasn’t going to work. Trill would even skitter away when Sharp reached toward her with a treat.
Dr. Sharp got creative, and started to try to communicate with Trill through clicker training. “Training a dog without touching her was new to me,” Sharp says, but she started trying to “shape” Trill’s behavior.
One of the first clicker-trained behaviors she worked on was clipping a leash onto the dog’s collar. Up until that point, Trill would do anything possible to stay just out of reach. At first, Sharp just put some leashes around the house, and began clicking a clicker, and then tossing a treat to the dog, every time Trill looked at or went near one of the leashes.
Soon, Trill realized she received more treats the closer she went to one of the leashes, and she began purposely walking toward and then touching leashes with her nose.
Sharp was then able to then able to pick up a leash and ask Trill to touch (or “target”) it. Trill was learning to play the training game! With a few more days of practice and a little more shaping, Sharp was able to clip the leash on and off of Trill’s collar.
Treats didn’t work as effectively when Sharp began trying to train Trill to sit. At first, when Trill would sit and Sharp would step or even just lean toward the dog to reward her with a treat, Trill would move away. Sharp realized that she needed to reduce the pressure that Trill felt from being too close physically – and that Trill felt more comfortable with more distance between them. So she used that space as a reinforcer; she rewarded the dog for sitting by stepping away from Trill, and Trill would remain sitting.
Target Training
It quickly became clear to Sharp that training was going to be an effective way to connect with and build trust with the dog. The most powerful and transformative behavior that Trill learned – a behavior that led to learning many other behaviors – was hand targeting. “It was fabulous!” Sharp says. She used this simple foundation behavior to guide Trill, inviting the dog to move forward, turn, and come nearer, just with a simple hand touch. Later, she used the technique to encourage Trill to interact with other people.
Over the course of the first year, Sharp taught Trill 30 or more tricks and other behaviors, as well as the names of dozens of actions. Sharp can say the word “eye” and Trill looks up to have her eye cleaned; when she says “chin,” Trill will plop her chin in Sharp’s hand. If she says “pet,” Trill will walk over to get petted. Sharp also taught Trill to scratch her nails on a sandpaper board to keep them from getting too long while they work to improve her comfort with nail clipping.
“Clicker training has been a really big deal for us,” Sharp says. Trill learned that the clicking sound indicated she was doing something right, and that a reward for doing it was on its way.
What about when she wasn’t doing the desired behavior? Well, then nothing happened! The fact that positive results always came when she figured out and did the “right” thing, and that nothing negative happened when she didn’t know or didn’t do the “right” thing, gave her the confidence to keep trying to figure out what the “right” thing was. “With clicker training, we learned to talk to each other, and learned to play,” Sharp says. She credits clicker training with helping Trill lighten up, noting the dog’s enthusiasm and happy demeanor whenever Sharp gives her a cue or starts a training game.
Each and every fearful dog and handler is different. While clicker training worked like magic for Trill and Dr. Sharp, having a larger repertoire of techniques can be helpful. With a different dog or handler, one of these other techniques might provide the critical key to connection.
Classical conditioning is when a dog learns to associate one thing with another; it can be a very powerful tool for fearful dogs. Classical conditioning can occur through natural associations, for example, when you grab your hiking shoes and your dog gets super excited; in this case, she’s associated going for an especially fun or long walk with your hiking shoes.
We can also use classical conditioning to our advantage by design. It can be used to create a positive association for a dog between certain things, as well as to counter-condition something that may cause a fearful response.
For example, I used classical conditioning with my fearful dog to help her stop reflexively exhibiting a fear-based response every time she felt a slight tug on the leash. I started the process by giving her bits of roast beef every time there was an unexpected or gentle, planned tug on the leash. The leash tug would predict roast beef. Very quickly, she went from exhibiting a startled or panicked flight every time the leash tugged her collar, to happily looking back at me for the roast beef.
You can use classical counter-conditioning to help a fearful dog learn to accept you. If food falls from your hands each time you walk by your dog, he will undoubtedly begin to look forward to you walking by. If this is done repeatedly, the dog’s emotional response can begin to shift from fearful to feeling good. One caveat, though: You need to manage the interaction in such a way as to keep the dog below his fear “threshold” – the point at which he’s too frightened to think, much less make a calm, conscious choice of how to behave.
A dog will go “over threshold” when he is too close, exposed for too long, or at too high of an intensity to something that scares him. It’s obvious when some dogs are close to or over threshold; they may panic and try to bolt, or bark or growl in defensive fear. But with some frightened dogs, it may be more difficult to see; some may get abnormally calm and still or display only subtle signs of fear. (For more information on thresholds, see “Across a Threshold,” WDJ April 2013.)
Sandi Kohn
Social facilitation is another tool that may help a frightened dog become less afraid. If you have another dog (and especially if the dogs get along well), your resident dog may be able to show your fearful dog that you are in fact a safe person. When you all walk together, hang out together, and spend time training or playing together, your fearful dog may start to loosen up and see you as part of the group.
Exploring the world together can be very bonding and can build trust and connections. Taking walks together can help you bond. But even if your dog is a little too frightened to walk on a leash, you can explore together at home or in your garden.
For example, when my dog Chance was still new to our home, I would pay attention to the things she was interested in. When Chance would check out a bug on the ground, I would wait until she moved away, and then I would go and check out the bug, too.
Then I would focus on something else, say, a flower in the garden. She would follow me and check out the flower, too!
As this mutual exploration developed, Chance would invite me to follow her and see what she was doing. She also began to follow me to see what I was doing. We bonded through this mutual exploration.
SK Photography
Play can be another effective way to connect with a fearful dog. Some dogs are so afraid that they show no interest in playing. But I have found one type of toy – any sort of stuffed animal or ball on a string or rope – often works very well in engaging a fearful dog in play. With a rope, you can strategically move the toy, to try to entice the dog into chasing it or pouncing on it, without the dog having to be too close to you.
Let the dog “win” frequently, by allowing him to catch the toy or even getting to keep the toy. Getting your dog to have fun with you can help cement a budding trust.
Working With Your Dog’s Outside Triggers
Each of the techniques mentioned above can also help when you have to deal with outside triggers, that is, things in the world that you can’t control, such as a loud truck or motorcycle roaring by. Training and training games can help a dog who is unsure in a new environment acclimate quicker. Classical conditioning can help create new, positive associations as well as help shift your dog’s fearful response to people, other animals, and things to a happier, more confident response. Calm, worldly dogs can help less-socialized dogs learn about unfamiliar environments, and exploration and play can tap into a dog’s sense of fun and adventure, no matter what is going on around them.
Careful introductions to new places, people, and other animals can also help set up your dog for success. Dr. Sharp, for example, works to find Trill’s optimum levels of exposure to new and different things; she watches the dog’s reactions and tries to protect Trill from becoming overwhelmed. “I really pay attention to where Trill is and don’t expect her to be further along,” Sharp says. “I intervene if I know something is too much for her, but I try to walk the line between protecting her and giving her room to explore.”
Positive experiences cause exponential growth, Dr. Shar says. “The neat thing is, each good experience grows on itself.” Each dog Trill meets and has a good experience with opens the door wider for her to meet the next dog. Each person she meets and engages with makes her braver the next time.
Moving Forward from Fear
As you probably already guessed, Trill is no longer a foster; Sharp intends for Trill to share her home for the rest of Trill’s life. They are in their second year of living together, and while it’s much better all the time, a challenge of living with an under-socialized or fearful dog can pop up at any time. Sharp says they still have a long way to go before she’d consider Trill to be a truly confident, trusting dog.
“Trill was more than just fearful about humans when I met her,” Sharp says. “The world was just too much for her. I don’t remember ever working with a dog who was that scared, even in a veterinary setting.”
Today, Sharp says, Trill mostly trusts her, though on occasion the dog will still get that “Should I trust her?” look in her eye. While Trill is better acclimated to the human world, and can go to the beach, travel with Dr. Sharp, and interact comfortably with most people and dogs, she still has a few significant hurdles to overcome. For example, Trill has yet to accept restraint and is resistant to some types of handling. Sharp says they are working on this, but it will likely take a long time before Trill is as comfortable with intimate handling and restraint.
The support of other knowledgable, positive dog people was critical to her success with Trill, Sharp says. She credits working closely with a trainer, as well as “the dog club meetings twice a week, all of the people at those meetings who knew to leave Trill alone and let her be, and the well-trained dogs who gave her room to get used to them slowly. It was all so important.”
But as challenging as it has been, Dr. Sharp says that she would do it again. “Trill is a good kid! She loves to learn and I love to train her. Trill forced me to be creative. She made me learn to train without touching. And now watching her go to the beach and seeing her run and run – it is all really fun.”
Mardi Richmond is a writer and trainer living in Santa Cruz, CA, with her wife and her formerly fearful feral dog, Chance. She is the owner of Good Dog Santa Cruz, where she works with fearful dogs and puppies and utilizes early socialization to prevent fear-based behaviors. Mardi thanks Dr. Evelyn Sharp and Trill for sharing their story.
To provide the best experiences, we use technologies like cookies to store and/or access device information. Consenting to these technologies will allow us to process data such as browsing behavior or unique IDs on this site. Not consenting or withdrawing consent, may adversely affect certain features and functions.
Functional
Always active
The technical storage or access is strictly necessary for the legitimate purpose of enabling the use of a specific service explicitly requested by the subscriber or user, or for the sole purpose of carrying out the transmission of a communication over an electronic communications network.
Preferences
The technical storage or access is necessary for the legitimate purpose of storing preferences that are not requested by the subscriber or user.
Statistics
The technical storage or access that is used exclusively for statistical purposes.The technical storage or access that is used exclusively for anonymous statistical purposes. Without a subpoena, voluntary compliance on the part of your Internet Service Provider, or additional records from a third party, information stored or retrieved for this purpose alone cannot usually be used to identify you.
Marketing
The technical storage or access is required to create user profiles to send advertising, or to track the user on a website or across several websites for similar marketing purposes.
This website uses cookies and other tracking technologies to offer you a better experience, personalize content and ads, and analyze our site traffic. Before proceeding, you agree to our Terms and that you’ve read our Privacy Policy. Update Settings
Functional
Always active
The technical storage or access is strictly necessary for the legitimate purpose of enabling the use of a specific service explicitly requested by the subscriber or user, or for the sole purpose of carrying out the transmission of a communication over an electronic communications network.
Preferences
The technical storage or access is necessary for the legitimate purpose of storing preferences that are not requested by the subscriber or user.
Statistics
The technical storage or access that is used exclusively for statistical purposes.The technical storage or access that is used exclusively for anonymous statistical purposes. Without a subpoena, voluntary compliance on the part of your Internet Service Provider, or additional records from a third party, information stored or retrieved for this purpose alone cannot usually be used to identify you.
Marketing
The technical storage or access is required to create user profiles to send advertising, or to track the user on a website or across several websites for similar marketing purposes.