By Nancy Kerns
My husband is a diehard catch-and-release fisherman, and my Border Collie is a tennis ball maniac, so when I first saw Reel Dog, a toy that combines the concepts of fetch, tug, and fishing, I thought we had a real winner on our hands. I snapped one up and brought it home to try out.
Examining its packaging, I noted that its maker, Happy Dog Toys, of Phoenix, Arizona (a division of Farnam Pet Products), has created a small line of innovative interactive dog toys. I tracked down two more products from the line – Bubble Buddy and Tug Master– and tested all three.
I have some good news to report and some bad news. First, the good news: Happy Dog Toys is really on to something. Their products are highly appealing to playful people, so much so that they can’t wait to go try them out with their dogs. The concepts behind the toys are novel, creative variations on old favorite human/canine play themes: fetch, jump, tug. The company’s marketing and distribution network seems very advanced; the toys can be found in most of the “big box” pet supply chains and in many small pet supply stores, too.
Finally, Happy Dog Toys goes to the extra effort to conform to the ASTM testing standards of the toy industry, ensuring that the toys are as safe for your dog as they are for your children.
The bad news? None of the three interactive toys I tested performed quite as well as their packaging suggested. Each had a fatal flaw (or two) that kept me and my test dogs from fully reaping the riches of fun promised by the product’s design.
It’s my sincere hope that Happy Dog Toys continues to develop products like these, but my fear is that the toys’ shortcomings will discourage repeat purchases. Will the line of toys survive long enough to improve? I’ll have to wait and see. In the meantime, I have a lot of (I hope) constructive criticism to offer!
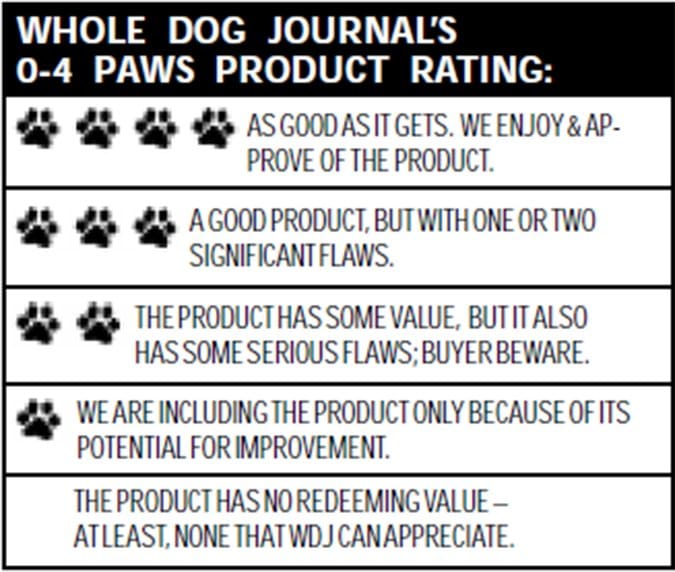
While I don’t often publish product reviews that don’t include at least one item that garners WDJ’s top (four-paw) rating (see sidebar, below), I’m doing that very thing this month. The Happy Dog Toys products are so engaging and so promising . . . and maybe other dog owners will find them less problematic than I did. Fortunately, the toys are not prohibitively expensive, so buy one anyway if one of them seems pretty fun to you, despite my criticism.
Reel Dog
The first Happy Dog Toy I saw in a pet supply store, Reel Dog is built along the lines of a child’s play fishing rod, but with a tennis ball (rather than some sort of hook or lure) at the end of a 30-foot line. The “fisherman” pulls the crank out a notch to release the line, and then casts the ball in the direction they want the dog to go. Ostensibly, the dog grabs the ball and the “fight” is on, with the fisherman providing resistance by pulling on the rod and cranking in the line, and the dog enjoying a novel game of tug.
The biggest problem I had with this toy is that it took only two games of tug for my canine “fish” to realize that they could win much faster if they grabbed the line, rather than the ball. Each of my first two test dogs (the ball-crazy Border Collie and a tug-crazy Lab) snipped through the line with their teeth within minutes. The line appears to be a cotton/poly cord, which proved very strong when reeling in even a large dog, but is not at all resistant to sharp teeth.
Also, while it’s nice that the toy contains 30-plus feet of cord, so a dog can enjoy a good dash on his way to fetch the ball, the reel that brings in the line is relatively small, so it takes a long time to land that fish! In addition, I found it very awkward to turn the crank that reels in the line with my left hand (since the crank is positioned on the left side of the toy handle); I thought it was due to my own inept technique. But my husband had barely touched the Reel Dog when he blurted out, “The darn reel handle is on the wrong side!” It wasn’t just me! It’s awkward for all right-handed fishermen.
On the other hand, perhaps the designers at Happy Dog Toys thought it would be easier for the average right-handed person to “play” the dog with his strong hand, pulling the dog toward him with the right hand and using the left hand to quickly wind in any line that is gained. I don’t know if this was their thinking, but after a little practice, I got the hang of it.
Happy Dog Toys also makes a huge number of simpler tennis ball-based toys, such as Tennis Bones (two balls affixed to either end of a plastic “bone”) and Tennis Buddies (tennis balls that look like little cartoony animals, with little arms and legs and faces attached). All these toys are constructed with specially made pressureless and double-thick natural rubber balls, which makes them virtually impossible to pop and chew.
Tug Master
If you’re like me, you won’t be able to get this phrase out of your head, once you’ve heard the recorded voice inside this toy repeat its eponymous refrain, spoken in a deep superhero voice: “Tug Master!”
Again, this novel toy has some engaging features. It has two handles: a hard plastic handle for a person to pull in, and a softer plastic one for a dog to grip with his teeth. A spring or similar mechanism provides resistance, so the handles can be (with great effort) pulled in opposite directions to effect greater or lesser scores on the “Tug-O-Meter,” a gauge that records the strongest tugs. (This toy, I should note, is intended for big, strong dogs.) As the handles are pulled, an electronic voice barks, exhorts the contestants to “Get tough!” or suggests “You’re the dog; you’re the big dog!”
Unfortunately, I couldn’t convince even Paws, my rowdiest Labrador acquaintance who is a huge fan of tug o’ war, to take hold of the end of the toy intended for him. He didn’t appear to be either put off or encouraged by the recorded noises; he just didn’t appear to be comfortable gripping the semi-hard plastic handle.
As soon as I tied a rope toy around his end of the Tug Master, however, Paws was off to the races. He pulled and pulled with delight . . . but he does that with any old rope. I tried to get several other dogs to play Tug Master with me, but couldn’t find a single one that would grip the hard handle. Maybe your “tug master” would’t mind mouthing the toy. You won’t know unless you try it.
Even though I’m not getting much tug-time, I like to keep the toy around, mostly so I can press the button that makes it chortle, “You’re the dog!”
Bubble Buddy
Even after the first two disappointments, I was certain that I would be pleased with Bubble Buddy. Many dogs enjoy leaping about and chasing bubbles, and, incredibly, Happy Dog Toys has developed edible bubble solutions that smell like savory bacon, peanut butter, or barbecued chicken. Wowee!
Well, the odoriferous bubbles are impressive, but the plastic “gun” that is supposed to produce them is not. Only a tiny reservoir is provided to contain the bubble solution, and within just a minute of pulling the trigger more or less constantly to manufacture enough bubbles for the dog to chase, I had to stop and refill it. Plus, the reservoir is not only too small, but also difficult to pour the bubble solution into without spilling. And, once it’s full, it’s hard to walk with the gun without tipping the solution out of the reservoir.
My advice is to buy the Bubble Buddy Replacement Bubbles (sold separately, $3 for two four-ounce bottles) and use an old-fashioned bubble wand – the little plastic circle you blow through. That is, at least until Happy Dog Toys redesigns the Bubble Buddy with a big, deep, spill-proof reservoir.
Happy Dog Toys is on the right track; if they keep improving the design of these innovative toys, and we’ll happily buy ‘em all, and recommend them to all our playful doggie friends, too.
Also With This Article
Click here to view “Super Durable Dog Balls for Fetching and Beyond”