We get it! Tiny dogs are adorable! But the term “teacup dog” is usually a red flag that indicates irresponsible breeding practices. Thankfully, you can get a dog that stays small without compromising on health or longevity.
People want small dogs for many reasons. In cities, tiny dogs are perfect for apartment living (your landlord may even have weight limits for dogs) and carrying on public transit. If you fly a lot, a small dog can ride in a bag under the seat. Some hikers prefer small dogs because they are easy to carry if they get tired or hurt. And of course, there is the age-old reason of just wanting a warm little dog to curl up in your lap and cuddle.
Small Dog Breeds
Most dogs who will stay small even as adults come from the toy breeds. The “toy group” is a grouping of breeds that were developed to be small, friendly companions. Many terriers are also petite, but these dogs tend to have a lot more attitude and energy.
Exact weight ranges can vary by breed or mix, sex, and the individual, but breeds and mixes of breeds in the toy group all weigh under 20 pounds, and many weigh far less. We get predictability in size thanks to the efforts of breeders over the centuries who came together to develop and follow the breed standard that acts as a blueprint for each breed.
You can occasionally get outliers who grow larger than their brethren, but this is uncommon when getting a puppy from a breeder who adheres to the breed standard. Mixed breed dogs will of course be more varied than purebred dogs, but if both parents are small, their puppies should be as well.
Toy or Teacup?
supplemental photo Credit: Cynoclub | Getty Images
All teacup dogs are toys, but not all toy dogs are teacups.
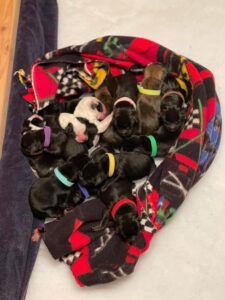
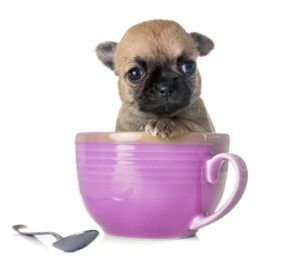
“Teacup dog” is a marketing term that refers to a dog that is unusually small, sometimes so small that it could maybe fit into a teacup. Often this means the dog will weigh less than 5 pounds or so as an adult, but the term has been applied to members of larger who breeds who are just smaller than most of their relatives.
There are no teacup breeds, just individual dogs within breeds that can be considered teacup varieties. For example, a teacup Chihuahua is just an extra-small Chihuahua, not a separate breed.
Some toy breeds that are commonly caught up in the teacup fad include the Chihuahua, Maltese, Pomeranian, Poodle, and Yorkshire Terrier.
Why Teacup Dogs Are Bad
Teacup dogs aren’t inherently bad. The problem is that whenever humans latch onto a specific marketing term, we tend to hyper fixate. All it takes is one celebrity posting a photo of their teeny tiny dog, and suddenly everyone wants one. And, of course, some people jump in to try to make a quick buck breeding these tiny canines.
Breeding happy, healthy dogs is much more complex than just putting two dogs in a room together. Many behavior traits, characteristics, and health factors are controlled by recessive genes that are not obvious to the naked eye. Dogs who appear perfectly healthy could be carrying genes for serious health problems that doom their puppies. It is our responsibility when considering breeding dogs to collect as much information as we can about each individual dog and their relatives to get a more complete picture of the genes that dog might carry and the risks those genes might bring.
Many toy breeds are already predisposed to certain health problems, and it is very easy to make those issues worse if a breeder is only making breeding decisions based on size.
Problems common with toy breed dogs include:
- Luxating patella
- Collapsing trachea
- Portosystemic shunts
- Open fontanelle (literally a hole in the skull that leaves the brain unprotected)
- Legg Calve Perthes Disease
- Mitral valve disease
- Pancreatitis
- Periodontal disease
- Hypoglycemia
Every person breeding toy breed dogs, including mixes, should be aware of these issues and know of the prevalence in their lines. Some of these problems can even be tested for. In Pomeranians, it is recommended that all breeding prospects receive evaluations from the Orthopedic Foundation for Animals (OFA) for their hearts, patellae, eyes, thyroid levels, hips, and Legg-Calve-Perthes disease.
You can find out what health testing is recommended for your breed on the OFA website thanks to the Canine Health Information Center. If considering a mixed-breed puppy, look up all the breeds that are involved with the litter. Tests that are recommended for multiple breeds are the most important for these mixed-breed litters.
People breeding teacup dogs often do little to no health testing. Doing this generation after generation can quickly increase the frequency of health problems within a line or gene pool. These disorders can cause pain and distress for your dog, are costly to treat, and can even be fatal.
Temperament of Tiny Dogs
Temperament and socialization can also suffer when a person is fixated on producing the tiniest puppies possible. If one or both parents are shy or aggressive, the puppies are likely to share those flaws. And while a ferocious Pomeranian may be cute, it isn’t much fun to live with and can make veterinary care challenging.
Puppies need to be safely exposed to a variety of surfaces, smells, people, animals, and experiences while they are young and impressionable. Most toy breed dogs do not go to their new homes until at least 12 weeks of age, so it is critical that the breeder has a plan to provide their puppies with safe experiences to prepare them for the rest of their lives.
If you are considering a “teacup” puppy, ask the breeder for a detailed description of their socialization protocol. Breeders passionate about the wellbeing of their dogs will have an answer, while those who are just taking advantage of the fad likely will not.
Tiny Dog = Big Care
Thanks to their diminutive size, teacup dogs are extremely fragile and require extra day-to-day care compared to larger dogs.
Their tiny bones are extremely fragile, and teacup dogs can experience fractures from simple activities like jumping off a couch, being dropped by a person, or getting caught in a door. They are also vulnerable to being stepped on or sat on by humans or other pets.
Toy and teacup dogs alike are prone to hypoglycemia, or low blood sugar. Puppies require at least three meals a day, often four to five to ensure adequate blood sugar levels. Even in adulthood a teacup dog may require small frequent meals to stay healthy.
Tiny dogs are also vulnerable to hypothermia because of their small size and increased surface area compared to body mass. Puppies and adults alike require access to warm blankets and coats and may need to use a pee pad rather than walking outside in the winter.
How Long Do Teacup Dogs Live?
Lifespan varies by breed, but toy breed dogs routinely live into their mid or upper teens. Unfortunately, the health problems and fragility of teacup dogs can shorten this time by several years.
There are no guarantees, but purchasing a puppy from a knowledgeable breeder who does health testing and can tell you the health and longevity of a litter’s ancestors gives you the best chance at a healthy puppy.