Dogs lick each other as a way of socialization and submission, but physical problems, fear, or anxiety may also need to be considered, especially if the licking behavior increases. Credit: Rachel Haines – Eye Em | Getty Images
Licking is also an important method of communication. In Psychology Today, Stanley Coren PhD., DSc, FRSC, said: “For dogs, licking can communicate information about relative status, intentions, and state of mind, but it is most frequently a peacemaking or pacifying behavior.”
Why Do Dogs Lick Faces?
We know that female dogs lick their puppies at birth to stimulate elimination and to clean them.
But why do dogs, often unrelated, lick each other’s ears, mouths, and faces? Research holds many viable theories. Among the most common beliefs is that it’s a way of appeasement or calming. German animal behaviorist Angelika Firnkes’s 2016 study published in the Journal of Veterinary Behavior found that licking their own lips may be a way of canine appeasement when greeting another dog or a person.
There may be a physical reason, too. A 2012 study published in the Journal of Veterinary Behavior found a relationship between dogs who obsessively licked surfaces and internal gastrointestinal disorders.
Dog Licking Behavior
Puppies lick their dams around the mouth to stimulate vomiting up partly digested food, begging for food, and for submissiveness. The overall body language of a submissive dog is a lowered body, ears back, coming up to the mouth. Adult dogs who do a lot of this are often low on the totem pole in the household.
The University of Bristol Veterinary School cautions that an increase in licking activity may be a message that the dog is experiencing anxiety or fear. Look closely at what’s happening when the licking begins to see if you can determine why the dog is licking. If you suspect anxiety or fear, your veterinarian can prescribe medication to help.
Why Does My Dog Lick Other Dogs’ Ears?
As we’ve noted, licking may be a social, or pack, behavior. From the veterinary standpoint, physical causes also may a reason. Some licking may be stimulated by blood due to an injury or the smell of an infection. Oral infections could also attract licking due to the odor, so it may not be just ears.
Of course, licking around the mouth could also be opportunistic if the dog being licked has food residue around his muzzle.
Some veterinarians think dogs simply like the taste of ear wax or discharge. Ear wax is believed to be a little salty, and it includes dead skin cells, dirt, and other debris. If the dog with the wax-laden ears seems at all painful, that dog should be seen by your veterinarian to rule out illness and so you can learn more about cleaning your dog’s ears.
If your dog is licking other dogs as a way of socializing, and you don’t see any indication of fear, it’s OK. If the dog who is being licked doesn’t seem well, your licking dog may have just given you a heads up to a brewing infection or injury.
I have heard countless methods for tick removal: Paint a tick with nail polish and it will detatch from the dog to avoid being suffocated. Touch a just-extinguished match to the tick’s body so it pulls itself out. Pull while turning the tick clockwise. No – pull while turning counter-clockwise! All of these tactics are ineffective; don’t do any of them!
It’s actually quite simple: Just try to get a good grip on the tick, as close to the dog’s skin as possible, and pull it straight out. Notice that I said simple, not easy. Ticks are tiny. Your dog may be squirming. If his coat is thick, it might be hard to isolate the tick in your grip. You may end up pulling, or being impeded by, his hair, too.
And if your fingers are thick, you run the risk of squishing the tick between them as you pull, which can result in squeezing the contents of the tick’s mouth and guts into your dog! Ack! That actually increases the chance of infecting your dog with any disease-carrying spirochetes that the tick might be hosting!
Tweezers can be used more effectively than your fingers, but they, too, pose the risk of squeezing the tick and squirting that potentially pathogenic-filled tick spit into your dog’s body. Instead, use a tick pulling tool with a V-shaped slot. Slide the tool between your dog’s skin and the tick’s body, wedging the tick’s body into the tightest part of the tool’s crevice. When you feel that the tick is securely lodged in the slot, pull upward on the tool and – pop! The tick comes right out.
WHAT TO DO AFTER YOU REMOVE IT
After you remove the tick, clean the bite area with soap and water, hydrogen peroxide, or alcohol. Cleaning the wound – regardless of how small – will reduce the risk of secondary bacterial infection.
Schedule bloodwork to check for any tickborne diseases. It takes several weeks for most tick-borne diseases to be detectable on blood tests, so there is no need to rush your dog to the vet unless he starts to show clinical signs of illness. The most common include fever, lethargy, and lameness.
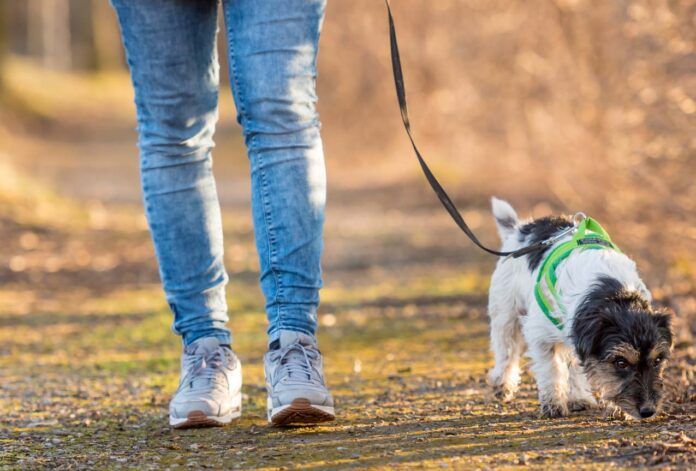
You want your dog to be able to sniff and explore on your walk – after all, that’s his fun – but you need to be able to call him off if he grabs something he shouldn’t. Credit: K. Thalhofer | Getty Images
If your puppy is trying to eat everything he sees on walks, or your dog is scavenging on walks, it’s more than annoying. It’s downright dangerous. Dogs can ingest something toxic or swallow things that could cause an intestinal blockage in the blink of an eye. Constantly nagging your dog or yanking on him and pulling him away will not stop him from eating dumb stuff. Yelling at him often results in him swallowing his prize as quickly as possible.
The best way to stop your dog from eating everything he sees is to teach him the “leave it” cue. This will take some time and patience, but it’s totally worth it. While you’re training, however, your best bet for a dog who insists on constantly eating on walks is a muzzle, so we’re going to discuss that first.
Using a Muzzle
A muzzle is the safest option for dogs who eat everything in sight; it’s the most reliable way to keep your dog or puppy safe. It is extremely important, however, that it is the right type of muzzle.
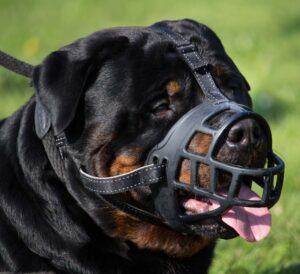
The only muzzles that are safe to use while out on walks are basket muzzles. Basket muzzles are loose-fitting with large openings allowing for panting, drinking, accepting treats, and the safe expulsion of vomit should that occur. See “Dog Muzzles: When to Use Them and How,” for information on muzzle fitting and introducing and accustoming your dog to wearing one.
Teach Your Dog to “Leave It”
A basket muzzle allows your dog to sniff, drink water, eat a treat, and breathe comfortably. It just stops him from grabbing something he shouldn’t. Credit: Noella Raymond | Getty Images
With your dog protected by a muzzle on walks in the interim, start your “leave it” training sessions in the house. There are too many distractions outside of the home. Your dog or puppy needs to be able to focus while learning a new behavior and cue.
Start simply by having a yummy treat in the palm of your left hand. When your dog tries to take it, don’t say anything. Simply close your palm so he can’t get it. Once he stops nudging, pawing, licking, or anything else to get at the treat, quietly open your palm. If he comes back at it, close your palm. Keep doing this until your dog doesn’t go after the treat when your palm is closed. Mark this with the click of a clicker or a verbal marker, such as the word “Yes!” and feed him a treat from your right hand. Repeat this until you’re sure he understands that the way to get a treat is to refrain from trying to take it from you!
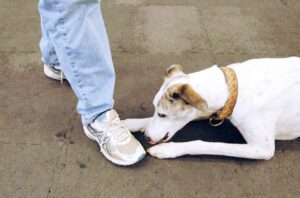
Next, put the treat on the floor. If the dog goes for it, quickly cover it with your foot. Repeat the same process you did for the palm treat until you’re sure your dog understands it.
Add the Words “Leave It”
Next, you will say, “Leave it!” and drop the treat on the floor. It’s important at this stage to do everything you can to make sure the dog doesn’t accidentally get to the treat. If he tries, be ready to stomp on it. Once he “leaves it” (backs away and/or looks at you), mark and reward him with something else from your pocket or treat pouch. Make this reward something else yummier and juicier than what he agreed to “leave.” Repeat this process until you’re sure your dog is rock-solid with this new behavior on cue. (For a more detailed protocol, see “How to Teach a Dog to ‘Leave It’ and ‘Drop It.’”)
Walking Without Eating Stuff
Now you can graduate to trying it out on your walks. Bring some treats you’ve used both for him to “leave” and for his rewards. Practice outside the same as you did in the house to cement his understanding.
Finally, go ahead and try it out on real-life encountered items, like that discarded sandwich remnant or rotting pigeon carcass. Be sure to congratulate him heartily if he is successful with “leaving” these high-value items! Have a big party and give him a jackpot of yummy special treats for being such a good, smart dog!
If you think your dog’s cough indicates heart disease, get a veterinary examination. Early intervention nets the best prognosis. Credit: Subman | Getty Images
The most common type of heart failure in dogs is congestive heart failure, which is left-sided heart failure. The left side of the heart receives the freshly oxygenated blood and sends it back out to the body. If the left ventricle can’t pump enough blood, fluid can begin to back up in the lungs and other parts of the dog’s body. This may produce the signs of heart disease in dogs that you can recognize.
How do you know if your dog has heart disease? If you see these general signs – weakness, lethargy, lack of appetite, difficulty breathing, everyday walks take longer over the same route – something is wrong with your dog.
Symptoms of Congestive Heart Failure (CHF) in Dogs
A heart disease cough is a real sign of left ventricle heart disease, but a cough alone is not enough to indicate heart failure in your dog. A heart disease cough can be loud and honking like a cough due to tracheobronchitis (kennel cough) because, as the heart fails, it begins to enlarge due to blood backing up. When that happens, the heart muscle must work harder and sometimes starts pushing up on the trachea, inducing a tracheal cough. But that cough might be just kennel cough, too. A thorough physical examination and chest x-rays can usually solve this conundrum.
Signs of left-sided heart failure in dogs include:
Changes in the dog’s breathing
Heart disease cough
Exercise intolerance
Restlessness
Discomfort lying down
Lethargy
Weakness
Lack of appetite
Collapse
Noticeable Signs of Heart Failure
If a dog is battling heart failure, you may notice that his respiratory rate elevates as his body tries to get more oxygen. Normal respiratory rate is less than 30 breaths per minute (bpm). Monitoring your dog’s sleeping respiratory rate is a good way to catch CHF in its earliest stage. If it rises above 35 bpm and stays elevated, have your dog examined by a veterinarian.
This is especially important for dogs with heart murmurs, as murmurs significantly increase the risk of developing CHF in dogs. Breathing will eventually become labored, which looks like your dog is pulling hard to get air in and to get air out. It typically involves noticeable pushing from the abdomen.
You also may notice a change in how long it takes to complete your walks. A route that used to take 30 minutes now takes 45 minutes. This may be an early indicator of exercise intolerance. Sometimes it’s more obvious. Your dog just quits on your walk; sits or lies down, usually panting/breathing hard, and refuses or is unable to continue.
Right-Sided Heart Failure in Dogs
The right side of the heart receives blood coming back from the rest of the body and sends it to the lungs. When the right side begins to fail, fluid backs up in the body. You may notice:
A big, swollen, fluid-filled belly (abdominal effusion)
Increased respiratory effort because of the swollen belly
Fluid accumulating around (not in) the lungs (pleural effusion)
Swelling of the lower limbs that shows your fingerprint when you press on it (pitting edema)
Restlessness
Discomfort lying down
Weakness
Lethargy
Lack of appetite
Catch Heart Failure in Dogs Early
If you notice any subtle changes along these lines, the sooner you have your dog examined and begin a heart disease medical treatment plan, the longer and more comfortably your dog will live. Annual wellness exams are a great way to catch signs of heart disease in dogs as early as possible.
Dogs ingest water when they swim, whether they intend to or not. Steve Cole Images | Getty Images
Blue-green algae is deadly to dogs. You can identify it through “foam, scum, mats, or streaks” on the water, according to the Centers for Disease Control and Prevention (CDC). The algae produce one of the most powerful natural poisons known.
How Much Blue-Green Algae Is Toxic
A tiny amount of the toxin – literally a few drops – can kill a dog. Dogs who ingest water containing blue-green algae while swimming, lick the water the water off themselves, or just take a quick lap of water can be poisoned. The algae can even be in water sources around your home.
Symptoms Appear Quickly
Blue-green algae begin to affect the dog almost immediately. Symptoms develop quickly, usually within 30 to 60 minutes. Many people report their dogs started getting sick on the drive home, usually with vomiting and diarrhea.
Symptoms of blue-green algae poisoning in dogs include:
If you suspect poisoning, go to a veterinarian immediately. Fatal liver failure occurs quickly. Aggressive veterinary therapy includes IV fluids and plasma to help replenish electrolytes, regulate blood glucose, support organ function, and to prevent shock. Muscle relaxers and anti-seizure drugs are sometimes necessary, too. Sadly, the prognosis related to blue-green algae toxicity is poor.
Blue-green algae contain two types of toxins: microcystins and neurotoxins. Neither has an antidote. The microcystins attack the liver. The neurotoxins begin to paralyze the dog’s respiratory muscles so he can no longer breathe. Immediate treatment with anti-seizure medications and oxygen may help avoid death.
How Can You Protect Your Dog?
Keep him out of any water that you are not familiar with or that looks funky. If you’re going to a park, check for blue-green algae warnings in the area at the Environmental Protection Agency before going. The EPA lists state resources for HABs (harmful algal blooms). Be especially suspicious if the temperatures have been warm and the water is not moving/flowing, as both conditions help the poisonous blooms grow.
If you have any concern that the water your dog was in may be toxic, immediately rinse or hose him with clean water and towel dry him. Wear gloves when you do this because the algae are poisonous to humans, too. Wash your hands when you finish. Follow up with a bath. As stated, any symptom should prompt an immediate trip to the veterinarian.
Blue-green algae can look so awful that you would never allow your dog to get in it, but, sadly, it can also be invisible. Credit: troutfisherman | Getty Images
Blue-green algae can appear like different colors on the water: green, blue, red, or brown. Some people say it looks like paint streaks. The body of water may look like thick green soup or be cloudy or swampy. The blooms may appear white, if at the end of the life cycle, although the toxins remain in the water for three weeks after the blooms are gone. Even more scary, the algae can be in water that looks clear.
Blue-green algae can’t be seen by the naked eye until the algae clump together. The bacteria thrive in warm, nutrient-rich water. When conditions are right, the algae can grow quickly. It is most common in non-flowing water like lakes and ponds, especially during times of hot weather and little rainfall. However, it can occur at other times of the year, especially as our planet continues to warm.
Cyanobacteria is most common in standing water, versus quickly moving streams and rivers. That’s why the microscopic bacteria can also grow in backyard fountains, garden pots, birdbaths, livestock troughs, and anywhere water is allowed to become stagnant. As a result, it’s important to consider where your pets might be drinking from on your property. Regular emptying and cleaning with a stiff brush is a smart idea if you have vessels on your property that are used to hold water for thirsty animals. Note: Boiling infected water or using chlorine or ultraviolet disinfection will not get rid of cyanobacteria toxins.
Sadly, blue-green algae blooms have killed deer, elk, livestock, cats, horses, and more soon after drinking the water.
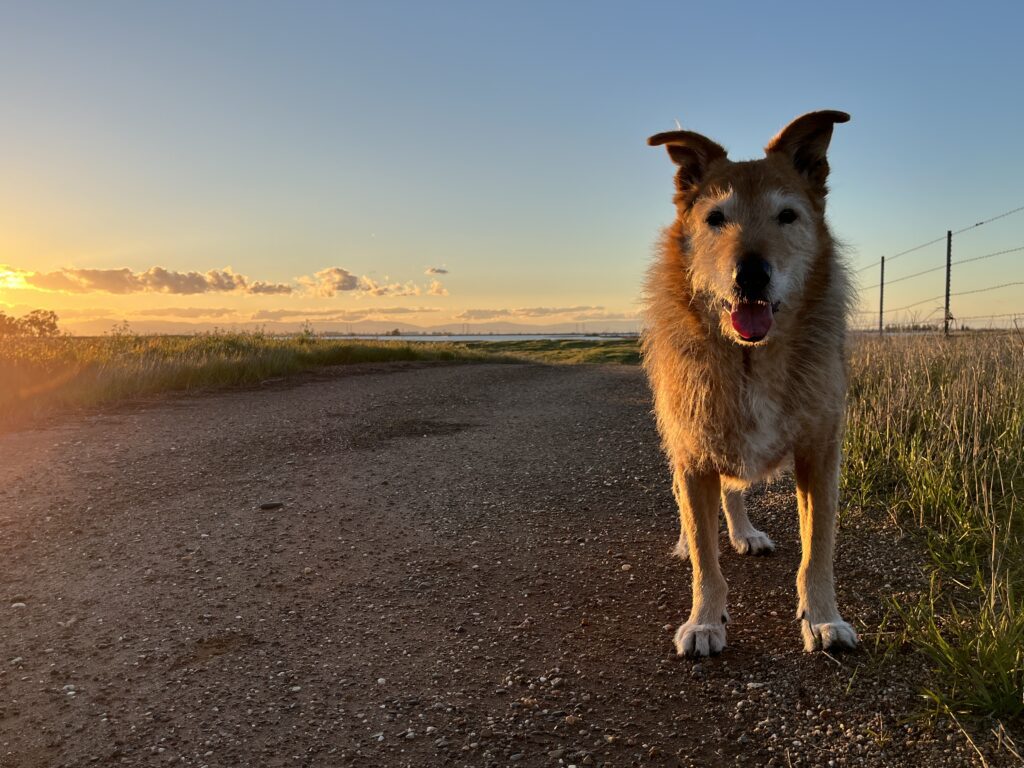
Last September, I thought we were at the end of life for my 15-year-old dog Otto. His arthritis pain is severe, and his daily NSAID and gabapentin was not keeping his discomfort at bay. Thinking he had not long to live, I made an appointment with a housecall veterinarian who specializes in hospice care and at-home euthanasia, who suggested that we increase his dose of gabapentin and add tramadol, an opiate pain-reliever, to his medication regimen.
The tramadol definitely improved Otto’s comfort and mobility. He doesn’t look fantastic – walking behind him as his back legs wobble and partially buckle sometimes is alarming – but he’s happy, still demanding to go for (short) walks with the other dogs, and climbing laboriously onto and jumping off of our couches at night. The medication is definitely worth the hassle of obtaining it.
And yes, it’s a hassle. Because it’s a Schedule IV drug, the veterinary hospital that prescribed it cannot dispense it for at-home use (though they keep it in stock and administer it to hospitalized patients); the vets are concerned that humans may take the drug that’s meant for their pets. Instead, the vet calls one month’s worth of the prescription (no more) into a human pharmacy, where I have to show my identification to pick it up. And I can’t call ahead too soon, because the pharmacy will only allow me to have so much on hand. This got a little dicey a couple months ago when I had to pick up the medication the day I left for a six-day vacation to make sure Otto did not have to go without the medication toward the end of my trip.
At the six-month anniversary of Otto being put on this drug, I had to make an appointment with his vet in order to continue receiving it. A dog can’t go more than six months without a veterinary examination in order to receive it. This was fine, though; it gave both me and the vet an opportunity to marvel at Otto’s stubborn refusal to throw in the towel on this painful but still apparently enjoyable life.
Recently, though, we ran into a bigger problem: the challenge of getting the drug at all.
When I called the vet clinic to ask them to call in Otto’s prescription this month, I got a call back from the veterinary pharmacist. He told me that he tried to call in the prescription to the pharmacy at Costco, like he does every month, but was told by the Costco pharmacist that there is a national shortage of the drug. The Costco pharmacist said the store is prioritizing human patients until they can get more, hopefully in a few weeks. The veterinary pharmacist called me to ask which alternative pharmacy he should call the prescription in to.
Here’s the thing: The first month that Otto was prescribed the drug, and the veterinary pharmacist asked me where I wanted to pick up the prescription, I just named the first pharmacy whose name popped into my head: CVS. When I went to pick up the medication, the CVS pharmacist warned me that it was expensive, $120; did I still want it? I was surprised; I hadn’t been aware it was that costly, but I wanted to obtain the medication and see if it really helped Otto, so I paid that amount. When it clearly reduced his pain and increased his mobility, I started calling other pharmacies to see if I could find a better price elsewhere.
Were you aware that drugs cost wildly different amounts, depending on where you buy them? My next call was to Costco, where the same prescription that costs $120 at CVS costs $10. TEN DOLLARS! Unreal.
But now Costco won’t fill the prescription – temporarily, I hope. So I called all five other pharmacies in my town (already knowing CVS charges $120). The supermarket pharmacy quoted me $77. Walgreens charges $90. Neither Walmart nor Rite-Aid would tell me what they charge for that drug; they don’t give out prices for any controlled substances! The pharmacist at Rite Aid also told me that they, too, are prioritizing human patients, and won’t fill a prescription for a pet right now – but the nice person did recommend the little family-owned pharmacy in town that I forgot even existed. When I called that pharmacy, I was quoted $59, and that they would fill a prescription for a dog, at least this one time. (They also mentioned the shortage of the drug.) Whew! I gave the pharmacy information to the veterinarian’s pharmacist and was able to pick up Otto’s prescription later that day.
I’m happy to learn that tiny, independent pharmacies can (apparently) earn a living charging less than the giant chain pharmacies for life-improving or life-saving medications. But I hope that the shortage of this effective medication ends quickly, and that I can buy the drug for Otto at Costco again next month. And I hope that my story of price-shopping Otto’s daily medication inspires you to check the prices for your dog’s daily medications.
Once he declines to try to get the treat under your foot as soon as he hears your “Leave it!” cue, start rotating your foot so that the treat is momentarily exposed to your dog and say “Leave it!” If he looks at you instead of trying to get the treat, mark and give him a different treat. He’s getting the idea! Photo by Nancy Kerns
There’s probably not a companion dog on earth who hasn’t coveted or grabbed something he wasn’t supposed to have, or worse, that could harm him, such as a dropped prescription pill or packet of rat poison. Teaching your dog to happily “Leave it” or “Drop it” might not just save that expensive pair of shoes, a beloved keepsake, or your child’s favorite toy, it could also save your dog’s life!
How to Teach “Leave It” to a Dog
We use “Leave it” when the dog gazes at – or heads toward – something we don’t want him to have or interact with. When your dog is intently eyeing a tempting deer, or the tasty steak that fell on the floor, a well-taught “Leave it!” cue can save the day.
Start teaching “Leave It” by saying, “Leave It!” cheerfully (remember, it’s a cue, not a command!) as you hold up a treat, then place the treat on the floor, under your foot to protect it. Allow your dog to sniff, lick, and/or nibble at your show as he tries to get the treat.
Start by putting a delicious treat (we used a jerky treat) under your foot (wear sturdy shoes!) and allow your dog to try to get it, by licking or scratching. The moment he moves away or looks at your face instead of the treat, mark the moment with a click or “Yes!” and give him a different treat. Photo by Nancy Kerns
The instant he stops sniffing or licking, or looks away, even if it was by accident (say, he heard a noise in the next room), mark that moment (with the click of a clicker or a verbal marker such as “Yes!”) and give him a treat.
Keep repeating the steps above until the dog turns his head away from the treat or looks at you when he hears the cue, “Leave It!”
When he’s getting the hang of it, move your foot away from the treat slightly to expose the treat as you use the “Leave it!” cue. When he moves away from the treat, use your marker (click or “Yes!”) and give him a treat multiple times to reward him for staying away from it.
If he dives for the food, just cover it with your foot again to prevent him from getting it. Mark and treat when he looks away. Do not verbally correct your dog; just wait for the desirable behavior of resisting the food, and mark and reward this with a treat.
Remember to say “Leave It!” just one time as you place the treat on the floor; do not repeat it if your dog goes back for the treat – just cover it with your foot to protect it, wait for him to move away or look away, then mark and treat. Practice until he’ll leave anything alone when you ask him to.
How to Teach Dog to Drop it or Trade
Start teaching “Trade” by giving your dog something he likes. In Tito’s case it’s a ball that perfectly sized for his small mouth. Photo by Nancy Kerns
Teach a dog to “Drop it” or “Trade” so that you can get him to release something he already has in his mouth that you don’t want him to have. Again, a well-taught cue can save the day. We prefer “Trade” over the more common “Drop it” as it implies a cooperative interaction.
To start, give your dog a toy that he likes. When he’s happily playing, offer him a treat. As he drops the toy to take the treat, say “Trade,” then mark and feed him the treat.
Keep feeding treats from one hand while you pick up the toy with the other so he doesn’t race you for it. Toss the toy for him to play with and then “Trade” again.
Say “Trade!” and offer him a tasty treat. If your treat is yummy enough, like Tito, he will likely drop the toy and take the treat. Don’t try to race your dog to get the toy, but continue to feed him treats away from the toy so you can casually pick it up. Then throw it for him and start over. Photo by Nancy Kerns
When he trades easily, use a higher-value item such as a food-stuffed Kong. As long as you have a treat that is very high-value, he’ll want to trade, and is unlikely to try to guard his item. (If he does guard his item and isn’t interested in trading, see “Resource-Guarding in Dogs: What You Need to Know.”) Remember to always give the item back to him promptly, so he doesn’t think “Trade” means he’ll lose his good thing.
On the rare occasion he has something he shouldn’t, play “Trade” exactly the same way – just don’t give it back afterward.
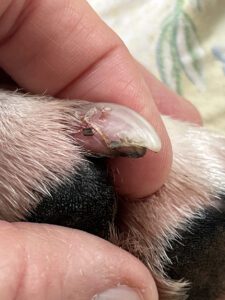
Excessively dry nails are prone to splitting lengthwise (very painful for the dog), peeling (as can be seen on one nail in this photo), and breaking off (which may have happened to the two-stubbed off nails in the photo.) Keeping the nails short, moisturizing the feet and nails, and adding nutritional supplements will help prevent these problems. Photo by Faba-Photography, Getty Images.
Dog nails splitting, tearing, peeling, or breaking can occur at any age, and they’re no fun for dogs who limp in pain, bleed, lick, or chew their damaged nails, or simply hurt. Split nails disrupt a dog’s coordination, interfere with walks and play dates, and can become infected. For an overview of the best treatment of nail splits and infections, see “Broken or Split Nails,” WDJ December 2022. Here’s how to help prevent this problem from happening in the first place.
Keep those nails trimmed
Too-long nails can become brittle and prone to injury, including snags on carpets, furniture, and other surfaces. Long walks on surfaces that wear the nails down, regular trips to the groomer, and learning how to use clippers or a Dremel rotating nail grinder all help prevent splits. See “The Importance of Trimming Dog Nails,” WDJ April 2016.
Prevention through nutrition
Nails take four to six months to grow, so upgrading your dog’s diet won’t produce overnight results. Be patient, though, because nutrition is a proven long-term strategy. As Amelia White, DVM, DACVD, explains in “Why are my dog’s toenails breaking?” (VETzInsight, June 2018), “The most common reason your pet’s nails are too brittle is that there is a nutritional deficiency somewhere.” The following changes to the diet and/or supplements can help prevent your dog’s nails from breaking and splitting.
Improve your dog’s protein sources. As canine nutrition expert Mary Straus (dogaware.com) explains in “10 Healthy Additions to Your Dog’s Dry-Food Diet,” animal-source protein such as eggs, meat, fish, and dairy products support the immune and central nervous systems, contribute to wound healing, help build lean muscle, and are required for skin, coat, and nail health. In general, added foods should represent only a small portion of the calories your dog consumes. “Replacing more than 25% of the calories from a commercial diet with fresh foods, treats, and chews risks seriously unbalancing the overall diet, unless care is taken to balance the added portion,” she says.
Use biotin to strengthen nails. Biotin (Vitamin B7) supplements are given to dogs to treat thinning hair, brittle nails, scaly skin, skin lesions, a dry and dull coat, and hair loss.
White nails are softer and more prone to breaking or splitting than black nails. Keeping them short is critical. Photo by Nancy Kerns
A natural way to correct a biotin deficiency is with foods that contain it, such as liver, kidneys, and other organs from beef, pork, or lamb, and poultry organs or eggs. However, as Straus notes, the low amounts of biotin in fresh foods are less likely to improve skin, coat, and nails than supplements can.
Straus says, “For dogs with minor issues, I would add fresh foods (organs and eggs) to the diet, or consider a B-complex supplement. For dogs with severe nail problems, I would consult a vet to rule out other causes and then, if biotin was appropriate, try megadoses for at least 6 months.”
Daily megadoses were used in one small study (pubmed.ncbi.nlm.nih.gov/2602924/) that found the supplement helped more than 90 percent of dogs with skin and coat problems. The dosage used worked out to 1.5 mg for a 10-pound dog, 3 mg for 25 pounds, 5 mg for 50 pounds, and 9 mg for 100 pounds. Straus recommends using human-grade biotin-only supplements.
Fish oil can help nails. Fish oil is best known as an effective treatment for canine arthritis, but it is also recommended for brittle, broken nails. Fish oil’s omega-3 fatty acids contain eicosapentaenoic acid (EPA) and docosahexaenoic acid (DHA), both of which are associated with canine skin, coat, and nail health.
In a small 2014 clinical trial reported in the Swedish journal Acta Veterinaria Scandinavica, dogs with symmetrical lupoid onychodystrophy (SLO) were treated either with the immunosuppressant drug cyclosporine or with fish oil that provided 35-40 mg EPA+DHA per pound of body weight once daily for six months. The study concluded that cyclosporine and fish oil appeared to be equally effective.
Most fish oil is manufactured from cold-water fish such as salmon, sardine, or anchovy. Introduce fish oil gradually so your dog tolerates it well, using an amount of fish oil that provides 10 mg of EPA+DHA combined per pound of body weight daily for healthy dogs, or up to 30 to 40 mg per pound for dogs with health issues.
Collagen supplements might help, too. Collagen, the main structural protein found in skin and connective tissues, determines the strength and elasticity of hair, bones, nails, and teeth. As dogs age, their capacity to produce collagen diminishes, making them more susceptible to injuries, painful conditions of the bones and joints, and poor skin, coat, and nail health.
Lost collagen can be replaced through supplementation, which can help a dog restore and maintain healthy, moisturized skin, a soft and shiny coat, and strong nails that don’t split or crumble as they grow. Fresh animal proteins contain collagen as do bones and tendons. Giving your dog bones to chew or feeding bone broth can help, as can collagen supplements, which are widely sold. The recommended daily dose for dogs is 8 grams of collagen per 25 pounds of body weight.
Skip the Super Glue and brush-on nail hardener
Nail-hardening products designed for human use are not recommended for your dog’s nail splitting, and neither is Super Glue, which can cause swelling, pain, burning, and infections if applied to split or broken nails.
Moisturize toes to strengthen nails
Conditions like cold weather, low humidity, and exposure to salt and ice-melting chemicals make winter a difficult season for canine nails, so do what you can to protect your dog’s feet when it’s icy outdoors.
Products that protect a dog’s paws like Musher’s Secret and similar combinations of natural waxes and oils help prevent nail splits by moisturizing nails and reducing brittleness. Check your natural foods market for herbal salves that contain calendula blossoms, horsetail (shavegrass) herb, or myrrh essential oil, all of which are nail-friendly and safe for canine application. Every day or two, massage a salve or moisturizing product into your dog’s paw pads, nails, and the base of the nail bed. In addition, see “Savvy Salves” for do-it-yourself products that can keep your dog’s nails strong and supple.
When should I consult my vet about my dog’s nails?
If your dog suffers repeated split or broken nails, schedule a checkup, because the underlying cause might be a fungal infection, inadequate nutrition, an autoimmune disease such as pemphigus or lupus, allergies, ringworm, bacterial infections, endocrine disorders, or symmetrical lupoid onychodystrophy (SLO), an infection that begins in the dew claw nail bed and affects toes with pain, nail splitting, misshapen and disintegrating nails, and nail loss.
Keep track of each broken or split nail your dog endures by making a note on your calendar; if he has more than two in a year, it’s a good idea to discuss this with your veterinarian.
What dogs are most at risk of broken or split nails?
Older dogs, active and athletic dogs, and dogs with weak or long nails are potentially at risk for nail splits.
Genetics play a role, too. According to Auburn University professor and veterinary dermatologist Amelia White, DVM, DACVD, breeds predisposed to autoimmunity-caused nail breaking include the Boxer, German Shepherd, Golden Retriever, Greyhound, Labrador Retriever, Miniature Schnauzer, Rottweiler, and Siberian Husky. Breeds associated with allergies that cause dogs to chew and break their nails include the Golden Retriever, Terriers, German Shepherd, Bichon Frise, and Maltese.
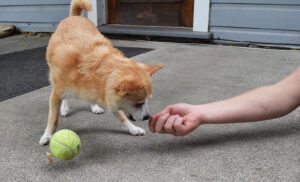
There any many training and bonding benefits to hand-feeding a dog, and only a few things to be aware of and careful about. Photo by Vladimir Godnik, Getty Images.
Many trainers feed very little of their dogs’ daily ration from a bowl, but instead, hand-feed the dog’s meals to him over the course of the day. Every interaction with a dog is an opportunity for training. Setting aside a portion (or all!) of your dog’s morning and evening meals and delivering that food by hand throughout the day as your dog complies with requests, along with catching your dog in the act of being good, helps drive up your rate of reinforcement and builds value for the behaviors you’d like to see more often. Hand-feeding is also a great way to help a puppy consistently practice basic skills (such as sit, down, wait, come, etc.) and overall polite behavior.
In addition, for dogs who are generally confident but who have many interests, of which you are just one – in other words, dogs who are easily distracted – hand-feeding for a period can help increase the dog’s attention to you as the handler by associating you with meals and feeding.
Hand-feeding can help establish a relationship between you and a new dog, or your dog and a new person in your life..
When is hand-feeding not a good idea?
While hand-feeding can be used to help establish a relationship with a dog, when used with particularly shy and fearful dogs, it can cause additional stress. Similarly, some people will try to use food or treats to build a fearful dog’s comfort with strangers. The hope is that the dog will associate the presence of the “scary person” (“Yikes!”) with the presence of the food (“Yum!”), but what often happens (especially with dogs who really like food), is that the allure of the food temporarily overrides their unease about the person – but only for as long as it takes to grab the food. Once the food is in their mouth, they instantly realize the “scary person” is too close for comfort. In this case, the food is more of a trap than a tool to help change the dog’s association.
A better approach in the case of the “strangers are scary” problem is for the owner to deliver food in the presence of the “scary person” while the person is noticeable, but far enough away so as not cause significant concern. Take a similar approach if you are trying to use food to bond with a highly fearful dog, by being close enough to him that he associates your presence with the food, but not so close that it takes a major act of courage (or desperation) to eat it.
What to watch for when hand-feeding a dog
Hand-feeding can increase some dogs’ lack of self-control around food. Many dogs are overly excited by food and may jump up or lunge at their owner’s hands as they attempt to get the food. To help teach impulse control in this situation, ask your dog to sit and hold a piece of low-value food in your open palm. Attempt to move your palm closer to your dog. If he moves toward the food, close your fist and, if needed, ask him to sit again. As your dog can control himself as your food hand gets closer, use your opposite hand to deliver food to his mouth and invite him to “take it!”
“Self-control” will look different for different dogs. For especially excitable dogs, self-control might initially mean she holds a sit for two seconds while your open hand is 12 inches above her head. If your dog tends to jump on you when you have food, use a leash to tether her to a sturdy object and stand just beyond the length of the leash. With consistency, your dog will learn the fastest way to get the food is to exercise patience around the food.
If your dog bites down too hard when taking food from your hand, try these tips.
What about dogs who only eat when hand-fed?
In some cases, a dog will get used to being fed by hand and might balk at eating from a bowl. In such cases, a little “tough love” might be in order. Present your dog’s meal in a bowl and give him five minutes to eat. If he doesn’t, pick up the bowl and try again later. A healthy dog won’t starve himself when food is available, even if this technique means he skips a few meals while he waits to see if you’ll revert to feeding by hand.
Take your puppy on short walks on a loose leash, preferably on grass or dirt. Let the puppy explore the world at her own speed. Credit: Dzmitry Dzmitryieu | Getty Images
For a new puppy who is about 8 weeks old, keep walks to 5 or 10 minutes. Let your puppy choose the speed, and take breaks as needed. If she is tired and doesn’t want to walk, carry her home.
As your puppy gets older, she can gradually take longer walks. A 12-week-old puppy can walk about 15 to 20 minutes. Again, allow your puppy to choose the speed and take plenty of breaks for sniffing. Avoid trying to pull the puppy.
Puppies are still developing their muscles and bones, so long walks can be too hard on their bodies. If you must walk on pavement, keep walks shorter. Walks on grass or dirt are easier on your puppy’s growing bones than pavement.
Increase Walks as Puppy Grows
By 16 weeks of age (4 months old), most puppies can go for 30-minute meandering walks. Increase the time to 45 to 60 minutes as your puppy reaches 6 or 7 months of age.
Hold off on true hikes or long purposeful walks on pavement until your puppy has physically matured.
Long Walks Stress Puppy Bodies
Your puppy’s bones are still growing. She will become physically mature at around 12 months of age for small dogs and around 18 to 24 months for larger dogs. Puppy bones have soft “growth plates” at the ends where new bone is produced as the puppy grows. The growth plates are not as sturdy as mature bone, so they are easier to damage. Even worse, an injured growth plate can cause the bone to stop growing early. This can result in lifelong orthopedic problems.
Free Run Instead
The best exercise for puppies is safely free running. Let your puppy choose her own adventure and play at her own pace.
If you have access to a fenced yard, allow your pup to wander freely, choosing her speed and direction. Stay with her! She will naturally regulate her activity, going fast when she wants to and slowing down when she gets tired.
If you don’t have a fenced yard, let your pup play on a long line of around 15 feet for young puppies in a safe space. Hold the end of the line while she plays, keeping it slack as much as possible.
Longer Walks Will Come
It can be tempting to take your puppy for a long walk to wear her out but resist the urge. Instead, treasure these meandering strolls while her body grows and matures. Try to see the world through your puppy’s eyes and enjoy her antics as she zigzags around the yard and explores her world. Let her learn about the world.
Leave your puppy home and take your older dog or go for a solo outing when you want to take a more purposeful walk and cover ground. When your puppy has matured, you’ll have plenty of time for hikes and long walks, and those healthy joints you nurtured when your dog was a puppy will last a lot longer.
They’re called dry shampoos because you don’t have to rinse them out. You still have to towel-dry the dog or brush him out. Overall dry shampoos don’t really save time. Credit: Dorottya Mathe | Getty Images
If your dog sort of, well, stinks and you don’t want to give a real bath, you may ask yourself, “Can I use dry shampoo on my dog?” The answer is simple: Yes, you can use dry shampoo on your dog. The bigger question is, “Should you use dry shampoo on a dog?”
Dry shampoos for dogs, also known as waterless or no-rinse shampoos, deodorize your dog—and that’s about it. So, while these products may help in a pinch with an odor, they don’t clean your dog. You’re not truly removing any of the dirt from the dog’s skin. The dry formulations may absorb some of the excess oils in your dog’s coat, but your dog will not look freshly bathed. He won’t be shiny and bright with a glossy, flowing coat. He’ll just smell better for a while. Maybe.
How to Use a Dry Dog Shampoo
Most dry shampoos are not powders that you sprinkle on your dog. They’re foams or sprays you work into the dog’s coat, like human hair mousse products.
The word “dry” refers to the fact you don’t need water. These products are not a whole lot easier to use than a real shampoo, except, of course, you don’t need to rinse. You also generally still must towel-dry the dog, or if you did choose a powder dry shampoo, comb your dog’s hair. Dry shampoos are not time-savers!
Choosing a Dry Shampoo for Your Dog
We don’t recommend dry shampoos, but if you insist on using one, there’s one main thing to avoid: Don’t buy any product that’s delivered in a container that uses a propellant. Personal care products that come in cans, including human hair mousse and pet dry shampoos, often contain petroleum distillate propellants like propane or butane. And benzene, a cancer-causing chemical, is a common contaminant of petroleum distillates. Powdered or manual pump-spray products are safer.
Choosing a product formulated for dogs is an absolute must. Look for dry shampoos for dogs that contain only natural ingredients that help deodorize your dog. (Remember, regular shampoos are only on the dog’s coat for a minute or two and then thoroughly rinsed away; dry stuff stays in the dog’s coat until you give him a real bath or he goes swimming.)
Still, we advise you to only use a dry shampoo when there’s no other choice because, really, there are no shortcuts for a good, healthy bath.
To provide the best experiences, we use technologies like cookies to store and/or access device information. Consenting to these technologies will allow us to process data such as browsing behavior or unique IDs on this site. Not consenting or withdrawing consent, may adversely affect certain features and functions.
Functional
Always active
The technical storage or access is strictly necessary for the legitimate purpose of enabling the use of a specific service explicitly requested by the subscriber or user, or for the sole purpose of carrying out the transmission of a communication over an electronic communications network.
Preferences
The technical storage or access is necessary for the legitimate purpose of storing preferences that are not requested by the subscriber or user.
Statistics
The technical storage or access that is used exclusively for statistical purposes.The technical storage or access that is used exclusively for anonymous statistical purposes. Without a subpoena, voluntary compliance on the part of your Internet Service Provider, or additional records from a third party, information stored or retrieved for this purpose alone cannot usually be used to identify you.
Marketing
The technical storage or access is required to create user profiles to send advertising, or to track the user on a website or across several websites for similar marketing purposes.
This website uses cookies and other tracking technologies to offer you a better experience, personalize content and ads, and analyze our site traffic. Before proceeding, you agree to our Terms and that you’ve read our Privacy Policy. Update Settings
Functional
Always active
The technical storage or access is strictly necessary for the legitimate purpose of enabling the use of a specific service explicitly requested by the subscriber or user, or for the sole purpose of carrying out the transmission of a communication over an electronic communications network.
Preferences
The technical storage or access is necessary for the legitimate purpose of storing preferences that are not requested by the subscriber or user.
Statistics
The technical storage or access that is used exclusively for statistical purposes.The technical storage or access that is used exclusively for anonymous statistical purposes. Without a subpoena, voluntary compliance on the part of your Internet Service Provider, or additional records from a third party, information stored or retrieved for this purpose alone cannot usually be used to identify you.
Marketing
The technical storage or access is required to create user profiles to send advertising, or to track the user on a website or across several websites for similar marketing purposes.