Fleas are among the most irritating, harmful, and common parasites that attack dogs. They can cause nonstop itching, scratching, skin abrasions, infections, flea-allergy dermatitis, and the transmission of tapeworms and diseases. Unfortunately, fleas are easy to pick up but can be very difficult to get rid of.
Medications to prevent and treat flea infestations on dogs are available both over the counter and by prescription. However, factors including the dog’s age, size, sensitivity to pesticides, and medical conditions might mean commercial flea treatment products aren’t the right option for your pet. That’s where natural flea repellent for dogs can help, and there is a range of natural flea repellents and remedies to choose from.
Home Remedies for Fleas
Most fleas live for six weeks but under ideal conditions, they can last up to a year. Female fleas can lay 500 or more eggs that hatch into larvae, hide in dark, protected areas like cracks and crevices, then survive in pupal cocoons for up to five months before emerging as adults. According to the Journal of the American Holistic Veterinary Medical Association, the most effective toxin-free way to address flea infestations is with Integrated Pest Management. This approach focuses on flea behavior, pet health, outdoor and indoor environments, and safe (or at least low-risk) flea-killing treatments.
Garlic
Despite warnings to the contrary, garlic is not toxic to dogs the way onions are. Most garlic warnings are based on a November 2000 study published in the American Journal of Veterinary Research in which 4 test dogs were given extremely large doses (1.25 milliliters of garlic extract per kilogram of body weight, the equivalent of 5 grams of whole garlic per kilogram) through a feeding tube every day for 7 days. For a 50-pound dog, this would be a daily dose of 5-1/2 teaspoons of garlic extract or 4 ounces (approximately 24 cloves) of whole garlic. Although none of the dogs developed unusual symptoms and none were diagnosed with hemolytic anemia, changes in their red blood cells led the researchers to conclude that garlic is dangerous to dogs. In enormous quantities fed for extended periods, it might be, but the study’s conclusions don’t apply to small amounts routinely given to dogs.
Many veterinarians who prescribe garlic for dogs with fleas recommend 1/2 clove of fresh raw crushed garlic per 15 to 20 pounds of body weight. When introducing garlic to your dog, start with smaller amounts and increase gradually. Garlic doesn’t kill fleas, so adding it to your dog’s diet won’t make an immediate difference, but after a month of daily garlic, your dog should be far less attractive to fleas.
B Vitamins and Brewer’s Yeast
Vitamin B-complex with vitamin B1 (thiamine) has helped many dogs repel fleas, and it can be given as a supplement or as brewer’s yeast. Brewer’s yeast is a single-celled fungus used in beer brewing, hence its name. It’s a rich source of nutrients and generally considered safe for dogs, though some dogs with compromised immune systems or taking certain prescription medications should avoid it. Check with your veterinarian for advice. Despite its name, brewer’s yeast (Saccharomyces cerevisiae) will not cause or worsen canine yeast infections as it’s a different species from the Malassezia pachydermatis yeast that causes skin infections in dogs. Start with small amounts to avoid digestive discomfort and gassiness, and gradually increase to the product’s label dose for your dog’s weight. Discontinue use at once if your dog has an adverse reaction and discontinue after one month if the product is ineffective.
Some supplements designed for pets contain garlic, brewer’s yeast, or both, such as Springtime Bug Off for Dogs, NaturVet Brewers Yeast Powder, Guardian’s Choice Flea Chews for Dogs, and Pet Honesty Flea & Tick Defense Chews.
Natural Flea Sprays for Dogs
Flea-killing solutions that do not contain harsh chemicals are becoming more popular as pet owners look for products that are toxin-free, safe, and effective. Wondercide Flea, Tick, and Mosquito Spray, Cedarcide Bug Spray, and Vet’s Best Flea and Tick Spray use essential oils to repel adult fleas and kill adults, eggs, and larvae. These products can be applied to a dog’s coat and worked in with your fingers (no protective gloves needed), plus sprayed around bedding and wherever your dog spends time. All three companies make spot-on or brush-in products that can be used in place of systemic flea and tick treatments plus flea sprays for outdoor kennels and yards.
Homemade Flea Spray for Dogs
To make your own natural flea spray, fill a spray bottle with 2 cups water. In a small glass combine 2 fluid ounces (4 tablespoons) vodka or other distilled alcohol with 50 drops (1/2 teaspoon) of cedarwood, eucalyptus, peppermint, lemongrass, or lemon essential oils in any combination. Add the blend to your spray bottle, shake well, and spray a fine mist over your dog’s coat and work it in with your fingers or a brush, avoiding the face. Spray on and around your dog’s bed and wherever your dog spends time indoors.
It’s a good idea to offer fragrances to your dog before applying them. Simply place a small amount of essential oil or any scented product on your hand, then hold your hand out for your dog’s inspection. If your dog turns away, try a different product or fragrance.
Set a Flea Light Trap
An easy way monitor your flea population is with an electric flea trap. The TERRO® Refillable Flea Trap, KILSACO Flea Trap, and WILKKS Flea Trap combine flea-attracting yellow-green light bulbs with sticky pads to capture adult fleas. For a simple do-it-yourself trap, fill a shallow bowl with water, add 2 tablespoons liquid dish soap, and agitate the water to create foamy bubbles. Fleas don’t drown in plain water because their bodies aren’t heavy enough to break the water’s surface tension, but soap reduces surface tension so the fleas sink and drown. Place the dish beside or under a directional lamp or table lamp (using a yellow-green colored bulb if you can find one) and leave it on overnight. Empty and refill the dish daily.
Diatomaceous Earth for Fleas
Diatoms are microscopic plants that live in fresh and sea water. Ground into a powder, their glass shells form diatomaceous earth. Also known as silicon dioxide, food-grade diatomaceous earth (which is different from diatomaceous earth used in swimming pool filters) is a nontoxic insecticide powder that damages the bodies of fleas and other parasites so they dehydrate and die. Brands sold for pet use include Wholistic Pet Organics Diatomaceous Earth, Lumino Diatomaceous Earth for Pets & People, and Flea Away Diatomaceous Earth for Dogs.
Before applying diatomaceous earth to floors and furniture, remove electronic equipment or protect it with plastic. Because diatomaceous earth can irritate the lungs and respiratory tract, wear a mask, and keep children and pets away while applying it to floors, dog beds, and areas where fleas congregate. This includes under furniture, under beds, along floorboards, on upholstery, and on carpets. Work it into carpets, floors, and other surfaces with a push broom or dust mop. Although small amounts are unlikely to harm your vacuum cleaner, consider using a shop vacuum with a water reservoir that catches dust or use a broom and mop when cleaning the residue.
Diatomaceous earth can also be applied topically to treat fleas on your dog. To apply diatomaceous earth to your dry (not wet) dog as a flea powder, wear a mask and create one for your pet with a scarf that covers his nose and mouth. Use approximately 1/2 teaspoon of diatomaceous earth per 10 pounds of your dog’s weight, such as 3 teaspoons (1 tablespoon) for a 30-pound dog or 6 teaspoons (2 tablespoons) for a 60-pound dog. Sprinkle small amounts into your dog’s fur starting at the neck and moving down the spine, massaging it into the skin. Be sure to include all areas except the face. For best results when using diatomaceous earth for fleas, start with small quantities. Reapply to dry hair after bathing or swimming.
How to Get Rid of Fleas in the House
An important part of getting rid of fleas in the house completely is removing fleas in all stages of life. Indoors, this means thorough vacuuming at least once a day, frequent washing of your dog’s bedding, toys, area rugs, towels, and other washable items, and the daily application of flea control sprays. If your vacuum cleaner uses a bag, replace it frequently.
Steam cleaning kills adult fleas and larvae, so if you have a serious flea infestation, rent a steam cleaner or hire a professional to treat carpets and upholstered furniture. The treatment can be repeated every one or two months as needed. Continue to vacuum daily between treatments.
If you live in a humid area, removing moisture with dehumidifiers can interrupt flea reproduction because flea eggs require at least 50% humidity in order to develop and hatch.
Flea Busters RX for Fleas Powder is applied like diatomaceous earth but it’s made of finely milled borate that is statically charged. The borate damages flea larvae so that they dehydrate and die. This product should not be used on pets, only on carpets, bare floors, furniture, baseboards, under beds, and wherever your dog spends time.
How to Get Rid of Fleas in the Yard
If you have a lawn, keep it short, mow the grass frequently, rake leaves, and trim weeds to prevent fleas from flourishing in damp, dark areas. Many gardeners use diatomaceous earth to protect plants from slugs, worms, and other pests, and it can be sprinkled wherever fleas might live. Reapply diatomaceous earth weekly, after windy or rainy weather, and after watering your lawn or garden. Yard sprays like those described above can be applied to all parts of your yard to reduce its flea population.
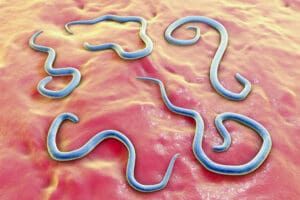
In addition, consider purchasing beneficial nematodes, which look like tiny worms, to eliminate flea larvae in your yard and garden. The nematodes used for flea control do not harm plants, animals, or people. For information see Fleabusters® Nematodes or Flea Defeater Nematodes.
It may take three or four months to control a flea infestation, so be patient. Always treat your home, pets, and yard at the same time to prevent reinfestation. And when fleas are under control, remain vigilant and proactive so you can prevent them from returning.