


Imagine not having to worry about treat recalls or ingredient sources, or, for that matter, whether the actual ingredients match what’s on the product label. It’s not a dream; in fact, it’s well within anyone’s abilities. It’s easy, it costs less than commercial products, and as an added bonus, you get the peace of mind from knowing these treats won’t be recalled.
Heck, you have to go grocery shopping anyway, so it shouldn’t be a problem to pick up the necessary ingredients while shopping for the other members of your family. Whether you shop at Safeway or Whole Foods, one thing is certain: the quality of the raw ingredients you’ll buy in human grocery stores is far higher than what is used in most commercial treats.
Making dog treats is amazingly simple. No special equipment is needed. You can use a dehydrator for dehydrating if you have one; but all you really need is an oven, which you can use for dehydrated meat treats or baked, cookie-style treats. My oven uses natural gas, and can be used at very low temperatures (under 200 degrees). That’s very useful for slow, even, and complete dehydration, which is what’s needed to make a good treat.
My oven is old, and has a pilot light, so I can even store my “ready to eat” treats therein. They will stay dry and not mold because of that pilot light, so they don’t require refrigeration. Don’t forget to remove them before preheating that oven for something else, however! If your oven lacks a pilot light, you will need to store your treats in the refrigerator or freezer.
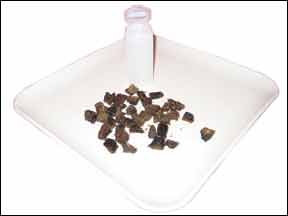
For dog treats, “simple is best.” What do most dogs like best of all? Meat. One of the dehydrated treats I make is London broil (bought on sale for $3 to $3.50 a pound). I use London broil because it’s a lean cut of beef with good, solid texture. Fat is on the outside of the piece of meat, and so is easy to trim off. Visible fat must be trimmed. High-fat treats must be fed in limited amounts, and are at greater risk of rancidity if not fed within a few days.
After visible fat is trimmed, place the meat (which is usually about an inch thick) flat into a pan of boiling water until it firms up. This step is not essential; but it speeds the dehydration process, and makes it less messy as well. Cut the firm meat into cubes, between 3/8- and 1/2-inches square, and then place the cubes on a cookie sheet, not touching each other. Put the cookie sheet into the oven at an ideal temperature of 150° – 200°F. Check the treats every half hour or so, move them around on the cookie sheet, and if there is a lot of liquid on the cookie sheet, drain it off. The treats need to be really, really dry; as dry as kibble; moisture is your enemy.
I store the dehydrated treats in food-grade chewing gum dispensers that snap open easily for access. That way, they do not defile my pockets! And the dogs can’t immediately tell I’m carrying treats.
I can’t estimate what these treats cost someone else to make; I figure my out-of-pocket cost is $3 for the meat, which leaves me with an estimated 6 oz. of treats, after trimming and shrinkage. I have to allow for energy costs, so the true cost is higher than 50 cents an ounce; and if the meat is $3.50 a pound on sale, that increases the price, too. But I still think it’s the best bargain in town, and encourage you to try it.
Here’s a more complex recipe, with two ingredients. Don’t worry; it’s still simple. I came up with this recipe for baked liver-pumpkin cookies when I found that feeding liver-only treats often causes loose stool. Many people wish to avoid feeding grains, but to cut the effect of the liver, something had to be added. Pumpkin functions well as a binder and is palatable to most dogs, to boot. It’s just too good to be true that pumpkin acts to firm canine stools if they are too loose, and to loosen them if they are too firm; it’s the perfect companion ingredient for liver.
To make liver-pumpkin cookies, combine a can of canned plain pumpkin (not the kind that comes pre-seasoned for pies) and an equal amount of pureed lightly boiled liver in a food processor. Spoon drops of the mixture onto parchment paper-covered or lightly greased cookie sheets. Flatten out the drops so they are an equal height and will bake evenly. Bake in a slow oven (325° – 350°F) for 20 minutes or until firm enough to handle. Remove from the over, cut the spoon-dropped pieces into the size you want, and then continue to bake them until they are dry. Store in the refrigerator or freezer; they can be layered with waxed paper separators, or they can crumble a bit – the dogs won’t care.
Try one or both of these two recipes. You have nothing to lose but your worries about potentially harmful treats.
Shari A. Mann lives in San Francisco with her dogs Meg and Zebra. She currently mans the “help desk” at bullterrierrescue.org, enthusiastically supports dog rescue, and pursues a lifelong interest in all things canine.


I cook, I bake and I can usually write out ingredients and directions drawn from an article. I HAVE to adjust my human recipes in any event, can’t eat a lot of the ingredients, so I am always working in substitutions or making a recipe smaller so I don’t have leftovers unless I want to freeze a meal ahead. I don’t always feel up to all the prep, clean up, cook, serve and more cleanup. Life is not easy for most of us & dogs are companions and complications! I love home made foods for my dog. Not having to worry about ingredients and recalls in commercial products is huge bonus! Thank you Dog Journal!
I have a grill I can use as a smoker. Do you have any recipes for smoking dog treats, or would that not be good for doggo?
I find when there are means to make good things for my pet – it’s always wrapped up in a lengthy
paragraph. When making a recipe (for anything) it should be titled – defined and the ingredients
and directions written out as one would a household recipe for people.
That way it is easy to fine and can be printed for further reference.
Please make these recipies available in the standard format not only for me but for a lot
of my friends as well.
Boo. This writer went to a lot of work to write a clear, well-written and interesting article. If you don’t like her format, look elsewhere and quit complaining and bringing people down.