


Before I knew anything about dog training, I viewed the “stay” cue as the start of some sort of battle of the wills. I imagined a human would need to have incredible authority over a dog to convince him to stay put for any amount of time.
After I learned about positive reinforcement training, though, I came to understand that teaching a stay behavior doesn’t need to have anything to do with power and control, and instead is a matter of reinforcement and trust.
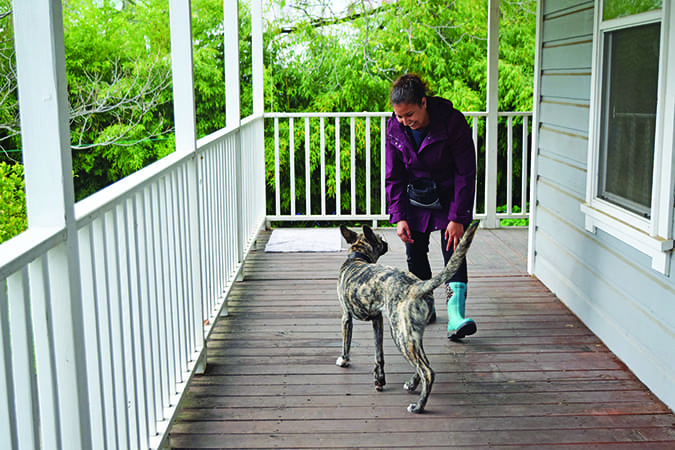
A really solid stay is a beautiful thing to observe. A dog is cued to stay, and despite distractions around him, he won’t move from his spot. I am especially impressed when I see a dog looking happy and relaxed while staying put, fully trusting that he’ll be released eventually.
The icing on the cake is that this behavior is actually pretty simple to teach, and as a bonus, it can be a really fun process for both the trainer and her dog.
Once your dog has learned to stay on cue, the behavior can come in handy. In the past week alone, I’ve asked my dog to stay a number of times: When I opened the door for a delivery, when we moved a heavy piece of furniture and didn’t want him underfoot, and when I needed to wipe very hot pasta sauce off the kitchen floor (don’t ask).
Your Dog Should Choose to Stay
When I’m teaching a dog what I want him to do when I ask him to “stay,” I aim to make sure he knows he has a choice in the matter. He can stay, or he can get up and walk away. Yes, that’s right – he can leave if he wants to, right in the middle of a training session. Does this surprise you? Let me explain.
I give my canine students full agency to end a training session whenever they want. They’re never obliged to participate. It’s my job to keep them engaged and interested in what I’m teaching them.
I also set up the environment to make it far more likely that the dog will offer me the behavior I’m looking for, and in turn this will provide me with the opportunity to reinforce that behavior. If I’ve done my job right, the dog I’m teaching won’t be interested in getting up to leave. He’s allowed to – and I won’t stop him if he does – but he won’t want to.
Coercion is completely unnecessary when teaching a stay. When we train using rewards to reinforce behaviors, we make it more likely that our dog will choose to do the behavior we reward. In other words, we greatly increase the odds that he’ll offer that behavior when given the opportunity.
That’s how you end up with a dog who looks relaxed in a stay position, rather than worried, vigilant, restless, or on the verge of standing up and leaving. When I see those worried dogs, I think to myself how simple it would be to turn that situation into one the dog trusts. “You want me to stay here? Sure thing, happy to! Take as long as you need!”
How to Prepare Your Dog to Learn to Stay
Before we get started, make sure you have the prerequisites in place:
A dog who’s had the opportunity to expend some energy. Don’t try to work on this behavior when your dog is bursting at the seams and hasn’t yet been for a walk or had some play time. On the other hand, avoid wearing him out completely before practicing. You want him to be a little spent, but still have enough energy to use his brain.
Food, and lots of it. Cut treats into a very small size, like the size of your pinky fingernail for a large dog, and half that size for a smaller dog. You’ll be using a lot of food and feeding repetitively. That means avoid working immediately after feeding your dog when his tummy’s full, and alternately, avoid working when your dog is really hungry. A hungry dog is far too interested in getting immediate access to the food, and he’ll struggle to relax into the exercise.
A mat, towel, or rug. In the early stages, you’ll be using this item as a target on the floor to help your dog identify where he’s supposed to be. Avoid using your dog’s bed for this exercise. Your dog’s bed should be as free as possible from any rules or requests for behavior, in my opinion.
That’s his sanctuary, his own free space. Grab something else instead.
How to Train Your Dog to Stay: the 3 D’s of Learning to Stay
We’ll split the training exercises into three categories:
Distance – how far you can move away from your dog.
Distraction – what kinds of movements you can make and other environmental distractions you can add to the equation.
Duration – how long your dog can stay put before you release him.
We’ll work each of these categories separately at first. Keeping them separate will make it easier for your dog to be successful. We’ll start with the easiest level in each category, and we’ll gradually make the exercises more difficult as your dog masters each level.
But every time we make things a little harder in one category, we’ll make sure to keep the other two categories at a level your dog already knows really well. For example, when we’re working on increasing the distance between you and your dog, we’ll make sure we keep the other two categories at an easy level. We’ll never increase the distance and the duration and the distraction levels simultaneously. That would just be unfair to your dog and would slow your progress.
Verbal Cues for Teaching Stay
You’ll want a verbal cue or a hand gesture, or maybe both. Personally, I use only a hand gesture with my own dog. It looks a little like a “Stop!” hand gesture: hand positioned vertically, palm facing my dog, and fingers together. It doesn’t matter what gesture you choose, as long as you and all family members are consistent. For example, if I keep my fingers together, but my husband opens his fingers (like he’s flashing the number five), that can be confusing to our dog during the training process.
It’s not necessary to place your hand close to your dog’s face. In fact, that can be intimidating and uncomfortable for him. I keep my elbow somewhat bent and my hand about 12 inches in front of my body.
The standard verbal cue is “Stay,” of course, but you’re welcome to use whatever other word you want. If you choose to teach both a verbal cue and a hand gesture, I suggest you begin teaching only the hand gesture at first. It’s easier for dogs to learn visual cues before verbal ones.
Once your dog understands the visual cue, you can then add your verbal cue to your training sessions by saying it just prior to showing your hand gesture. After many repetitions of saying “Stay” before showing him the hand gesture, he will have associated the two, and you should be able to drop the hand gesture.
Choose a Release Word
Before we get started on teaching your dog to stay on cue, you need to choose what word you’ll use to let him know he’s now free to move around. You can use whatever word you want! In fact, the more unconventional your release word, the less likely your dog will be accidentally released by someone else saying the word, or by you saying the word in regular conversation.
For example, I see lots of people use the word “Okay!” to release their dogs. I think it’s a perfectly fine word to use, except that it can sometimes cause some confusion for the dog when that same word is used in casual conversation while he’s been asked to stay.
Imagine asking your dog to stay, and shortly after, a family member tells you, “I’m just running to store, I’ll be right back.” What is your likely response to that? “Okay!” … and oopsie, you’ve just unintentionally released your dog from his stay.
To release my dog, I say his name followed by “Let’s go!” but that’s just a suggestion. I’ve had clients use funny words like “potato” and “shazam!”
Choose whatever release word you like, as long as it’s unlikely to slip out during a casual conversation. It’s also a great habit to say your dog’s name before giving him your release word. It lets him know that you’re addressing him, that the next thing that comes out of your mouth is something he should pay attention to, and helps eliminate confusion.
Ready, Set, Stay!
The first exercise is incredibly easy:
1. Choose a quiet spot in your home that will allow you to walk a few steps away from your dog and where there are few to no distractions. Grab about 15 small treats.
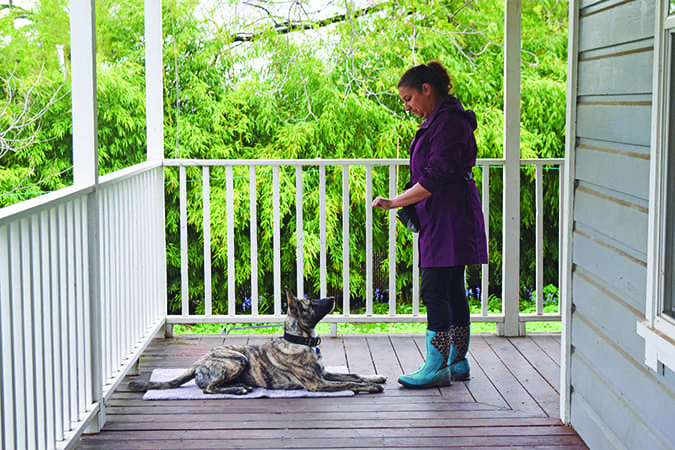
2. Ask your dog to lie down on a mat, and stand facing him.
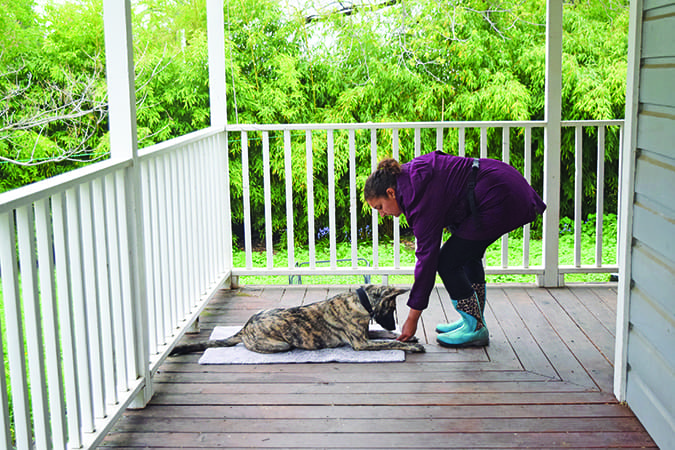
3. Show him your hand gesture for “stay” and immediately lean down and place a treat on the floor between your dog’s outstretched front legs, then stand straight again.
4. Repeat this until you’ve gone through all 15 treats.
That’s it. You’re done. It doesn’t seem like much, but you have already begun teaching your dog that lying on a mat and not moving is really kind of fun!
Getting Your Dog to Stay at a DISTANCE
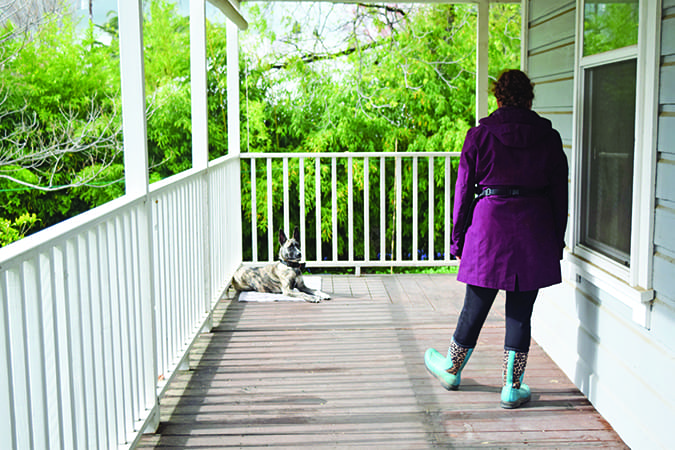
The next exercise is set up the same way, except now you’ll start moving away from your dog, one step at a time. The lesson you’re teaching your dog is “even though I’m moving, the best thing for you to do now is to stay where you are.”
Once you have your treats in hand, and your dog is lying on his mat, facing you, you will:
1. Show your dog the stay cue and then take a single step backward.
2. Return to your dog, lean down, and place a treat on the floor between your dog’s outstretched front legs. Why on the floor? Because if you deliver the treat to his mouth, you’ll soon notice he will start to stretch his neck and body upward and toward your hand to get the treat. Soon, he’ll be standing!
3. Repeat this single-step exercise five times. You will have gone through five treats.
4. Now show him the hand gesture and then take two steps back.
5. Return to your dog. Lean down and deliver the treat.
6. Repeat this two-step exercise five times. You will have gone through five more treats.
7. Now take three steps backward, return to your dog, and deliver the treat. When you’ve done this five times, you should be out of treats.
Releasing the Stay
It’s time to release your dog from his stay.
1. Stand still and resist the urge to make a gesture with your hands or body. We want the release word to become significant and to not be overshadowed by any movement you might make.
2. Say your dog’s name, followed by a brief pause (so he doesn’t learn to start to rise when he hears his name), then say your release word. For example, “Fido (brief pause), let’s go!”
3. Then, after you’ve finished saying your release word, you can invite your dog to move off of his mat by clapping your hands and moving backward quickly, or clapping your thighs and using a high-pitched playful voice (for example).
4. Praise your dog and play with him for a moment away from his mat. He’s done really well!
5. Soon after your short break, grab some more treats, invite your dog back on the mat, and begin again.This time, try to make it to four steps backward for a few repetitions. If your dog finds this harder and stands up, refer to the trouble-shooting tips below and on the next two pages.
6. If he’s doing well with four steps, resist the urge to go to five steps just yet! Instead, start varying the number of steps you take, always returning to deliver a treat on the floor. Try taking three steps (return and treat), then one step (return and treat), then four steps (return and treat), then two steps (return and treat).
7. When you’re out of treats, stand still and say your release cue, then invite your dog to step off his mat and play with you.
That’s enough for now. Call it a day!
Distance Practice Tips
As you gradually increase the number of steps you take away from your dog, you can begin adding these new elements of difficulty.
Turn Your Back
So far, you’ve been taking steps while moving backward, always facing your dog. Later, when your dog is acing the easier exercises, try turning your back to walk away from your dog instead of stepping backward. Keep it easy at first! If you can take eight steps away from your dog while facing him, try showing him the hand gesture, turning your back, and taking only three steps away before turning back around and returning to him to deliver the treat.
Walk Around a Large Object
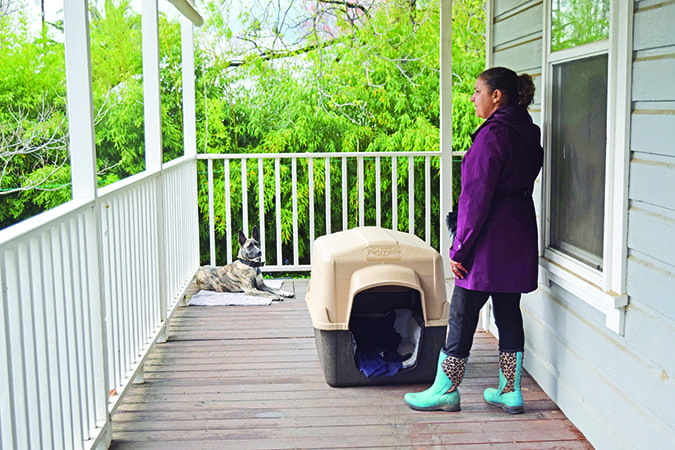
Once you’re able to move away from your dog with your back turned to him, try walking around an object that only partially obstructs his view of you before returning to deliver a treat to him. For example, walk around the dining room table (he can still see your legs), or around the island in the kitchen (he can still see the top half of your body).
Disappear from His View Entirely
This one can take some time to work up to. Don’t rush it! When your dog successfully stays on his mat while you walk around an object, try slipping out of his view for just a nano-second. Maybe you can walk away from him in a straight line down a hallway, and after a few steps, slip into a bedroom doorway or behind a corner, and then very quickly reappear. Return to him to deliver a treat between his paws.
Distance Trouble-Shooting Tips
- When you’re stepping away from your dog, move quickly. If you move too slowly, your dog might get up and follow you. You want to move at a pace that will assure him that you’re returning immediately to deliver that treat.
- Don’t pause between stepping back and returning to your dog. Stay in constant motion. Once you reach the maximum number of steps you want to take during a repetition, immediately return in one fluid motion. Your movement should look like that of a ball being tossed in the air; there is no hesitation before returning.
- Be mindful you’re not tossing the treat or letting it drop on the floor from too high up. This might cause it to roll or bounce away from your dog, and he’ll stand to get it. If that does happen, though, let him have it, and invite him back into position on his mat before resuming the practice. It was your mistake, not his.
- If your dog stands up when you bend down to deliver a treat, it’s possible that he’s not comfortable with having someone lean over him. Try bending your knees and squatting to avoid leaning over him, or stand a step farther away from him.
- If your dog successfully stays on his mat while you take two steps backward, but he gets up and follows you when you try three steps, return to an easier level of the exercise and do a few more repetitions before trying three steps again.
- If you have a dog who is used to always training with the use of a clicker and you feel he would do better if you used one for these exercises, you can click to mark the moment just before you begin returning to him. In other words, you would click at your farthest point. But in general, a marker is not necessary when training the stay behavior.
Steps to Training Your Dog to Stay: DURATION
To add duration to the stay behavior, you can begin to pause before returning to your dog to deliver the treat.
Start with a very short pause at first. Take an easy number of steps away from your dog, pause for two seconds, and return to your dog to deliver a treat. Gradually increase the number of seconds you pause. Don’t move ahead too quickly with this part! Resist jumping from a two-second pause to a 10-second pause, and just as you did with the number of steps in the earlier exercises, vary the length of your pauses.
For example, once you’re able to consistently pause for five seconds before returning to your dog, and your dog is looking nice and relaxed, try varying your next repetitions between five seconds, then three seconds, then one second, then increase to six seconds, then back to two seconds. Keep it variable as you slowly increase the number of seconds.
Don’t forget to practice your dog’s release cue every now and then! Once he’s off the mat, praise him playfully. Then invite him back to his mat for more training and treats.
You might notice that it takes a little more effort to convince him to get up when you release him. That’s great! It means he’s enjoying the stay exercise. It’s fine if he chooses to stay on the mat. A release cue simply means “You can move, now” – not “You have to move now!”
Duration Trouble-Shooting Tips
- If your dog appears to become less tolerant of the longer pauses, he might be anticipating that the next pause will always be longer than the last one. That can become frustrating and demotivating. You don’t always need to keep making the exercise more difficult in a linear fashion. Once in a while, throw in an easy repetition or two to keep your dog interested in the game.
- Avoid staring at your dog while you pause. He’ll think you’re expecting him to do something, and you might notice him start to offer you behaviors that he knows. Keep facing your dog, but “act casual.” I sometimes look around the room calmly, blinking softly. Or I’ll inspect my fingernails.
Steps to Training Your Dog to Stay: DISTRACTION
Distractions need to be introduced gradually into your training. So far, you’ve been working in a quiet environment and all of your movements have been pretty consistent. You have been moving away from your dog and returning to him to give him a treat.
Now you can start to change the game up a bit. Instead of moving in a straight line away from him, you can start moving in a circle around him. But wait! You’ll need to proceed with this exercise the same way you did with the distance exercises: One step at a time.
Once you have your treats in hand, and your dog is lying on his mat, facing you, you will:
1. Show him your hand gesture, and then take a single step a little to the right. Imagine you are beginning to walk a circle around your dog, counter-clockwise.
2. Return to face your dog after that one single step. Lean down and place a treat on the floor between his outstretched front legs.
3. Repeat this single-step-to-the-right exercise five times, showing your hand gesture before each repetition.
4. Now take two steps counter-clockwise.
5. Return to your dog. Lean down and deliver the treat.
6. Repeat this two-step exercise five times.
7. Now take three steps counter-clockwise, return to your dog, and deliver the treat.
8. Once you have successfully done a few repetitions at the halfway mark – i.e., you’ve reached your dog’s tail end – you can then try walking all the way around the dog.
When you’ve successfully done a handful of repetitions in one direction, it’s time to start doing the same exercise, but in the clockwise direction. Again, start with one step at a time. This might feel repetitive, but this type of gradual progress is the best way to get that nice, relaxed response from your dog when you ask him to stay.
Distraction Trouble-Shooting Tips
- If your dog stands when you’re walking a full circle around him, step around him more quickly. He might turn and shift his weight to watch you walk. That’s okay. If you’re quick, he won’t have time to stand up. Once you’ve gone around a couple of times, he’ll understand what to expect and he’ll relax into the exercise.
- Be mindful of his tail! Sometimes dogs will be quick to stand if we come too close to his tail. I can’t blame them! If you notice this, give his tail end a wider berth. That should help reassure him.
- If your dog struggles to stay put, look around for things in the environment that might be making it hard for him. Are there distractions like food or toys on the floor, or another dog close by? Are you working next to a busy area of the house, or maybe next to a door? Is there an appliance nearby that keeps turning on and off noisily?
More Distraction Practice Exercises for Learning Stay
Add Silly Movements
So far, you’ve kept your body movements relatively quiet. Now, begin adding more movements that can serve as a distraction that your dog learns to ignore. For example, after walking a short distance away from your dog, briefly wave your arms around before returning to him immediately to reward him. Or perform a few dance steps, get silly with it! If your dog gets up, tone it down a bit until he understands that he’s still expected to hold the stay. Then you can turn up the silliness quotient again.
Add a Low-Value Toy
Grab a low-value toy or object and hold it behind your back, out of your dog’s view. Stand back a few steps from him, show him your stay gesture, then extend your other arm to the side to show him the object. Quickly hide it behind you again and then deliver a treat to him. Repeat this several times. When your dog does well, you can begin shaking the toy a bit, or even squeaking it just once or twice. Remember to reward your dog after every single successful repetition.
Add a High-Value Toy
Repeat the previous exercise, but with a toy you know your dog really wants.
In the end, teaching a stay behavior is all about rewarding your dog heavily for staying in one place. It’s also about releasing him often during practice so that he learns to trust that he’ll be allowed to move soon enough, which should help him to relax while he waits.
Nancy Tucker, CPDT-KA, is a full-time trainer, behavior consultant, and seminar presenter in Quebec, Canada.


Perceived as an excellent article, but what if your dog is food adverse and has never had a toy in his mouth. How do you overcome that?
STAY where you are, as you are, I will come back for you to release you. Not supposed to call your dog to come to you from STAY.
Does anyone know WHAT KIND OF DOG Nova is? She is absolutely beautiful!
My dog would definitely have a problem with treats. He’s extremely food motivated, which is good, but if he smells it, forget it — he’ll be doing his kangaroo impression until he gets it. (He’s a Lab/Mastiff mix). What would you do in a case like that?
What do I do if my dog is deaf?
Madelon – Dealing with a deaf dog can be SO challenging, BUT so rewarding when you give your little pal hope and confidence. I had this problem with my shephard/pit mix. She was a rescue and I was told that the previous family had not given her much attention, nor did they even look into the fact that she was deaf. So disturbing…
One thing that I did was find a good online course to do so (without having to break the bank) with a personal trainer. I came across this course that was (fairly) cheap compared to any trainer I could find. It seemed weird to try a course, but I figured it may be a big game changer for the long run – so I gave it a shot. I’m sure there are a lot of good long-term focused courses our there you could try, but I used this one: shorturl.at/efrRV
If you give it a shot I’d love to hear if you find the same success as I did with it! Adrienne is a licensed trainer and my little girl is doing SO good now with obedience, confidence, and trust around other people in general and my little cousins! Hope it helps 🙂 Good luck!!
For a deaf dog, use your hand signals followed by a treat. They will soon relate your signals with a treat. I used this method with my deaf dog.
Thanks for writing this all up.
Don’t forget to add to practice NOT facing your dog. If you are taking the groceries out of the car or picking up poop on the walk, you will be taking your eyes off your dog. So you do not want your face to be part of the picture for staying.
I have 3 dogs which are always together, either at home or at the park. Should I keep them separated when training them or do you think it is it possible to train all 3 at once? They are very good at waiting for each other to get treats.