


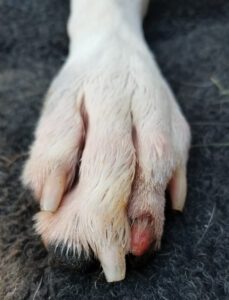
Rock salt (sodium chloride) helps humans by melting ice that makes walking and driving dangerous, but it harms our dogs’ paws by causing irritation, burning, and even frostbite. And if dogs lick their paws in an effort to remove the salt, they can suffer from vomiting and diarrhea.
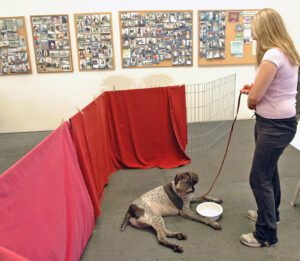
If you live where rock salt is commonly used to melt icy roads, sidewalks, and/or parking lots, plan ahead to make this a safe winter. Limit walks in salted areas. If your dog walks where salt or other de-icing agents have been spread, clean her paws by rinsing them in cool or warm (not hot) water. Salt dissolves in water so you won’t need soap or special rinses. Simply dip her feet into a container of water, massage water into her paw pads, and dry with a clean towel.
Protect your dog’s paws from ice melting chemicals
Boots are a great direct line of defense for protecting your dog’s paws. They take getting used to, but many dogs adjust to wearing booties that fit well, are the right size, and attach securely. Treats and patience speed the process. Even if rock salt isn’t widely used where you live, booties can make below-zero temperatures more comfortable for dogs.
You can also protect your dog’s paws with products like Musher’s Secret, which contains white and yellow beeswax, carnauba wax, and candelilla wax. These waxes form a protective layer that prevents salt from reaching the skin, plus they prevent cracking, dryness, and hardening of the paw pads.
Apply by gently massaging a thin layer into your dog’s paw pads, between toes, around the central pad, and around the nails. A second layer helps with salt protection.
Other products recommended as protection against rock salt feature oils such as mango, coconut, shea, and cocoa butter. Bag Balm, another popular paw protector, contains petrolatum, lanolin, and paraffin wax. Apply and let the oils absorb for a few minutes before going outdoors.
“Pet friendly” ice-melting products
Dozens of ice-melting products claim to be “pet friendly.” That claim is often the only difference between an expensive product sold in pet supply stores and identical (and much less expensive) ones sold in home improvement stores. The term “pet friendly” is meaningless and not subject to any enforcement; ice melts are not regulated by any government agency. And few of them list their ingredients on their labels, leaving consumers without any way to investigate the “friendliness” of the products.
The ASPCA’s Animal Poison Control Center classifies all ice-melting products as chemical irritants and warns that these products can cause gastrointestinal symptoms such as vomiting and diarrhea plus topical irritation to the paw pads and skin.
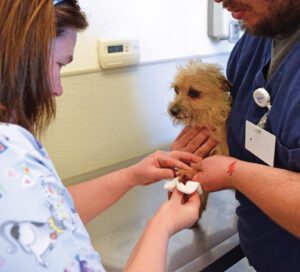
Most de-icing products are sold in the form of pellets or crystals that are meant to be sprinkled on the iced-over areas where melting is desired. It’s easy for these pellets to get stuck to or wedged between the pads of a dog’s paws, where they can cause a burning sensation. And when the dog licks his paws for relief, he consumes the rock salt or chemicals in the pellets – not good!
Even ingredients that melt ice without harming skin, such as ethylene glycol, can be toxic and even fatal if ingested. Ethylene glycol is the active ingredient in antifreeze. A safer ingredient is propylene glycol, but it doesn’t work as effectively so it is often combined with urea, which makes it toxic to cats and ruminants such as cows and goats if ingested.
Safer for dogs: Chloride-free de-icers
Chloride-free de-icing products contain no salt or any other form of chloride (such as sodium chloride, potassium chloride, or magnesium chloride) to melt ice and snow. In contrast, most chloride-free ice-melts use calcium magnesium acetate (CMA), which doesn’t work as well to melt snow or ice that has already accumulated – but works well as a pre-treatment, before snowfall or freezing weather, to prevent the formation of ice. CMA products do not contain chloride, urea, or nitrogen and have minimal impact on storm water run-off. They are less irritating to dogs’ paws than chloride salts.
CMA products are more expensive than rock salt and are less effective than salt at de-icing at the coldest temperatures, but are biodegradable and less corrosive to concrete, metals, flooring, and other surfaces.
We like the CMA product called Play Safe Ice Blocker. Unlike most of its competitors, Play Safe Ice Blocker lists all of its ingredients (on its label and on its website), a practice that we strongly support. It’s also applied as a liquid, sprayed onto surfaces to prevent ice formation; there are no pellets or crystals to get stuck to your dog’s paws use caution
If ice is a problem on your sidewalk or driveway, compare labels and ingredients before buying an ice-melt product that claims to be “pet friendly.” Store it where your pet can’t reach it, use it cautiously, and rinse it off of your dog’s feet as necessary. If your dog ingests a chemical ice melt product or rock salt, contact your veterinarian or a pet poison control center:
The ASPCA Poison Control Center
aspca.org/pet-care/animal-poison-control
(888) 426-4435
The Pet Poison Helpline
(855) 764-7661


")

")

")


