

Most dogs are used to our touching them with randomly placed pats on the head or back. If you think about it, however, the primary result of this brief contact is communication. Petting your dog is one way we thank them for a job well done and convey our love or appreciation for them.
Massage and other forms of touch are also ways to communicate with your dog, but in a very different manner than petting. When carried out consciously with quiet intention, the methods I will show you in this article will convey your affection AND communicate in a deep manner with the physical structures of the dog’s body. These methods have the potential to increase blood flow and stimulate healthy function of the nerves, muscles, and joints of the dog’s back and spine.
I made a number of suggestions for setting up a successful massage session in the March issue of The Whole Dog Journal. You’ll want to be sure to approach your dog during a quiet time of day(evenings are good), in a location where both you and your dog are comfortable (in or near his bed, on the floor where she likes to sleep, sitting with you on the couch or bed). You also need to touch very slowly and gently and be sensitive to her sore areas. Each of the following methods can be performed with the dog sitting, standing, or lying, as she prefers.

1. Flat Hand Massage
This flat-hand massage stroke is a relaxing method which I use to get the dog mentally settled down and comfortable with a style of touch which is different from petting. These long, gentle strokes also warm and gently stretch the skin and muscles, readying them for the more specific massage methods which follow. This method slows you down and sensitizes your hand so you can become aware of any odd areas in your dog’s body that may signal deeper problems. Feel and watch for areas that are warmer or colder than normal body temperature, areas that twitch or sag as you apply pressure, and patches of dry hair or skin.
This method is simple. Put one hand on the dog’s chest, both to comfort and to stabilize her. Shape the broad surface of the palm and fingers of your other hand into a flat, mitten-like form. Place this hand over your dog’s backbone just behind her shoulder blades. Leave your thumb separate from your fingers on one side of the spine.
Press down into her body with uniform pressure throughout your hand and fingers. Use gentle pressure at first – once your dog learns to relax with the method you can increase the weight of your hand. Now, slowly slide your hand all the way down your dog’s back to the tail. Use the downward pressure to smooth the hair, skin and underlying muscles in a steady continuous motion. Always stroke from head to tail, moving in the same direction the hair grows.
Repeat the flat hand stroke directly down the spine and nearby muscles at least three to five times. Note areas which have temperature and texture differences. If your dog flinches and does not like this method no matter how lightly you apply it, contact your veterinarian for investigation of deeper muscular or skeletal problems.
Once you have finished these strokes, move on to the other methods mentioned below or apply similar, flat strokes to other areas of the body. Depending on the size of your dog, you could apply flat hand or flat finger strokes to the neck and shoulder and down the foreleg, lower back, hip and hind leg. Be sure to stabilize your dog with one hand while you stroke in the direction of the hair growth with the other. Pay attention to your dog’s reactions. Adjust the pressure of your hand to bring comfort and relaxation.
2. Cross-Fiber Massage
Another helpful massage technique uses a back-and-forth rolling motion of the fingertips to increase circulation and unlock contracted muscle fibers. It looks similar to the probing motion I demonstrated last month which is useful in detecting muscle and joint soreness along the spine. In human massage circles, this method belongs in a group of “cross-fiber” techniques because it applies pressure across the muscle fibers.
This method applies pressure to a small amount of tissue and gently forces it to move. Due to this direct pressure down into the tissue, areas which are already sore may flinch or contract. If your dog reacts with pain or surprise when you apply this method be sure to lighten your pressure or move to a nearby area.
Start this method one inch behind your dog’s shoulder blades. Locate the center of her backbone, lengthen your fingers and place the fingerpads on the firm area of muscle approximately one inch to the side (see photo A in link below) Press lightly down into the muscle, then curl your fingers, moving the underlying hair, skin and tissue back toward your palm (photo B). Once you have slowly rolled the muscle in toward the spine, slowly uncurl your fingerpads and move it back to your starting position.
Push your fingerpads down into the tissue with just enough pressure so it moves when you move your fingers. If you are not pressing hard enough you will slide over the hair. Repeat this back-and-forth movement at least two to three times but no more than five times in a row in the same site. Once you have finished in one area move your hand down to the next section and repeat. When you finish one side of your dog’s back, turn the dog (or move your body) so you can reach the muscles on the other side of the backbone and repeat the sequence. Go slowly and adjust your pressure to your dog’s comfort level.
As you practice, tune in to the quality of the tissue under your fingertips. Healthy relaxed muscles are firm but pliable. Tight, tense muscles are harder and may be pulled into rope or string-like bundles. The tight rope-like areas may be sore, but if you move slowly, the cross-fiber movement softens and unlocks the knotted tissues.
3. Spine Like a Chain
This technique is not actually a massage method, but rather a movement exercise I adapted for dogs from the Feldenkrais® Method of human movement education. The Feldenkrais Method uses gentle, tiny motions to improve movement ability and eliminate painful restrictions. I have experienced both private one-on-one sessions with a Feldenkrais practitioner and several years of practitioner schooling to eliminate chronic back pain and overcome the debilitating effects of a serious car accident.
During my private sessions, I benefited tremendously from a particular movement which involved slowly touching each vertebrae of my back. This segment-by-segment touch seems to relax and reprogram the tiny muscles, tendons, and ligaments which link each bone of the spine. After the session, I would get up off of the table and, in addition to being relatively pain-free, I would actually stand measurably taller! Considering I was in my mid-twenties at the time, imagine my surprise at “growing” over an inch in height as my study continued.
The method which follows for your dog’s spine is an adaptation of that touch. It is a good one to apply to the healthy active dog in order to maintain proper function of the muscles and joints of the spine. This method is particularly useful for dogs who experience weakness in the hindquarters due to age, calcification of the spine, or injury. In the latter case, I find it especially effective because regular massage methods can cause pain or scare a dog with a sore back.
If your dog has an area along the spine that really hurts, and you press hard on that site, he may bite you or leave. But with this non-invasive spine touch method, you can go into a tender, previously injured area and start the release without triggering pain or fear. That way, the tissues relax and the animal regains confidence about moving the area once again.
Its miraculous results requires one difficulty, however. In order for it to work properly, you, the toucher, need to be quiet, focused, and willing to patiently hold your fingers very lightly in one spot for at least 15 to 30 seconds if not longer. Some clients call this method boring because it moves so slowly. The dog may enjoy it, but the giver gets impatient. Actually, once you learn how to “get quiet” and tune in, there are a lot of fascinating sensations within the tissues you can “listen” to with your fingertips.
During a normal movement sequence, a muscle contracts as needed and then completely relaxes. Following an injury or prolonged hard work, the tissue can become contracted and become unable to completely relax and lengthen. After a period of time, it seems like the body just accepts this as a normal state and forgets about it. The associated joints and nearby muscles are hindered in their function often causing inflammation and pain. The spine becomes like a stiff stick instead of the flexible chain of multi-faceted joints it is designed to be.
By touching the dog in non-habitual or unusual, non-threatening ways like this spine touch, you can get the brain and body to wake up and reconsider the holding pattern of the tissues. Long-term restrictions can open up with just one session, returning the spine’s normally flexible link-by-link character. Even when permanent damage has been done to the body, this type of touch can result in profound changes.
Picture the information which moves between the body’s structures and the brain like traffic moving back and forth on a highway. If the highway gets blocked (by muscle contraction or injury), you can use this simple touch to either remove the block or open up little bypass roads to get the traffic (information) moving once again. This can stimulate circulation and improve nerve and muscle function even in damaged areas.
In these photos, I start in the middle of Hiedi’s back. Once you get the feel of the method you can start lower down on the back, clear down to the dog’s hips or up on the dog’s neck. Wherever you begin, skip over the anatomically complex area directly over dog’s shoulder blades.
4. Link By Link
Place one hand on your dog’s chest, to both hold and stabilize her. Run your free hand down the middle of her back, locating the knobs of the spine. Once your dog is comfortable, position your body close to her so you don’t lean and strain your back.
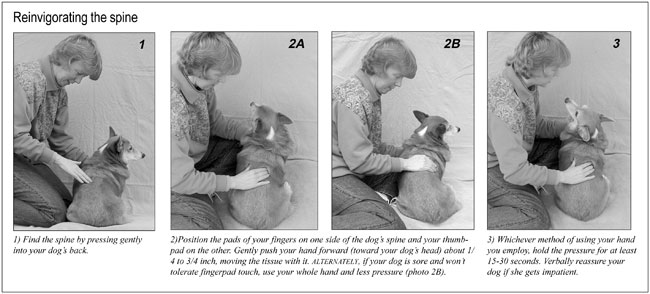
Put the pads of your fingers on one side of the spine and the pad of your thumb on the other side. You want your pads to be about a half-inch to an inch on either side of the backbone, though on a big dog the distance might be greater. You’re seeking the spongy muscle area.
Next, press down into the tissue lightly so that when you push, you move the skin and a small amount of underlying muscle tissue forward with your fingers. Gently push your hand up toward your dog’s head, about 1/4- to 3/4-inch (see popup image to the right). Use as little downward pressure as possible to move the tissue forward. Some dogs will have loose skin and muscle that will slide easily; other dogs’ skin is so tight that you can barely move it. Either way, you only need 1/4 to 3/4 of an inch of slide.
If your pressure is too slight, your fingers will just slide over or rumple the dog’s fur. Hold the tissue in the forward position for at least 15 to 30 seconds if not longer. The most common mistake people make when doing this for the first time is to get impatient and skip this waiting period. I recommend taking three deep, slow breaths before you slowly take the tension out of your fingers and let the tissue ooze back to your starting position. Then move your hand further forward, choosing a new spot 1/2 to one inch up the dog’s back and repeat.
If your dog gets impatient while you are holding the tissue forward, talk to her or give her a little chest scratch with your supporting hand to distract her. If she is very sensitive, forgo “pushing” the tissue forward. Simply place your fingers on either side of the spine and press into the tissue lightly, holding the pressure for 15 to 30 seconds.
Dogs with very sore backs might be unable to sit still for even this light pressure. If this is the case, I rest my flat open palm over the spine, relax my arm and shoulder and just breathe with the dog (photo 2B). Once this contact is accepted, I will attempt to slowly hug the tissue forward 1/4 to 1/2 inch with the flat hand rather than my finger tips. Hold this position for at least 15 seconds before slowly releasing the tissue.
Remember, the goal is to get the brain and body to focus on each link of the back separately from the entire backbone structure. You’ll see the best results if you move in small increments with as little pressure as possible and – the real key – hold the movement for at least 15 to 30 seconds.


