


A picture is worth a thousand words, and when it comes to our beloved canine companions, we can never have too many memories preserved in perpetuity. Like people, dogs have unique personalities. Learning to capture your dog’s attitude, spirit and charm can make the difference between a so-so photo and a memory you just have to blow up and frame. The following tips will help you take your best shot.
288
When you want jaw-dropping photos, it never hurts to let the true professionals work their magic by scheduling a professional photo shoot for your pet. Not only do professionals have the know-how and the equipment to achieve stunning images, working with a professional gives you the opportunity to be photographed with your pet.
While we strongly believe and have seen ample evidence that it’s worth the cost to arrange for some once-in-a-lifetime professional photographs of your dog, we’ve also learned that, with just a little knowledge and a lot of practice any dog owner can learn to take terrific, memorable pictures of their dogs. One of the advantages you have, after all, is your familiarity with your dog; no one else will have as many opportunities to capture his unique personality.
And that is the key to a great portrait. Ask professional photographers and dog lovers Rachele Valadez and Amy VandenBerg of Artis Photography in Snohomish, Washington, the difference between a good photo and a great one, and their answer is emphatic: Personality.
“I think a lot of times people don’t take the time; they get a beautiful dog portrait, but it’s not their dog. It’s a dog. It’s a beautiful portrait of a Dalmatian, but it’s not ‘Echo,’” says VandenBerg.
Whether shooting pets or people, capturing a subject’s unique personality is the team’s main goal. To help achieve this with pets, they often ask owners to engage their dogs in a favorite game in order to capture the joy of being a dog: running full tilt after a ball, jumping for a Frisbee, rolling in the grass, or chewing sticks.
288
Similarly, Seth Casteel of Little Friends Photo in Los Angeles and Chicago (and who frequently tours the country taking portraits), specializes in lifestyle pet photography “embracing the at-ease mentality of pets on-location in their natural settings.”
“Each photo shoot I do is a unique challenge,” he says. “My goal is to showcase the dog’s personality through an image or series of images. Once I meet the little friend I am photographing, I find inspiration and ideas start to generate. I let the little friends tell me what kind of pictures best represent them.”
While posed pictures are nice, Casteel says a little creativity goes a long way to help unleash your pet’s inner rock star. Sometimes simply observing your dog in action (or in a state of inaction!) can help identify photographable moments. “Try something different,” says Casteel. “Play hide-and-seek with your dog. Ask him to sit and go hide in the house. Bring your camera and wait to be discovered.”
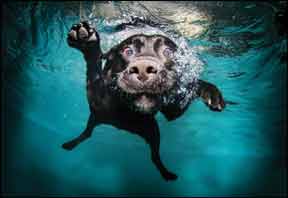
The last time Casteel tried something different, he was underwater photographing a diving dog. His underwater diving photos have since become a media sensation, going viral on the Internet and becoming the subject of his forthcoming book and 2013 calendar, both titled, Underwater Dogs.
Casteel dove into underwater photography quite by accident while shooting an on-land photo shoot with “Buster,” a Cavalier King Charles Spaniel who wanted to spend his time chasing his ball into the backyard pool.
“I thought, ‘I wonder what he looks like in there,’” recalls Casteel, who was so curious, he ran out and bought a waterproof point-and-shoot camera to capture Buster’s antics. Liking what he saw, and sensing he was on to something creatively, he decided to save up for a waterproof housing to protect his professional gear.
“It was a happy accident,” he says.
Enjoy the Great Outdoors
Shooting outdoors offers the benefit of myriad backdrops and the advantage of natural lighting, which pros favor at certain times of day. When planning an outdoor photo adventure, consider shooting during what photographers call “the golden hour,” the hour or so just as the sun is rising or setting. The light during this period is softer and offers warm, flattering hues. Also, because the sun is lower in the sky, it reduces the degree of overhead shadow.
288
Avoid shooting midday when the sun is directly overhead, as it creates harsh shadows that distort the image. If your dog decides to be a perfect poser in the park at high noon, look for a well-shaded area to help filter overhead sun.
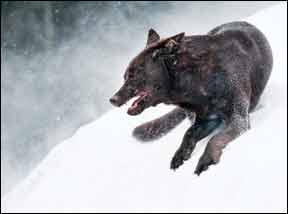
Even cloudy days offer certain advantages, according to Los Angeles photographers Kim Rodgers and Sarah Sypniewski, authors of Dog Photography for Dummies. “Don’t write off a cloudy day,” they write. “Thinking that you can’t get good photos on a cloudy or overcast day is a misconception. In fact, this is sometimes the best light you can hope for, especially if you’re photographing a black dog. Clouds can act as a giant softbox that filters the sun to an even and dispersed state, so take advantage of those clouds and forget about the ‘high noon rule’ on a cloudy day.”
Dog photographer Ida Kucera of Lerum, Sweden, takes the “cloudy day effect” one step further and frequently photographs pets in inclement weather for a naturally dramatic effect. Her dynamic photos have also been seen making the rounds on Facebook.
“Don’t be scared of doubtful weather,” says Kucera. “Even a good blizzard or sand storm creates great effects in lighting and casts dramatic shadows. I enjoy a good, extreme weather situation – it brings natural drama and takes the pet ‘back to nature’ a bit.”
Photography Basics
Whether using a simple point-and-shoot camera, or a more complex DSLR (digital single lens reflex) camera, understanding a few basic concepts can help improve your at-home photo shoots.
Rule of thirds – This is a basic composition principle that splits the frame into a tic-tac-toe board with two vertical and two horizontal lines. Rather than position your subject directly in the center, place his face at one set of intersecting lines. Whether you use the top or bottom set depends on what you want to highlight. To highlight something in the background, place your subject on one of the lower intersecting points; to highlight the subject in the foreground, use the upper intersecting points. The rule of thirds is a subtle, but powerful way to make images more interesting.
Choosing a background – To help make your pet the star of the shot, watch out for distractions in the background. Pick up unnecessary items that don’t contribute to the story you’re trying to tell, and watch out for unsightly objects (for example, a dirty dumpster). Pay attention to items that appear to be “growing” from the subject, such as a light pole directly behind his head.
When photographing dogs outdoors, Casteel recommends looking for the “wall of magic,” a bank of attractive green bushes that can be especially flattering when the sun is shining through, yet the bushes create a shady spot for the dog. You can also look for colors that complement your dog, or patterns that are interesting, but not overly distracting (such as the repeating pattern of a brick wall or wood fence).
A new angle – For most pet portraits, shooting at eye-level produces the most flattering image. Get down on the ground and experience the world from your dog’s point of view. Extreme angles, such as shooting down on your dog from up high, or shooting up from ground-level offer fun, creative results, so don’t be afraid to experiment; it’s one of the biggest benefits of digital photography (you don’t have to pay for film and processing!). Also, don’t be afraid to rotate the camera from the traditional horizontal position to a vertical orientation to add additional variety to your pictures.
Flash – Most pros agree that using a camera’s built-in flash leaves a lot to be desired when it comes to pet photography. The burst of light reflects off the subject’s retinas, and creates an alien-like image of dogs with red and green laser beams as eyes. If your camera has a fixed flash, it’s best to avoid using it. If using a DSLR, consider investing in an external flash unit or a lightscoop. Both attach to the camera’s “hot shoe” (the square port on the top of the camera) and allow you to bounce light off the ceiling so it falls back on your subject from a softer angle.
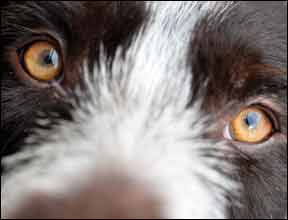
Fill the frame – Don’t be afraid to get close to your subject. Filling the frame with your subject, either by physically getting closer or using the lens to zoom in, creates stronger composition by highlighting the subject and helping to eliminate the possibility of clutter. For an artistic effect, you can even try filling the frame with one part of your dog – like the pads on his foot or his snout.
288
Black and white dogs – Predominately black or white dogs pose a special challenge for your camera’s automatic mode because the light meter attempts to adjust the exposure to a setting that represents the middle tone of a particular scene. As a result, details are often lost on dark dogs, and white dogs appear washed out.
When using a point-and-shoot camera or the automatic setting on a DSLR, the best bet is to avoid direct, midday sunlight in favor of an evenly lit shady spot or a cloudy day. Direct sunlight will cast shadows that destroy detail. If shooting indoors, daytime shots often work better because you can fill the room with natural light. For both black and white dogs, an external flash or lightscoop can be used to bounce light off the ceiling to help light the subject. Many photographers also use an external flash when shooting outside, especially in brighter sunlight, because the additional light can help “fill” areas lost visually to shadow.
Even with the help of an external flash, it often takes some tinkering with the exposure compensation feature to produce a properly exposed photo of a black or white dog.
Exposure compensation is a sliding scale, usually represented by -2.0 on the left and +2.0 on the right. When set at “0,” the camera is exposing the photo without any input from the photographer. Adjusting to the left (negative) makes the next photo you take darker; adjusting to the right (positive) makes the next image lighter. Exposure is a great tool to experiment with; a solid understanding of how exposure affects images can help you create far better photos – especially of dark or light dogs.
Understanding Your Equipment
The better you understand your equipment, the more creative muscle you can flex in your photographs. Manuals can be daunting, but it can help if you investigate just one issue at a time.
For example, if your photos are always a little bit blurry, look in your camera’s manual for more information about shutter speed – the length of time that your camera exposes its digital sensors (or film!) to the subject that you are photographing. The faster your dog is moving, the faster your shutter speed will need to be to capture him in a nice, sharp image. If you are using a point-and-shoot, look for a “sports” or “kids and pets” mode, often depicted by a running stick figure or a child and an animal. These modes automatically selects a faster shutter speed, which will help freeze the action of your subject.
Or perhaps you’d like an artistically (and purposely) blurred photo of your dog running or jumping? Then you need to know how to slow the exposure. Check your manual to learn how to override your camera’s automatic features.
As another example, if you want an image where your dog is in focus, but the background is no more than an attractive blur, you will need to learn a bit about “depth of field,” which is the range of components in a scene that remain sharp, and how to adjust it using different apertures (the size of the hole in the lens, which, when combined with shutter speed, controls how much light gets into the camera) on the camera’s lens. In general, the larger the opening on the lens, the shallower the depth of field in the photo. On a point-and-shoot, this effect can be accomplished by switching from the fully automatic mode to “portrait” mode (usually marked with the image of a face or head). A shallow depth of field is great for photographing stationary subjects you want to stand out against the background.
Recruit a Friend
Having a second person to help you handle your dog goes along way toward creating a successful photo shoot. Dogs move quickly and their facial expressions can change in the blink of an eye. You’re much more likely to catch the moment you’re looking for if you keep your eye behind the camera and your shutter-finger at-the-ready. Ideally the helper is someone your dog already knows and is comfortable with, but if not, let them get to know each other (treats and toys can work well to shorten introductions) first. During the photo shoot, the helper’s job can range from guiding a dog into position to displaying an array of antics to help elicit a bright expression.
Humans are drawn to photos where the subject is looking directly into the camera – and to those where the subject is looking completely sideways to the camera. The problem with taking photos in which the dog is making eye contact with the camera is that many dogs, like my Whippet, are uncomfortable looking into the camera – or looking at you when you have a camera obscuring your face! Have your helper perform her squeaky noises or toy-waving right behind your head, so it looks as much like your dog is looking into the camera as possible. Alternatively, position your dog, yourself, and your helper so that you get a beautiful profile, with your dog looking toward the sun, so that her eyes fill with light and sparkle.
Have Fun With It
When it comes to getting the right “look” from your canine companion, don’t be afraid to look or behave ridiculously – and be creative! Come to the shoot prepared with lots of props. Some dogs light up at the sound of a squeaky toy. Some dogs prefer toys that rattle or grunt. Some dogs are easily captivated by the crinkle of a plastic wrapper – the sure sound that a treat is nearby. With many dogs, tossing the treat or toy in the air and catching it piques their interest. Others light up if you playfully pretend to stalk them or ask the ever-popular questions, “Where’s the kitty?” or “Wanna go for a walk?”
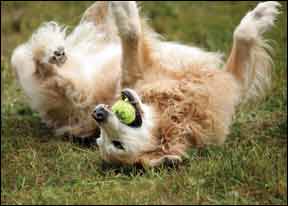
Photo by Artis Photography.
288
Whatever techniques you use, remember to reward your dog for his participation, don’t forget to take frequent breaks, and watch for signs that your dog is becoming stressed. Frequent lip-licking, yawning, panting, or averting his gaze and refusing to look at the camera are all signs that your dog is becoming stressed by the situation. Rather than try harder to get his attention, it’s time to take a break.
Train, Don’t Complain
Photo shoots, whether at home or in a professional studio, go a lot more smoothly when everyone is relaxed. In your quest to preserve precious memories, don’t forget your responsibility to keep your dog physically and emotionally safe. If he’s generally nervous in new places, consider building his confidence before expecting him to sit calmly in a photo studio full of strange people pointing strange equipment in his direction.
Similarly, consider brushing up on his basic skills before a photo session.
“If people want good pictures of their dogs sitting still and looking at the camera, a good ‘sit’ and ‘stay’ goes a million miles,” says VandenBerg. “It starts with training, for sure.”
Whether you plan to shoot at home or in a studio, make sure you practice any skill or behavior you know you want from your dog in the weeks and days before the shoot.
“Do not stress, do not yell, do not get frustrated,” says professional photographer Julie Poole, of Julie Poole Photography in Knoxville, Tennessee. “That will only torque up the dog.”
Poole, who breeds and shows Whippets, has been photographing pets since 2006. “I started in animal photography because I was showing horses and enjoyed photographing them even when I wasn’t showing,” she says. “Being a competitor, I knew more of what people wanted to see in their shots, and what not to shoot.”
A love of and familiarity with the subject is a huge advantage of working with a professional photographer who specializes in animal photography. Not only are they more likely to be patient with and attuned to the special needs of non-human subjects, they understand how to bring out the best in the animal.
“There’s something good about every subject that’s put in front of you. It’s up to you to bring it out in them,” says Poole.
Just Do It
“People take photos for many reasons,” Poole says. “The most important one is to preserve memories. At some point, the dog will be gone and memories are all that is left. It doesn’t have to be a Picasso or a Pulitzer to mean the world to you.”
VandenBerg agrees. “Document your dog throughout his life. Don’t wait,” she says. “I can’t count how many clients who have called and said, ‘I’m so glad you photographed my dog because we lost him the next day, or next week.’ Whether you choose to use a professional photographer or not, you just can’t have enough pictures.”
Stephanie Colman is a writer and dog trainer in Los Angeles. She shares her life with two dogs (whom she enjoys photographing), and actively competes in obedience and agility.


