


When it comes to tricks to teach your dog, the list of possibilities is endless. The tricks included in this article assume you’ve done some basic training already, but are as long as your dog has a sit and a down, you’ll be good to go. The fun part is that these are just the beginning. Once you learn how to teach your dog, the sky’s the limit.
Before diving in, it is important to note that you should never force your dog into performing a behavior. In the long run, it prevents the dog from learning and can create an aversion to the behavior you’re trying to teach. If you find yourself getting frustrated, take a break and try something different.
While there are many training methods available—each with their advantages and disadvantages—I use a combination of luring and shaping (see sidebar) to teach tricks. In my experience, training is most effective when everyone involved is engaged and having a good time!
Shaping: Shaping is a training technique that reinforces incremental steps toward a desired behavior. Each behavior is broken down into much smaller parts that eventually chain together to reach the end goal. When the dog is successful at the first step, you add the next. For example, if you want your dog to touch a target with his nose, you begin by rewarding any movement toward the target. Once the dog is moving toward the target regularly, you go to the next step and reward the dog only when he gets within a foot of it, then only when he touches it, then only when he touches it with his nose. While it takes patience and precision on the part of the handler, shaping is a great way to teach complex behaviors. It also requires the dog to make decisions and find solutions to challenges (figuring out what you’re asking him to do) on his own, engaging his brain in ways that often lead to a strong understanding of what he’s being asked to do.
Luring: The luring technique uses a reward—usually a toy or treat—to guide a dog to perform the desired behavior. For example, if you want to teach a dog to sit, you can hold a treat in your hand, put it in front of his nose, and raise your hand above his head. Most dogs will sit back to follow the treat with their noses. By following the “lure,” the dog has moved into a sitting position—just like you wanted. Luring is often the fastest way to get a dog to perform a behavior and can be useful for training “trick” behaviors a dog might not naturally do on his own. However, it is more likely to produce reliance on rewards if not used properly and can lead a dog to act without thinking or understanding what’s being asked.
Fade: Fading is the process of removing the need for a lure, reward, or physical cue used to get a dog to perform a behavior. While several articles worth of topic all on its own, the basics of fading are as follows: once a dog is responding reliably to the lure plus the cue you plan to use for a behavior, gradually begin diminishing the use of lure. To go back to the example of the dog learning to sit, when the dog is regularly following the motion of your hand with the treat (the lure), you will begin saying “sit” (the cue) immediately before you make that motion. As the dog gets used to those two things always coming at the same time, start waiting for a second or two between saying “sit” and making the hand motion. If your dog begins to sit upon hearing the word without waiting for the hand gesture, you can continue to gradually increase the time between the word and the gesture (and make the gesture smaller) until eventually the dog only needs to hear the word before sitting. From there, you can fade the reward itself by offering treats less often and at varying intervals.
Mark: A marker is meant to provide immediate feedback for the dog by way of positive association. It says, “That was the behavior I wanted!” It lets the dog know that a reward is coming (and why) without you needing to shove a treat in his mouth the exact moment he did what you asked. I use the word “Yes!” or a clicker. You set up these markers by “charging” them. To charge a marker, do several short practice sessions where you only use the marker and offer the reward: click the clicker (or say the word), give a treat, and repeat—nothing else.
Reward: Rewards don’t just mean food! Anything your dog likes and is willing to work for can be effective—yummy treats, favorite toys, praise and cuddles.
Cue: The word or signal used to ask the dog to perform a behavior.
Reset: Go back to the starting position for the exercise.
How to Teach Your Dog to Spin
For this trick, the end goal is to have your dog stand in front of you and spin in a circle. It is one of the easiest tricks to train and, as a bonus, it looks pretty cute. Here’s how to teach it:
- Grab a treat (or toy) and stand in front of your dog.
- Show him the treat.
- When he moves toward it, move your hand away in a slow circle in front of you.
- As he completes the circle, mark it and reward him (more about that in the sidebar, “Training Terms and Techniques”). If your dog is having trouble making a full circle, you can start by marking and rewarding at the halfway point and move on to full circles once he has that down.
- Repeat until he is reliably circling then add the verbal cue you want. I use “spin” to ask for a circle to the left and “twist” for a circle to the right.
How to Teach Your Dog to Shake Paw
“Shake” is a classic for a reason. In addition to being a fun trick, it’s also useful for getting your dog accustomed to having his feet touched—a huge help for drama-free nail trims and vet visits. Like humans, most dogs have a side they prefer. When teaching this trick, I start with the side the dog offers first. To begin:
- Cue your dog to sit in front of you.
- Put a treat in your palm and close your hand into a fist around it.
- Hold your fist out in front of the dog within easy paw reach—I find somewhere between floor level and about six inches off the ground works well for most dogs, though you may have to try different heights to see what your dog is most likely to go for.
- Wait for your dog to move his paw. As soon as he does—even a little bit—mark it and reward him. It’s a good idea to reward him with your opposite hand (not the one you’re hiding the treat in). This will make it easier for him to understand that the reward comes when he touches your hand with his paw, not his nose.
- Reset your dog and repeat the process. Once he starts to lift his paw more regularly, you can begin waiting for him to move it closer to your hand before rewarding him. As a note, many dogs jump straight to pawing at the hand with the treat. That’s great for teaching this trick. Mark and reward the behavior.
- Once he is reliably touching your hand with his paw, you can begin raising your hand higher. When he’s got that down, begin offering him your palm instead of your closed hand. If he has trouble, don’t worry! Just back up a step and let him get some more practice before trying to up the difficulty once more.
- When he is once again putting a paw in your hand regularly, add the verbal cue “paw” or “shake.” I use “paw” for the left paw and “shake” for the right.
- Fade out the reward once the cue is established.
How to Teach a Dog to Backup
Backing up on cue is another “trick” behavior that has many practical uses—such as asking your dog to move away from a door or getting him to give you some space when he is underfoot. To teach it:
- Stand in front of your dog with a treat in hand.
- Hold the treat over his nose and take a small step toward him—this will put the treat over his head instead.
- When he steps back to follow the treat, mark and reward the behavior. It doesn’t have to be a big step on his part. Any backward movement is good to start. You may have to stand still and wait a bit for him to figure it out.
- Grab another treat and repeat the process.
- Once he is able to take one step back reliably, you can add a second step before marking and rewarding.
- Gradually increase the number of steps before the reward.
- When your dog can reliably do three or four steps back, add a verbal cue. I use “back.”
- Once he is responding consistently to the verbal cue, fade out stepping toward him.
If your dog has a good recall, you can add some complexity to the trick by sending him away from you with “back” and then calling him to you.
Teach Figure Eights to Your Dog
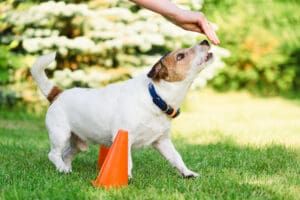
Figure eights won’t work for a Great Dane without some adjustments, but for any dog short enough to walk through your legs, this is a great trick to learn. In addition to looking impressive, it is useful for developing flexibility (in dog and handler!). I work on figure eights inside or in a fenced yard since adding a leash to the mix can create a trip hazard. To begin:
- Ask your dog to sit in front of you.
- Take a step to the side so your feet are a little farther than shoulder-width apart. There should be enough space between your legs for the dog to fit through easily. Make sure you are comfortable and well-balanced.
- Hold a treat in your right hand.
- Hold the hand with the treat behind you low enough that your dog can see the food—mid-thigh level usually works for medium and large dogs. For smaller dogs, it’s helpful to have a target stick.
- When your dog moves toward the treat, pull it slowly back and to the right. The goal is to lure him through your legs toward your right side. As soon as he walks through, mark it and reward him. If he’s uncertain about it, you can try throwing the treat or a toy behind you to add some momentum. A note here: If your dog is reluctant to walk through your legs, absolutely do NOT straddle him or grab his collar and “help” him—while it may not seem like a big deal from the human perspective, asking a dog to walk underneath you is asking for a lot of trust on his part. If your dog isn’t having fun, find another trick to teach first before returning to this one.
- Reset and repeat the steps above until your dog is comfortably walking through your legs.
- Once he’s walking through your legs easily, have him sit in front of you again. This time, take a treat in each hand.
- When he walks through your legs, continue to move your right hand in a circle around your leg until it is in front of your knee. When your dog follows, mark and reward.
- Now, hold your left hand behind you and let him see the treat. Lure him through your legs and to your left side. Mark and reward.
- Practice those steps until you get a smooth flow.
- Once your dog clearly understands the process, you can add a verbal cue, “weave” in my case, and begin to fade out the lure.
For very large dogs or handlers facing mobility challenges, two cones—or any similar objects—can be used in place of your legs. Just position yourself where you can lure the dog around both obstacles and follow the steps listed above.
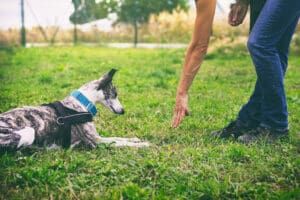
How to Teach a Dog to Crawl
I usually sit on the floor in front of my dog to teach crawl. Standing and using a target stick also works well. To start:
- Cue your dog to lay down.
- Hold a treat a few inches in front of his nose and drag it slowly away along the floor. Slow is key here since you don’t want him to hop up and walk toward it.
- If he makes any movement toward the treat without standing up, mark and reward.
- Once he’s reliably crawling forward a few inches, you can start gradually extending the distance and adding the verbal cue “crawl.”
- Fade the lure once he is consistently responding to the cue.
Once I’ve gotten “crawl” established as a cue, I expand the game by setting up obstacles for my dogs to crawl under—most often I sit on the couch, prop my feet on a stool and ask the dog to crawl under my raised legs. I use the same steps for training a dog to go under an obstacle as I do for a no-obstacle crawl. Again, it is important not to force a dog who is reluctant or hasn’t figured it out yet—while it might be tempting to give a gentle push to the shoulder if they won’t stay down, it’s far better to let him figure it out himself. Not only will he learn the behavior better, you’ll also avoid creating an unpleasant experience that could sour him on it.
Some of the best tricks my dogs have learned over the years started as pure silliness. Among other things, my two-year-old Airedale, Carmen, has learned a few dance moves. While there are plenty of behaviors we worked on with a plan and specific goals in mind, these evolved organically when she showed an interest in what I was doing and, since it made me laugh, I decided to reinforce it.
The dance moves began when Carmen was about five months old. My sister was dancing around the apartment and the puppy was fascinated. She started tracking my sister’s arm movements which resulted in a floppy-eared head bob. Not only was it absolutely adorable, I loved how closely the puppy was watching and responding. I grabbed treats and we had an impromptu dance party where we rewarded her for following along. With time and repetition, it evolved into several specific hand signals and behaviors—including the head bob, stepping in time, and a forward step-back-step combo.
The moral of this silly story is “don’t be afraid to play with your dog!” Try new things and reward behaviors you want to keep. Fun and excitement are powerful training tools for humans and dogs alike.


