
To continue reading this article or issue you must be a paid member. Sign in

Join Whole Dog Journal
Get full access to Whole-Dog-Journal.com – more than 4,000 articles – for just $20.
Join today and save 30% off our full price.

Subscribe
The best in health, wellness, and positive training from America’s leading dog experts

[Updated January 28, 2019]
In February 2010 my Border Collie, Daisy, became one of an estimated six million dogs diagnosed with cancer each year.
Chemotherapy. My stomach tumbled to my feet. The diagnosis was scary enough; how could I possibly consider chemotherapy? I had visions of a treatment worse than the disease itself.
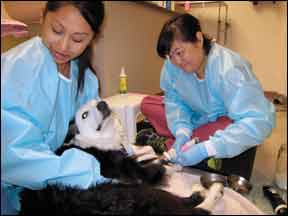
As it turns out, my preconceptions of chemotherapy were far worse than its reality. Chemo hasn’t cured my dog – more on that later – but it’s given us more than 18 months (and counting) of joyful, quality time together. It’s even given Daisy a dozen new friends and routines to look forward to, in the form of her oncologist and chemotherapy technicians and the special things they do to make her comfortable on her “chemo days.”
Chemotherapy at its most basic definition is simply chemical treatment of an ailment. In this sense, we use chemotherapy everyday: antibiotics, NSAIDs, vitamins, herbs. Chemotherapy for the specific treatment of cancer involves infusing the dog’s system or a specific place in the dog’s body with cytotoxic chemicals in an attempt to destroy the cancer cells while hopefully doing as little damage as possible to normal healthy cells. Other than a few specially designed drugs for a couple of specific cancers, chemotherapy drugs attack cells in the process of rapid growth or division.
Cancer chemotherapy was developed in the 1940s when researchers became aware of the effects of mustard gas, which was being used as a chemical warfare agent. Those exposed to the gas were found to have very low white blood cell counts and researchers reasoned that if the chemical had an effect on the rapidly growing white blood cells, it might have a similar effect on the fast growing cells in some of the blood cancers. This led to further research and development of similar drug protocols.
Daisy has transitional cell carcinoma (cancer of the bladder). It is not curable, but it is treatable. I had to ask myself why I would treat her with toxic drugs. For this type of cancer, the first reason is to prevent metastasis – the spread of cancer to other parts of the body. The second reason was to control the disease and thereby increase her longevity and enhance her quality of life. For other types of cancer, chemotherapy might be used to reduce the size of the tumor so that surgery can be performed. Chemotherapy can also enhance the effectiveness of other cancer destroying treatments such as radiation. In some cases, it can rid the body of the disease, though this goal is not realistic at this time for many with the disease.
The goal of chemotherapy drugs is to kill the cancerous cells, while administering a dose that causes “tolerable” harm to the body’s normal tissues. Since a distinct trait of cancer cells is that they grow at a faster rate than most normal cells, chemotherapy agents usually affect the process of replication of these rapidly dividing cells by interfering with DNA or RNA at the cellular level. Most agents kill cancer cells by affecting DNA synthesis or function, a process that occurs during the cell cycle. The agent binds to the DNA and alters the replication process; the cellular activity is thereby halted and the cell dies. There is a balancing act between destroying as many malignant cells as possible and leaving enough normal cells to recover.
There are more than one hundred chemotherapy drugs being used to treat canine cancers and more are being developed all the time. Many years of research have resulted in established (but evolving) treatment protocols – treatment plans developed for a specific cancer type in which drugs are selected for their unique and complementary cancer-fighting properties and administered in a particular order and schedule. Combination chemotherapy is a protocol in which different drugs are rotated or given concurrently. With this approach, the drugs are given so as to attack the cancer cells in different ways thereby decreasing the possibility that the cancer cells will survive and become resistant to the beneficial effects of the agents.
There are many factors that your dog’s oncologist will take into account when selecting the protocol to use for your dog, including the type and extent of the cancer, the nature of the agents, published evidence of their efficacy, any potential adverse reactions, and your dog’s medical history and overall well-being. Your dog’s breed, too, may affect the protocol; some breeds with the MDR1 mutation cannot tolerate certain chemotherapy agents. (Get a list of commonly affected breeds and a test to identify affected individuals here.) And of course, the oncologist’s own training and experience plays a part in the decision.
If an oncologist does not see a response within a certain timeframe, the particular agent may be determined to be ineffective and another protocol may be administered or the treatment halted. The oncologist may even develop a protocol that isn’t standard but is the best way to treat your dog.
The common routes of drug administration are by mouth (orally), or by injection, which can be given through a vein (intravenous), into a muscle (intramuscular), or under the skin (subcutaneous). These are systemic treatments that travel throughout the body to reach the cancer cells wherever they may exist. More recently, other methods have been developed to increase the local concentration of the agent at the tumor site. Such site-specific applications can direct the agents to the affected areas of the abdomen, lungs, bladder, the central nervous system, and the skin. This process can reduce the systemic effects as well as provide a stronger action of the drug at the disease location.
Your dog’s specific dosage of a drug will be generally based on his body weight; other factors include your dog’s overall health and sensitivity to drugs. The dose must be high enough to be medically effective but not so high as to cause unnecessary damage to healthy cells.
Most plans begin intensive therapy with higher and more frequent doses of the agent in attempt to beat the disease back. The duration of the protocol depends on the type of cancer, the extent of disease, and how responsive it is to the treatment; the general recommendation is to administer 2-3 doses of a particular agent before determining if it is having an effect. Treatment periods can range from weeks to years. While the sound of “years of chemotherapy treatment” may sound daunting, remember that it means the treatment is working.
In addition to the chemotherapy administration itself, other exams and tests will be performed during the course of treatment. Some tests are done to see if your dog can safely receive treatment; others, such as ultrasounds, urinalysis, x-rays, CT scans, MRIs, and scopes monitor overall health and cancer status.
A routine checkup will take place during every visit. Like a report card, the following information should be relayed: your dog’s overall well-being, medications given, any changes in eating/drinking/elimination habits, any sign of illness, change in behavior, change in tumor (if visible). Report any changes to your veterinarian’s staff, no matter how insignificant the changes may seem. Thorough awareness and inspection of your dog is your responsibility. Veterinary technicians will perform a physical examination that will include obtaining heart rate, weight, and a blood sample.
Because many agents also affect healthy cells and organs, your dog’s laboratory data will be checked before each chemotherapy administration. In addition, an assessment of the effects on organs may be performed on a periodic basis. Abnormalities in any of these values may require dose adjustments or delay of therapy.
The identification and development of effective nevv anticancer drugs is an ongoing process. Agents with a potential for antitumor activity are evaluated in clinical trials. Many veterinary teaching hospitals run such trials. lfyou are interested in having your dog participate in a trial, ask your oncologist or check caninecancer.com for a list of links.
– Is the expectation of the treatment worse than the treatment itself?
– How healthy is my dog?
– How does my dog handle trips to the veterinarian?
– How sensitive is my dog’s gastrointestinal system?
– Do l have emotional, financial, and/or time commitment constraints that will lessen my ability to commit myself fully to my dog?
Every dog will be different in his or her ability to handle treatment. Some dogs will experience side effects; some won’t. Side effects tend to be temporary, spanning just the amount of time that it takes normal cells to be replaced or to repair the damage incurred from the chemo.

Canine oncologists have considerable experience with many of the standard drugs and how they affect dogs; they may prescribe medications to help prevent known potential issues. As with the administration of any drug, there can be a severe immediate reaction; this is extremely rare. This is why your dog will be monitored closely during the administration of the drug and observed for about an hour afterward. Other side effects can appear 1 to 3 days after administration and include lethargy, decreased stamina, diarrhea, nausea, and or/vomiting.
To counter the potential for nausea and vomiting, anti-nausea medication such as metoclopramide is often administered along with the chemotherapy agent or drugs such as Cerenia will be dispensed to give at home should these symptoms occur. Pepcid AC may also be suggested to prevent stomach upset. Bland diets can also help.
Guardians need to learn what the potential side effects are for the drugs their dog is receiving and how to watch for them. At times, it can be difficult to determine if a side effect is caused by the treatment or from the disease itself. Symptoms are especially difficult to evaluate during the beginning stage of treatment when there is nothing to compare them to. A day or two of nausea or a vomiting episode or two is not unexpected and is rarely dangerous. Notify your veterinarian immediately if your dog does not eat or drink for one day or longer, or if vomiting is continuous and water cannot be kept down, or if you notice blood in vomit or diarrhea. Record and report all your observations to the oncologist. If your dog does have a reaction, you may wonder whether to continue treatment; remember that the dosage can be adjusted or a different drug selected for use.
Unfortunately, the treatment drugs cannot distinguish between cancer cells and non-cancer cells. As a result, the destruction of the fast growing cells of the bone marrow and gastrointestinal tract becomes a concern. In addition, some drugs may damage the reproductive tract (not a problem in neutered or spayed dogs); others may affect specific organs such as the heart, liver, and/or kidneys and thus require frequent monitoring.
Some chemotherapy drugs affect the bone marrow, thus affecting the body’s ability to produce new white blood cells (WBCs). Your dog’s WBC count will generally be at its lowest 5 to 7 days after treatment. The lowering of the white blood cell count can make your dog more susceptible to infections, which generally arise from bacteria that normally live in the dog’s intestinal tract and on the skin, not from the environment. (So let your dog do the things he or she usually does, just use common sense and avoid known hazards such as dog parks with an outbreak of a contagion). Your veterinarian may also prescribe prophylactic antibiotics to prevent the possibility of infection if your dog’s neutrophil (a component of white blood cells) count is low (neutropenia), even if there is no evidence of infection.
Early detection of infection is important so that antibiotic treatment can be started immediately. Signs of infection can include loss of appetite, vomiting, diarrhea, lethargy, or depression. To help monitor for infection, familiarize yourself with how to take your pet’s temperature. Contact your vet immediately if the temperature is higher than 102.5°F (or otherwise indicated by your veterinarian), as a fever is an indication of infection. A dog’s normal temperature is about 100.5°F to 102.5°F. Again, severe vomiting or diarrhea, bloody diarrhea, or lethargy are indications you should contact your veterinarian immediately; severe infections may require hospitalization for intensive supportive care.
The cumulative effects of multiple doses of certain chemotherapy drugs can cause permanent side effects; if the risks outweigh benefits, treatment should be discontinued. Certain powerful drugs can only be used a limited number of times before the risk of toxicity to certain organs becomes too great. Other drugs may be inappropriate because of reactions or debilitating side effects. Sometimes, the cancer develops a resistance to the drug. The list of effective chemotherapy agents may diminish as treatment progresses; this is where the knowledge, experience, and creativity of your dog’s oncologist come in.
The first question many people ask about canine chemotherapy is whether the dogs lose their hair! Most breeds have fur, not hair, and it grows and sheds in a cycle, not continuously. However, some curly-coated breeds with hair (such as Poodles) may experience hair loss. Chemotherapy drugs target fast growing cells (like hair); fur is not a fast growing cell. Sometimes dogs will lose their whiskers and shaved areas may not regrow as quickly, but that’s about it.
Find out how else chemo for dogs is like chemo for humans here.
As with humans being treated with chemotherapy, people and pets are not thought to be at risk from living and interacting with a chemotherapy-treated dog. Most chemotherapy drugs clear the system through the urinary and/or intestinal tract within 48 to 72 hours of administration. To limit exposure of these drugs to yourself and other pets, try to have your dog eliminate in one particular area, away from areas where children play and other pets frequent. Wear disposable gloves to pick up feces immediately and place in a plastic bag and seal before disposal. If possible, thoroughly rinse areas of elimination with running water to dilute any chemical residue.
If your dog vomits or eliminates in the house, wear disposable gloves and use paper towels to clean up as much of the waste as possible. Again, bag the gloves and soiled paper towels before disposing. Depending on the location of the accident, you may want to use a thorough water rinse to clean the area. If your pet is receiving daily doses of a drug that you administer orally, the drugs should be handled only while wearing protective gloves (and kept out of the reach of children and other pets). Always wash your hands after handling medications or waste! If any member of the household is pregnant, trying to become pregnant, or immune-compromised, she should not handle any treated animal’s waste or anti-cancer medications.
Chemotherapy treatment can be expensive as it involves professional time and expertise, the high costs of the drugs themselves, the duration of treatment, the associated procedures and diagnostics, as well as the removal of biomedical hazardous waste (including the leftover drugs, the catheters and needles used to deliver the drugs, the technicians’ smocks and gloves, etc.). Most veterinary centers will bill per treatment, not in one lump sum. If you have pet insurance, check your policy; some plans cover treatment. CareCredit also offers special financing for approved veterinary procedures. On her blog, Dr. Nancy Kay has a great resource page for “Financial Assistance for Veterinary Care.” This information also appear in her book, Speaking For Spot. Ask for an estimate of expected costs so that you can evaluate the financial impact and discuss any financial concerns you have with your veterinarian so that he or she can offer the best treatment options based on your budget.
1. What is the life expectancy without treatment?
2. What is the gained life expectancy with treatment?
3. What chemotherapy agents will my dog be given?
4. How are they administered?
5. What is the process?
6. How is the effectiveness evaluated?
7. How frequently will treatment be given?
8. How long will my dog receive treatment?
9. What is the estimated cost of treatment?
10. What side effects might my dog experience?
11. What clinical signs should I be concerned about?
12. What signs require me to bring my dog in immediately for examination?
13. Who should I contact after office hours if my dog has symptoms that worry me?
Your dog’s body must work harder to maintain good health; not only is it battling a disease, it is working to repair the collateral damage from the chemotherapy agents.
Be especially aware of symptoms of pain; as we know, dogs are especially good at hiding any signs that they might be hurting. But pain can cause stress and stress can be detrimental to your dog’s overall health and healing process. Work with your veterinary team to prevent and treat it.
The presence of cancer can result in significant alterations in your dog’s digestion. There are some general concepts that can be followed to provide good nutritional support: provide a variety of foods that are aromatic and tasty; minimize the feeding of simple carbohydrates (starches and sugars – studies have shown these to be fuel for cancer); give foods with high quality protein sources; and consider the addition of omega 3 fatty acids. While optimal nutrition is ideal, it may come down to feeding whatever your dog will eat. There are a myriad of supplements that claim to be of benefit, but many of these are unfounded and unproven; discuss any supplements that you consider giving your dog with the oncologist.
If your dog is on chemotherapy for any period of time, you may find she needs non-cancer treatment or medications. While on chemotherapy, no regular vaccinations should be given, though heartworm and flea preventatives can be given as long as not contraindicated with the chemotherapy or your dog’s overall health. Always coordinate regular veterinary care with your oncologist.
Other areas of support you might want to consider include acupuncture, chiropractic, herbal, and homeopathic remedies. Daisy receives acupuncture twice a month and takes herbal supplements as prescribed by her holistic veterinarian, who works closely with her oncologist to check for drug interactions. Her herbal supplements are ceased 24 hours before and after chemotherapy administration to reduce the potential for any interactions.
One of the most important aspects of treatment is to maintain a positive attitude and keeping your dog’s life – and your life – as normal as possible. Exercise within your dog’s abilities, play, and enjoy every moment. While we have to remember the clinical reality, it’s best to focus on your dog’s reality!
– Be an informed guardian.
– Research your dog’s specific disease.
– Discuss your findings with your dog’s oncologist.
– Join or start an online support group.
– Record every detail about your dog’s behavior during treatment.
– Act quickly if immediate medical attention is needed.
– Familiarize yourself in advance about the potential side effects.
Chances are there has been research and studies (try searching online using Google Scholar) on your dog’s particular kind of cancer. These studies will often include statistics such as median survival times and side effects of particular agents. They can be disheartening or encouraging. Do discuss your findings with your dog’s oncologist, but remember there is no crystal ball to predict how your dog might react or respond. Each dog is unique and each cancer that develops is unique. A disease that develops in one dog may not be treatable in another for a variety of reasons such as location of disease, the dog’s age and health, and the cost and availability of treatment. That said, it can be helpful to review the statistics, however extensive or limited, and use them as guidelines for weighing potential risks and benefits.
Realistically, there are few cancers that can be cured by chemotherapy. Some can go into remission (no detectable evidence of the disease), and even multiple remissions (such as with lymphoma). Others can become static (reduction and or no advancement of the disease).
Remember, if you decide to embark on the chemotherapy route, you can stop at any time. When I started treatment with Daisy, my guiding principle was that if it affected her quality of life in any way, we would cease therapy immediately. She’s been receiving chemotherapy for over 16 months now, including intravenous mitoxantrone, carboplatin, and vinblastine; we also tried the oral drugs Leukeran (chlorambucil) and Palladia. Unfortunately none of these had the desired effect of combating the disease, but fortunately they did not have any detrimental affect to her well being. She’s also received piroxicam (an NSAID that has anticancer properties) for over a year; we’re not sure if this had any effect on the disease, but it did seem to have a palliative effect (she now takes Deramaxx instead).
There was a period when I did stop treating her with conventional chemotherapy agents, but that was because we had run out of drug options for her particular type of cancer. At that point, I put her on an herbal chemotherapy as recommended by her holistic veterinarian. She continues taking it now in conjunction with a special combination protocol of two chemotherapy agents as developed by her oncologist. We’re now at 18 months since diagnosis (her prognosis was less than a year) and I can joyfully report that her disease is static and she is happy and feisty. She comes home from her oncology visits ready to play frisbee.
The author wishes to extend her heartfelt thanks to Daisy’s amazing and caring oncologists, Jeffrey N. Bryan, DVM, MS, PhD, DACVIM (Oncology), at the College of Veterinary Medicine, University of Missouri and Martin Crawford-Jakubiak, MLAS, DVM, DACVIM (Internal Medicine, Oncology), and his wonderful team at Sage Centers for Veterinary Specialty and Emergency Care in Concord, CA.
Author Barbara Dobbins is a dog trainer on hiatus who has been inspired to return to school to study veterinary oncology.


Resource guarding in dogs is a natural, normal behavior. In fact it’s a natural behavior for most warm-blooded animals. Even we humans guard our resources—sometimes quite fiercely. Think about it. We lock our doors. Store clerks have loaded rifles under checkout counters, while homeowners keep shotguns and baseball bats leaning in the corner by the back door. Companies hire security guards. Banks keep valuables in vaults. Some of us get insanely jealous if someone pays too much attention to our significant other. I could go on…

Dogs guard their resources as well, sometimes quite fiercely. This is most troublesome when they guard those resources from humans, but resource guarding can also get them in hot water when they guard from other dogs. That said, some dog-dog resource guarding behavior is quite appropriate and acceptable. The wise dog owner not only knows the difference between appropriate and inappropriate guarding, she also knows when and how to intervene, manage, and modify.
If dogs didn’t guard their resources from other dogs they’d be in danger of starving—both in the wild and in multi-dog households. It’s this survival instinct that triggers everything from the canine dirty look known as a “hard stare” to the ferocious blood-letting, sometimes fatal battles that can occur when dogs fight over valuable, mutually-coveted resources: food, toys, objects, locations, beds, and human attention.
There are several different scenarios that can occur when one dog chooses to guard something from another dog, ranging from a very healthy, normal interaction, to those that risk the very lives of one or more of the combatants:
The ideal resource-guarding scenario probably plays itself out frequently in multi-dog households, dog parks, doggie daycares, and anyplace dogs randomly gather. It looks something like this: Dog A is chewing happily on a (insert any valuable resource here). Curious, Dog B approaches. Dog A gives Dog B “the look.” Dog B quickly defers, saying, “Oh, excuse me!” by calmly turning and walking away. No harm done. Much of the time the dogs’ owner isn’t even aware that this occurred.
Dog A is chewing on (insert resource). Dog B approaches. Dog A gives Dog B “the look.” Dog B gives Dog A “the look” back. Dog A defers, “Oops, sorry!” by dropping the resource and leaving. Dog B was inappropriate, but Dog A didn’t want to argue about it. The danger here is that somewhere along the line Dog A may get fed up with Dog B’s inappropriate behavior and decide not to defer.
Dog A is chewing on (insert valuable resource). Dog B approaches. Dog B would defer if warned, but rather than giving “the look,” Dog A leaps into action and attacks without giving Dog B the opportunity to defer.
Dog A is chewing on (insert valuable resource). Dog B approaches. Dog A gives “the look.” Dog B is oblivious, and keeps blundering forward, until Dog A feels compelled to escalate the intensity of his message, to aggression if necessary, to get his point across.
Dog A is chewing on (insert valuable resource). Dog B approaches. Dog A gives “the look.” Dog B gives Dog A “the look” back. Instead of deferring, Dog A takes offense and escalates his aggressive behavior to maintain possession of his resource. Dog B reciprocates with increased aggression, and a serious fight ensues.

The same five scenarios can apply to other resource guarding situations—the dog who doesn’t want to share his sticks or toys; who becomes tense if another dog approaches him on his bed; or who claims his owner’s total and undivided attention. So whether it’s food or some other valuable possession your dog is guarding, what do you do about it?
First, you have to be aware of the resource guarding tension. It’s hard to miss in Scenarios 3, 4, and 5, but if you have dogs engaged in one of the first two you may have overlooked it. Time to sit up and take notice! With Scenario 1, where both dogs respond appropriately, all you need to do is keep an eye on things and breathe a sigh of relief. As long as the pattern repeats itself, you needn’t worry. You just need to stay calmly observant and take note if the pattern changes—if, for example, Dog B is slower to defer over time, which may cause an increase in Dog A’s tension and possibly escalate to higher-intensity resource guarding. Many dogs live happily together their entire lives politely signaling and deferring in relation to valuable resources. That’s how it’s supposed to work—perfectly appropriate and normal.
If you see subtle signs of increasing tension, however, or if you see Scenario 2 behavior, where Dog B is bullying Dog A into giving up the resource, you have potential trouble brewing. It’s possible that Dog B will calmly defer for the rest of the dogs’ lives together. You could continue to observe, and intervene only if things start to escalate. Maybe it never will. Or you could intervene with management and/or modification now, before you have significant relationship damage to repair, and a more difficult behavior modification challenge.
Of course, anything more dramatic than Scenario 2 behavior requires immediate action in the form of management and, if you choose to do so, modification.
I’m a huge fan of management. If your dogs’ list of guardable items is relatively short and the dog-dog guarding interactions are reasonably predictable, then management may be a realistic option. Feed meals to your dogs or give them pig ears only when they are safely crated or closed in separate rooms. If you have a toy guarder, do toy-play with the dogs separately, and put coveted toys away when the dogs are together. Case closed.
Modification is in order, however, if battles grow increasing likely to erupt unexpectedly over an ever-growing list of miniscule triggers, such as a crumb dropped on the floor, a preferred resting spot on the rug, the hallway to the kitchen, equitably delivered treats to both dogs, or a rapidly growing radius around a valued human. Of course you’ll manage in the meantime, but since management always carriers a risk of failure and guarding battles can be fierce, the more generalized the guarding, the more critically important it becomes to convince your dogs to act appropriately with other dogs in the presence of high-value resources.
Aggression is caused by cumulative stress that pushes a dog over his aggression threshold. We’re all grumpier when we’re stressed. (See “Understanding Aggression in Dogs,” WDJ October 2010). Begin your modification program by minimizing as many other stressors as possible in your dogs’ world. That includes creating structure and predictability in their lives; exploring and treating any possible medical conditions that may cause pain or distress; and eliminating the use of any coercive or pain-causing training tools and methods (shock, choke and prong collars, physical or harsh verbal punishment).
At the same time, incorporate calmness-inducing products and procedures such as increased aerobic exercise, the “Through a Dog’s Ear” recordings, Thundershirts or Anxiety Wraps, calming massage, and TTouch.
There are a few different options for modifying resource-guarding behavior between dogs. You can classically condition Dog A (the guarder) to love having another dog around him even in the presence of valuable resources; you can operantly condition Dog A to perform a different response when he’s in possession of a valuable resource and another dog approaches; and you can operantly condition Dog B to avoid the guarder when he has a valuable resource. Here’s how each of these work.
The point of counter-conditioning is to change Dog A’s emotional response to the proximity of Dog B in the presence of a guardable resource. This procedure will require dogs with very solid sit-stays and down-stays. Alternatively, you can use tethers. It’s critically important that Dog A not be triggered to guard during these training sessions; awareness of threshold distance and the dogs’ proximity to each other is paramount.
Step 1: Start with the two dogs sitting a few feet from each other—farther, if necessary to avoid guarding behavior. Have a bowl of pea-sized, high-value treats. Give a treat to Dog B (the non-guarder), and then give one to Dog A, accompanied by happy-voice praise. If the dogs are so far apart you have to walk some distance to get to Dog A, start praising as you walk. Repeat until you see Dog A brighten noticeably when Dog B gets his treat; this tells you he’s made the association between Dog B getting a treat and the next delicious treat coming to him. This is a “conditioned emotional response” (CER)—the physical manifestation of the emotional change that happens because of the pairing between the presence of the other dog and the arrival of a high-value treat.
If you start with the dogs far apart, when you have established a consistent CER with Dog A, gradually move them closer together, continuing with the counter-conditioning and achieving CERs at each new distance until the dogs are happily taking treats a few feet apart. Depending on your dogs, this could take one session or many.
Step 2: Have a bowl of high-value treats. Hang out with Dog A in a good-sized quiet room with the door closed—watch TV, read a book, work on the computer—but don’t feed him any treats. In fact, ignore him completely. After 20 to 30 minutes, bring Dog B into the room on leash and have him sit. Feed him a treat, then spend 20-30 seconds giving generous treats and praise to Dog A. Then remove Dog B from the room.
At varying intervals, bring Dog B back into the room and repeat the procedure—always bringing Dog B into the room before you make any move to reach for the treats in the bowl. Repeat until Dog A looks consistently happy—the CER—as you move to bring in Dog B.
Step 3: Repeat Step 2, but this time Dog A is in possession of a guardable resource—a bone, a toy, a favorite bed. If there are things he guards less intensely than others, start with a lower-value resource.
Tether Dog A with his resource as far from the door as possible, and hang out for another 20 to 30 minutes before bringing in Dog B. Step in the door with Dog B, have him sit, feed him a treat, and then do your 20- to 30-second praise-and-treat routine with Dog A. Repeat until you have a consistent CER—Dog A brightens happily when you enter the room with Dog B.
As you do these repetitions, occasionally encourage brief eye contact between the dogs several times at each distance, so that trigger gets built into the procedure. If eye contact triggers significantly greater intensity from Dog A, stay at the door until that intensity goes away and you are getting consistent CERs even with eye contact.
Gradually move closer with Dog B, obtaining consistent CERs from Dog A at each new distance before moving closer again. Remember to look for and reward some eye contact between the dogs.
When you have closed the distance by half, mark that spot and start over again at the full distance, but this time with Dog A untethered. This should not trigger any tension from Dog A, and you should be able to move closer to him with Dog B more quickly than before.
Step 4: Repeat Step 3 with the same value resource, in all the rooms in the house, until Dog A displays consistent CERs everywhere.
If you have multiple dogs who Dog A guards from, repeat Steps 1 to 4 with each of the dogs. Then do the same thing with multiple dogs in the presence of Dog A and a low-value guardable resource.
Step 5: Go back to Step 3, again with Dog A tethered, but now in possession of a somewhat more valuable resource. Repeat all steps with all dogs, individually at first, then in larger groups, until Dog A offers consistent CERs regardless of what dog or what room. Continue up the resource-value ladder until Dog A shows no sign of tension
Step 6: Do occasional “cold trials” without the set-up and repetition—a deliberate “management failure” in which counter-conditioning meets real life. Do at least one cold trial per day, and if you see tension reappearing, go back and do repetitions of the procedure at whatever step is necessary for your dog to regain his equilibrium. Then move through the steps to completion—probably much more quickly than the first time through.
Resource-guarding in dogs lends itself beautifully to the “Constructional Aggression Treatment” (CAT) operant conditioning protocol developed by Dr. Jesus Rosales Ruiz and Kellie Snider, MA, a few years ago at the University of North Texas. (See “Build Better Behavior,” WDJ May 2008). Our Dog A gets tense and eventually aggressive because he is concerned that the approaching dog is a threat to his valuable resource. These aggressive distance-increasing signals are often successful in making the other dog go away, hence they are reinforced, and behaviors that are reinforced are repeated.
To use the CAT procedure, tether Dog A with a low-to-moderate-value guardable resource, and approach from a distance with Dog B. If you know that Dog A begins showing signs of guarding at a distance of 15 feet, start at 25 feet. As you approach, watch Dog A for any small sign of tension. The instant you see it, stop with Dog B, mark the spot, and wait. As soon as you see any decrease in Dog A’s tension, any sign of relaxation, quickly turn and walk away with Dog B, back to the 25-foot distance.
Pause there for at least 15 seconds (longer, if you think Dog A needs more recovery time), and then repeat, returning to the marker at the spot where you stopped before. Continue these repetitions until you see no sign of tension from Dog A when you arrive at the marker with Dog B.
On your next approach move four to six inches closer and mark that spot. You will likely see Dog A display signs of tension again at this distance. Repeat approaches and departures at this distance until the tension is gone, then decrease distance slightly again.
What you are doing with this procedure is teaching Dog A that a new behavior—acting calm and relaxed—makes the threat to his resource go away. As he continues to deliberately act calm and relaxed, he actually becomes calm and relaxed, and eventually no longer feels threatened by the approach of Dog B. Ideally you will see “crossover” behavior, where he acts very friendly and affiliative as Dog B approaches, offering distance-decreasing signals instead of his previous repertoire of distance-increasing signals. When you’ve worked through the procedure with low-to-moderate-value resources, repeat with high-value resources.
With counter-conditioning, you change your dog’s emotional response, and as a result his behavior changes. With operant conditioning (CAT), you change your dog’s behavioral response, and as a result his emotional response changes.
You can also operantly teach Dog B a new behavior in the presence of Dog A and a valuable resource. This is a useful second line of defense, in combination with modifying the behavior of the guarder. You can teach Dog B to withdraw on your cue; you can also teach Dog B to withdraw in response to any noticeable warnings from Dog A, such as a hard stare or a lip curl. The advantage of a cue from Dog A is that it happens, and Dog B responds by leaving, even if you’re not there to give your cue.
Eventually you may find that the mere presence of Dog A-with-resource becomes the cue for Dog B to leave, which is just fine and dandy. If you see Dog B leaving the room before the cue, go ahead and reinforce that – it’s a good thing!
When the cue is given (yours, or Dog A’s), guide (lure or prompt) Dog B to a specified target, ideally in another room. Throw a treat-and-praise fest there for Dog B, and hang out with him there for several minutes before returning to Dog A’s room and repeating the process. Dog B should soon be dashing to the other room when the cue is given – either yours, or Dog A’s lip curl.
So what happens if Dog A is in the designated target room with a valuable resource? Great question! It’s a good idea to operantly condition Dog B to a second target location in a different room. When Dog A is in Room X, Dog B learns to target to the spot in Room Y. But if Dog A is in Room Y, Dog B learns to target to a spot in Room X.
Keep in mind that you are likely to always need some degree of management with resource guarding in dogs, even with your successful modification programs. For example, even if you’ve done a great job of modifying the behavior of a dog who tends to guard toys, the high-arousal of a dog-to-dog game of tug carries a high likelihood of retriggering guarding aggression. Reserve his tug playing for games with you, and limit his play time with his canine pals to romping and running games. Be smart. Manage as needed, keep your eyes open for signs of returning tension, and be prepared to do a little remedial modification as needed.
So there you have it. Select the method(s) that appeal to you to manage resource guarding in dogs and get started. It will do your heart good to see the decreasing tension between your canine family members. It will also be gratifying to see your guarder gain new associations and learn new behaviors without fear of losing his valuables to his four-legged siblings.
Thanks to Sarah Richardson, CPDT-KA, CDBC, of The Canine Connection in Chico, California, for modeling with Otto and Peanut.

The supply of Immiticide (melarsomine dihydrochloride), the only drug approved to treat heartworm infections in dogs, has been low since December 2009, but now it’s completely gone. Merial confirmed that it was officially out of the drug on August 9, 2011. The current situation is due to a new and separate manufacturing challenge related to technical issues with the company who provides the finished product, according to a Merial spokesperson. Merial said the company is working hard to make the drug available again, but cannot speculate when that might happen.
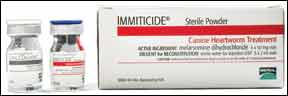
288
With Immiticide unavailable, the American Heartworm Society (AHS) has issued guidelines for treating heartworm-positive dogs to try to mitigate the damage that heartworms cause while in the body and the danger they present when they die. Briefly, here is what the AHS advises:
1) Verify all positive antigen tests with a second antigen test from a different manufacturer.
2) Give monthly heartworm preventive medication to prevent further infection. If the dog tests positive for microfilariae, pretreat with corticosteroids prior to giving the first dose of heartworm preventive medication and keep the dog under veterinary observation for at least 8 hours afterwards, due to the risk of anaphylactic shock from the rapid die-off of the microfilariae.
3) Treat dogs with doxycycline at the rate of 10 milligrams per kilogram of body weight twice a day for four weeks (give half as much if a dog cannot tolerate the higher dose). Repeat this dose quarterly (one month on, two months off) for as long as the dog is infected with heartworms. This will reduce the possibility of the infection being passed to other dogs through mosquitoes, shorten the lifespan of the adult worms, and lessen the chance of adverse side effects from worm death.
4) Restrict all activity and limit all exercise, as the danger from adult heartworms increases with physical activity.
5) Dogs with symptoms from the heartworms should receive medical treatment to alleviate respiratory distress. Surgical removal of the worms should be considered if cardiac function is affected.
6) When Immiticide becomes available, proceed with treatment if the dog still tests positive for heartworms.
I’d like to offer a few additional suggestions, based on what I’ve learned about this disease over the years.
While the AHS does not suggest any particular heartworm preventive medication, I recommend using Heartgard (ivermectin) or generic equivalent. Of the four drugs currently used to prevent heartworms, ivermectin has the strongest effect against adult worms. It also has a weaker effect against microfilariae, and so is unlikely to cause an adverse reaction, making pretreatment and observation less critical.
I also suggest giving weekly heartworm-preventive doses of ivermectin to most infected dogs. Be sure to use Heartgard, not Heartgard Plus or any other combination product, when giving weekly. Studies have shown that weekly ivermectin used along with pulsed doxycycline can reduce the number of adult heartworms by more than 78 percent over 36 weeks.
Do not combine Comfortis (spinosad), a newer flea-control product, with weekly doses of ivermectin, as it increases the risks of neurological side effects. Ivermectin should not be given more often than monthly to dogs with the MDR1 gene mutation making them more susceptible to certain drugs. Commonly affected breeds include the Australian Shepherd (standard and mini), Collie, Long-Haired Whippet, and Silken Windhound. See www.vetmed.wsu.edu/depts-VCPL for a list of affected breeds, and an inexpensive test to identify affected dogs.
As we discussed in “Update on Doxycycline and Heartworm Disease” (WDJ August 2009) and “Shortage of Immiticide for Heartworm Treatment” (April 2010), doxycycline is given to kill wolbachia, a symbiotic parasite that lives within heartworms. Destroying wolbachia weakens heartworms, makes them unable to reproduce viable offspring, reduces their adverse effects on the body, and decreases the likelihood of adverse reaction from their death. Doxycycline must be pulsed (given periodically) to keep wolbachia from repopulating. Studies that combined doxycycline with ivermectin for 36 weeks gave doxycycline during weeks 1 to 6, 10 to 11, 16 to 17, 22 to 25, and 28 to 33, but the schedule suggested by the AHS may be equally effective. Giving doxycycline with food can reduce gastric upset.
If Immiticide becomes available while your dog still tests positive for heartworms, you’ll have to decide whether treatment is warranted. Remember that the worms are doing damage as long as they are in the body, and danger of pulmonary embolism from their death also remains as long as any worms are present. Dogs showing symptoms of heartworm infection, those with heavy infections, and those who have been infected for a long time are most likely to benefit from Immiticide treatment, as are very active dogs, since the need for activity restriction would be shorter. Young heartworms are killed more quickly by the combination of ivermectin and doxycycline, so if the infection was caught early, later treatment with Immiticide is less likely to be needed. Keep in mind that dogs may test positive for heartworms for up to six months following the death of all worms.
If Immiticide treatment is not done, continue to give doxycycline quarterly until your dog tests negative for heartworms. Give ivermectin weekly to monthly while your dog remains infected.
For those considering natural heartworm treatment, remember that natural does not necessarily mean either safe or effective. These products are untested and usually contain toxic ingredients, such as wormwood (Artemisia absinthinium) and black walnut (Juglans nigra). The biggest danger of heartworm treatment is from the death of the worms, which can cause pulmonary embolism no matter how the worms die. There’s no reason to believe that alternative treatments are safer than conventional therapy, particularly if you do not give doxycycline as well.
– Mary Straus
For more information
The American Heartworm Society: Guidance for Heartworm Disease Management During the Adulticide Unavailability
heartwormsociety.org/UrgentAlert-8-9-11.pdf
Heartworm Disease in Dogs: Prevention and Treatment
dogaware.com/health/heartworm.html

[Updated October 11, 2017]
While treatment of Addison’s disease focuses on prescription drugs and electrolyte tests, holistic veterinarians add various support therapies to help their patients.
Standard Process
Nutrition is the cornerstone of every holistic therapy, and while diet cannot cure Addison’s disease, foods made of poor-quality ingredients or diets that lead to nutritional deficiencies are a significant source of stress, and additional stress is just what Addison’s dogs don’t need. Because wheat, corn, and soy are problem ingredients for some dogs, many holistic veterinarians recommend avoiding them. Some tell their clients to avoid grains altogether. In general, foods made from high-quality animal-source ingredients that are easy to digest work best, but because individual responses vary, caregivers should observe their pets’ responses and avoid ingredients that seem to trigger symptoms.
Veterinarians used to recommend adding salt to the food of dogs with Addison’s, but the benefits of the practice are not supported by research. Addison’s dogs do not require additional salt, which may lead to excessive thirst and urination.
The addition of probiotics can improve any dog’s diet, whether home-prepared, raw, cooked, canned, frozen, or packaged. Digestive enzyme powders are a sensible addition for any dog with digestive problems. These products are widely available in pet supply stores and online. Follow label directions.
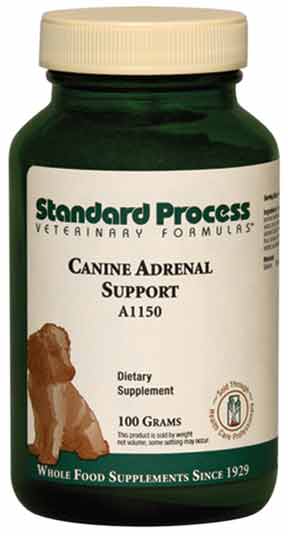
Prior to the development of synthetic adrenal hormones, Addison’s disease was treated with glandular extracts. Adrenal cortical extracts given orally or injected are still available, though because synthetic versions have so thoroughly replaced them, few veterinarians are familiar with their use. Those who are often prescribe Standard Process Canine Adrenal Support, a powdered supplement that contains animal tissue extracts and other ingredients that support the adrenals. “The goal of Canine Adrenal Support,” explains the manufacturer, “is to help maintain the adrenal glands’ response to metabolic demand, normalize adrenal function, support the body’s ability to handle stress, and promote the adrenal glands’ ability to rebuild and regenerate.” Adrenal glandulars may reduce the amount of medication needed or just help the dog feel better, but their use requires close supervision from a knowledgeable veterinarian.
Some medicinal herbs are known for their effect on the adrenals. Six years ago, the New Zealand Veterinary Journal published a case report by R.H. Jerrett, et al, that examined the effect of whole, natural liquorice (Glycyrrhiza glabra – what we would call licorice) on a dog with Addison’s. The 4-year-old neutered male subject had persistently high potassium levels despite receiving a moderate dose of fludrocortisone. “Financial considerations and the potential for adverse effects made increasing the dose of fludrocortisone undesirable, so liquorice was added to the dog’s diet in hopes that the hyperkalemia would be corrected,” wrote the researchers. The dog’s potassium levels returned to normal, where they remained for the duration of the 14-month study. “Given these very preliminary findings,” the authors concluded, “we believe it is possible that liquorice may, in future, prove to be a useful adjunct in the management of canine hypoadrenocorticism.” It may also prolong the effect of corticosteroids.
Licorice is an adaptogenic herb, a category that describes medicinal plants that help the body deal with stress. Relaxing or sedative herbs help Addison’s patients, too. Oatstraw (Avena sativa) and German chamomile (Matricaria chamomilla) brewed as teas separately or together can be added to food or even applied to the skin and coat to help dogs feel relaxed. Other herbs may be beneficial for gastrointestinal upset and liver support.
Aromatherapy’s essential oils are more concentrated than herbal teas, so they should be diluted with vegetable oils before being applied to the skin, coat, or paw pads. For details see “Aromatherapy for Dogs,” WDJ 2004.
In her book, Holistic Aromatherapy for Animals, Kristen Leigh Bell describes her Calm Canine Essential Oil Blend, made with ½ fluid ounce (1 tablespoon) hazelnut, sweet almond, or other vegetable oil, 3 drops valerian (Valeriana officinalis), 2 drops vetiver (Vetivera zizanoides), 4 drops petitgrain (Citrus auranthium leaf), 3 drops sweet marjoram (Origanum morjorana), and 2 drops sweet orange (Citrus sinensis) essential oils. Combine and store in a dark glass bottle.
“This is my standard calming blend,” says Bell, “which has had a very impressive track record for dogs in numerous situations. The calming effect ranges from ‘taking the edge off’ to soothing a dog to the point where she gets very mellow and takes a nap.”
For best results use therapeutic-quality essential oils. Several pet aromatherapy companies make their own calming sprays and oils.
Melatonin, a hormone produced by the pineal gland, is sold as an over-the-counter supplement to help people with insomnia sleep through the night.
Veterinarians have found that when given to dogs, melatonin helps manage separation anxiety and fearful reactions to thunder, fireworks, and other noises. In other words, it helps reduce stress levels.
Melatonin is recommended (one 3-mg tablet or capsule for a medium-sized dog) 20 to 30 minutes before stressful events. Although some experts warn that melatonin may interfere with corticosteroids and other medications, others consider the benefits of occasional use to outweigh the risks. Consult your veterinarian as to whether melatonin is appropriate for your dog.
Calming pheromones provide stress relief, too. The product Comfort Zone contains “dog appeasing pheromone” (DAP), which may significantly reduce destructive behavior, fears, and phobias and help some dogs deal with stressful environments. Comfort Zone is sold in pet supply stores as a spray or with a plug-in electric diffuser.
Other techniques that help Addison’s dogs include massage, the playing of soft classical music, and energy therapies such as Reiki.

1. Become familiar with Addison’s symptoms so you can recognize them in a hurry.
2. If your dog shows symptoms, go to a veterinarian at once. Prompt treatment saves lives.
3. Learn about treatment options and cost-saving tips.
4. Schedule checkups and blood tests to monitor your dog’s condition.
5. Observe your dog’s behavior and appearance to help determine the ideal medication dosage for her.
Something’s wrong with your dog but you’re not sure what. She seems listless, her eyes have lost their spark, and she just seems “off.” You might notice intermittent muscle weakness, tremors, and an inability to jump into the car or onto a sofa. Or your dog frequently ignores her dinner, vomits, or has diarrhea. These vague symptoms, which may improve and then return, could stem from a dozen canine illnesses – or they might point to Addison’s.

Addison’s disease, named for the 19th century physician who defined this adrenal gland dysfunction, is also known as hypoadrenocorticism or adrenal insufficiency. Is Addison’s Disease fatal to dogs? Yes, if left untreated, but with appropriate treatment Addison’s can be managed so that affected patients lead normal, active lives. First diagnosed in dogs in the 1950s, it is considered an uncommon canine disorder. However, veterinarians who routinely test for Addison’s often find it, suggesting that the illness is not really rare but rather under-diagnosed and under-reported. You don’t find Addison’s unless you look for it. Some veterinarians speculate that Addison’s disease occurs in dogs at a rate as much as 100 times the rate in humans.
Aiyana, a three-year-old Italian Greyhound who lives with Lydia Kunzler in Northern Utah, developed symptoms when she was nine months old, but none of the several veterinarians Kunzler consulted could find the cause.
“Last fall I noticed Aiyana was starting to lose weight,” she says, “and because I had a lot of things going on I attributed her loss of appetite to stress and tried to feed her more. But a week after one of my other dogs passed away she became very sick. She was vomiting, very lethargic, and her digestive system just shut down, sometimes going days without a bowel movement. A few weeks went by, and we had to keep her on intravenous fluids or she’d get really sick again. Finally I decided to change vets. I knew all this vomiting, alternating diarrhea and constipation, and other symptoms weren’t normal.”
Aiyana’s new veterinarian immediately recognized the signs of Addison’s and did an ultrasound test, saw how small the dog’s adrenal glands were, and ordered an adrenal hormone blood test to confirm the diagnosis.
Dogs of any breed, either sex, and any age can develop Addison’s. About 70 percent of dogs with Addison’s are female, although in some breeds, including Standard Poodles and Bearded Collies, males and females are equally affected. The median age of dogs diagnosed with Addison’s disease is 4 to 6 years, but it has been reported in puppies and in dogs as old as 12.
Certain breeds may be predisposed to Addison’s, including Portuguese Water Dogs, Bearded Collies, Standard Poodles, Great Danes, Soft Coated Wheaten Terriers, Airedale Terriers, Basset Hounds, Springer Spaniels, West Highland White Terriers, Leonbergers, Labrador Retrievers, Rottweilers, Saint Bernards, Nova Scotia Duck Tolling Retrievers, German Shepherds, German Shorthaired Pointers, other Poodles, and mixes of these breeds.
The most commonly reported symptoms of Addison’s disease, which can vary dramatically from dog to dog, include loss of appetite, weight loss, depression, listlessness, vomiting, diarrhea, hind-end pain, muscle weakness, tremors, shivering, increased thirst, excessive urination, a painful or sensitive abdomen, muscle or joint pain, and changes in coat, which may become thicker, thinner, longer, or even curly. About 15 to 20 percent of Addisonian dogs will have dark, tarry stools (melena, caused by gastrointestinal hemorrhage) or blood in their vomit. Symptoms often wax and wane, with the dog getting worse, then better, for months or even years.
Veterinarians examining Addison’s patients may notice mental depression, a thin or emaciated body, muscle weakness, dehydration, patches of darkened skin, a slow and weak pulse, low body temperature, low blood pressure, and pale mucous membranes. Blood tests may show any of the following: elevated potassium, low sodium, elevated BUN and creatinine, elevated liver enzymes, low glucose, high calcium, low protein (albumin and globulin), anemia, low cholesterol, and metabolic acidosis. Urine may be dilute (low specific gravity). A sodium/potassium ratio of less than 27 is strongly indicative of Addison’s, but a normal ratio does not rule it out, as many veterinarians assume. A sick dog with normal or elevated lymphocytes and eosinophils (lack of a stress leukogram) can point toward Addison’s.
Addison’s disease, called “The Great Pretender,” is often misdiagnosed because it resembles so many other illnesses. Both dog and human patients with Addison’s are often erroneously diagnosed as having gastrointestinal diseases such as inflammatory bowel disease (IBD), infections, parasites, cancer of the gastrointestinal tract, or poisoning. Acute renal failure, liver disease, urinary blockage, pancreatitis, insulinoma, hyperparathyroidism, and protein-losing enteropathy are other common misdiagnoses.
The most dramatic Addison’s symptom is the endocrine emergency called Addisonian crisis. This occurs when the dog goes into shock due to circulatory collapse, and it can happen so quickly that a healthy looking dog is suddenly, within a few hours, close to death.
In an Addisonian crisis, the lack of adrenal hormones depletes sodium levels (hyponatremia) and body fluids (hypovolemia), resulting in potassium retention (hyperkalemia), bradycardia (slow heart rate), hypotension (low blood pressure), associated cardiac arrhythmias (abnormal heart beats), and collapse. In other diseases, hypovolemia and shock cause tachycardia (rapid pulse); in Addison’s, the pulse slows. Low blood sugar levels (hypoglycemia) can cause seizures. Vomiting and diarrhea are common.

For many dog owners, the crisis is their first sign that something is wrong. About 30 to 35 percent of dogs with Addison’s are initially diagnosed during a crisis. Patients treated in time with intravenous fluid therapy and glucocorticoid steroids show such rapid improvement that it seems a miracle cure, though some have to be monitored and treated for several days before their condition stabilizes. And the cure is temporary, for without appropriate maintenance care, another crisis will follow.
As many as 90 percent of dogs in adrenal crisis will have elevated creatinine and BUN, which can lead to a misdiagnosis of acute renal failure. Dehydration and low blood pressure cause blood filtration to drop, resulting in “prerenal azotemia,” where waste products build up even though the kidney itself is functioning. Gastrointestinal bleeding can also cause increased BUN. The response to treatment is more dramatic for dogs with Addison’s disease than for those with kidney disease.
The adrenals are two small glands positioned next to the kidneys. The center of each gland is called the medulla and the outer area is called the cortex.
The adrenal medulla secretes the “fight or flight” hormones: adrenaline (also called epinephrine) and noradrenaline (also called norepinephrine). These hormones are generally not affected by Addison’s disease, which affects only those secreted by the adrenal cortex: glucocorticoid and mineralocorticoid hormones. Addison’s can cause deficiencies of both types of steroid hormones.
Glucocorticoids (primarily cortisol) affect nearly every tissue in the body. They help maintain blood pressure and cardiovascular function, activate the body’s stress response, regulate metabolism and blood glucose levels, stimulate appetite, modify red and white blood cell production, and promote a general sense of well-being. Glucocorticoid levels are controlled by adrenocorticotropic hormone (ACTH), which is produced by the pituitary gland.
Mineralocorticoids (primarily aldosterone) are responsible for regulating electrolytes (sodium, potassium, and chloride) and water balance, which affects blood pressure. Electrolytes also affect nerve and muscle function, including heart rate and rhythm.
Typical Addison’s, often called primary Addison’s, is caused by adrenal dysfunction that creates both glucocorticoid and mineralocorticoid deficiencies. The adrenal glands atrophy, usually because of an autoimmune response that may be hereditary. Other possible causes include granulomatous disease, tumors, injury, prescription drug side effects, infection, or inflammation. By the time symptoms appear, an estimated 85 to 90 percent of the adrenal cortex has been destroyed. Dogs with typical Addison’s will have electrolyte imbalances, but this alone is not enough to diagnose the disease, nor can normal electrolytes rule out Addison’s disease.
In atypical Addison’s, the adrenal cortex continues to produce aldosterone but not cortisol. Patients with atypical Addison’s have normal sodium and potassium levels. Most eventually progress to typical Addison’s disease within a few months or, in some cases, years.
In secondary Addison’s, the pituitary gland no longer produces ACTH because of immune-mediated damage, inflammation, trauma, or cancer. Similar to atypical Addison’s, only cortisol production is affected, but secondary Addison’s will never progress to the typical form of the disease. Because aldosterone is still produced by the adrenal cortex, secondary Addison’s disease does not cause electrolyte imbalances.
Addison’s disease can be brought on by treatment for Cushing’s disease designed to suppress or destroy overactive adrenal glands. The antifungal medication ketoconazole is sometimes used to treat Cushing’s because it suppresses adrenal function. The sudden withdrawal of prednisone or other cortisone medications after long-term use can also trigger an Addisonian crisis.
The ACTH (adrenocorticotropic hormone) response (or stimulation) test is considered definitive for Addison’s. Dogs must be off all corticosteroid hormones except dexamethasone for at least 12 to 36 hours (or more, if they’ve been on steroids for a long time) to prevent the drugs from affecting test results.

The cortisol level of an initial blood sample is measured; then the dog is injected with a form of the pituitary hormone ACTH that signals the adrenals to produce cortisol. One hour later, the blood cortisol level is measured again. In healthy dogs, cortisol levels rise, indicating a normal adrenal response. If the dog’s initial cortisol level is low and there is little or no response after ACTH stimulation, the diagnosis is Addison’s disease.
Synthetic ACTH (cosyntropin, Cortrosyn) is preferred for consistency; ACTH gels are not recommended for this test, because the results may not be accurate. An older protocol used one vial (250 mcg) of Cortrosyn for every dog, but only 5 mcg/kg is needed to achieve maximal adrenal stimulation when given intravenously. This can translate into a substantial cost saving for small dogs.
If the ACTH response test is positive and electrolytes are normal, then a separate test to measure endogenous ACTH levels can differentiate between primary and secondary Addison’s. Endogenous ACTH levels will be greatly elevated with primary Addison’s but low or undetectable with secondary Addison’s. Dogs with secondary Addison’s will never develop electrolyte abnormalities, making treatment and monitoring much less expensive.
Two situations can result in a misdiagnosis of Addison’s disease. Dogs from breeds originating around the Pacific Rim, including the Akita, Shiba Inu, and Jindo, often have elevated potassium values. This can be confused with Addison’s, particularly when symptoms are similar.
Whipworms can create a syndrome nearly identical to Addison’s, including low sodium and elevated potassium. Fecal tests for whipworms are often negative because eggs are shed infrequently.
In both cases, ACTH response tests will be normal. Always confirm a diagnosis of Addison’s disease before beginning mineralocorticoid supplementation.
In an Addisonian crisis, treatment with intravenous fluids, glucocorticoids such as dexamethasone, and sometimes glucose as well can literally save a dog’s life. Once the patient’s condition has stabilized, treatment moves to the life-long replacement of adrenal hormones, along with careful monitoring of electrolyte levels for dogs with typical Addison’s.
Glucocorticoid hormones such as prednisone, prednisolone, methyl-prednisolone (Medrol), or hydrocortisone are needed for all dogs with Addison’s disease. For atypical and secondary Addison’s, this is the only drug prescribed. Prednisolone and methylprednisolone have been converted to a bioactive form, a process which otherwise must be done by the liver, so these may be good choices for dogs with elevated liver enzymes. Methylprednisolone and hydrocortisone may be associated with fewer side effects. Hydrocortisone is synthetic cortisol, closest to the natural form.
The starting dose is 0.1 to 0.2 mg prednisone (0.4 to 0.8 mg hydrocortisone) per pound of body weight daily. This is a physiologic dose, meant to mimic the amount of cortisol the body would produce itself if it were able. It should not cause the type of side effects associated with prednisone given at therapeutic levels for dogs with problems such as allergies or autoimmune disorders.
Many dogs do well on 0.05 mg prednisone (0.04 mg Medrol, 0.2 mg hydrocortisone) per pound of body weight daily. Even large dogs usually do not require more than 5 mg daily, except during times of stress. The dosage is best divided in half and given every 12 hours in order to keep cortisol levels more even, particularly when using hydrocortisone, which has a much shorter half-life.
Dogs with typical Addison’s also need mineralocorticoid supplementation. Two options are available: fludrocortisone acetate (Florinef) and desoxycorticosterone pivalate (DOCP, commonly known by the brand name Percorten-V).
Florinef is an oral medication that is given once a day in the morning or split into two daily doses. Missing even a single dose can be dangerous. It can be difficult to regulate dogs taking Florinef, and increases in the initial dosage are frequently required, especially during the first year, as any remaining adrenal function is lost.
Percorten-V is given by subcutaneous injection once every 25 days or so. Experts find that in addition to having fewer side effects, Percorten-V regulates electrolytes more effectively than Florinef. Dogs who have problems when taking Florinef, including excessive thirst, urination, or incontinence, may do better with Percorten-V.
Aiyana, the Italian Greyhound who was finally diagnosed with Addison’s disease, was initially treated with Florinef. “Her electrolytes wouldn’t stabilize, and she didn’t respond as expected,” says Kunzler. “My vet switched her to Percorten-V injections, which has made a lot of difference.”
Dogs on Percorten-V require glucocorticoid supplements, such as prednisone, in addition to their monthly injections. Fludrocortisone has some glucocorticoid activity, so about half of the dogs who take this medication do not require regular glucocorticoid supplements, and others may need supplements every two or three days rather than daily.
All dogs with Addison’s need additional glucocorticoids during times of stress, injury, or illness. What constitutes stress will vary from one dog to another. Stress can be physiological, such as a medical procedure, injury, or even a particularly active play session. Stress can also be emotional, such as from a move, the loss of a human or animal companion, thunderstorms, fireworks, a visit to the vet’s office, or anything that disrupts familiar routines.
Stress increases the need for glucocorticoids from two to four times the maintenance level. A dog undergoing surgery may need even more, starting with a high dose and quickly tapering back to normal during the following week. An alternative would be to give an injection of dexamethasone during surgery, followed by oral steroids after. Fluid support should always be provided for Addisonian dogs during surgery.
With appropriate treatment, dogs with Addison’s share an excellent prognosis, with no anticipated disease-related problems affecting their life expectancy. Dogs usually feel better within days of starting treatment, and most symptoms are gone within two to four weeks. The main challenges to life-long treatment are its expense and the effort involved in monitoring electrolyte levels, administering medication, and keeping a close eye on the patient for signs of problems.

It’s important to monitor electrolytes through regular blood tests, especially when treatment begins. With Florinef, blood tests are initially done weekly, then gradually decreased once electrolytes reach normal levels, with continued monitoring two to four times a year after the dosage has stabilized. Dogs receiving Percorten-V are tested before each injection as the dosage is tapered to the lowest level needed, and then tested at least once or twice a year thereafter. Electrolytes should also be tested whenever the dog seems “off.” Dogs with atypical Addison’s require monitoring as well, in case the disease progresses to the typical form.
Dehydration or elevated potassium is indicative that the dosage may be too low. Dehydration causes tacky gums or shoulder skin that doesn’t snap back when pinched. Elevated potassium levels may slow the heart rate – a normal pulse for large dogs ranges from 60 to 100 beats per minute, and for smaller dogs 100 to 160 beats per minute. Severe muscle weakness may be due to low potassium from a dosage that is too high. Symptom changes should be reported as soon as they occur so that medication can be adjusted.
Cortisol levels are monitored not through blood tests but by observation of behavior. The goal is to give the lowest dose of glucocorticoids needed to keep your dog symptom-free, eating well, and happy.
Symptoms such as excessive thirst and urination, ravenous appetite, panting, hair loss, muscle atrophy, elevated liver enzymes, and frequent infections are indications that the glucocorticoid dosage is too high. Lack of appetite or energy, vomiting, diarrhea, and weakness or lethargy indicate that the dosage may be too low. Similar problems may be seen with too much or too little Florinef.
Zala Bu, a five-year-old Great Dane who lives with Jenny Schultz of Denver, North Carolina, was diagnosed with Addison’s at 18 months. “Her previous family did not follow up with their vet by doing continual blood testing to monitor her progress,” says Schultz. “To add to that, their vet was not prescribing a high-enough dose of Florinef, her first medication. As a result, Zala’s health declined. She came to me as a foster dog when she was in her second crisis and her family was fed up with dealing with her illness. She was anorexic, vomited frequently, and had chronic diarrhea. She had lost 30 pounds in six months.”
Schultz changed Zala’s medication to Percorten-V, which she says is “by far our preferred choice as it keeps the dog’s electrolytes consistent throughout the month and helps get a dog back to good health much faster.
“Her life started over the day she joined my pack,” she says. “Zala has been healthy for three years now and is a very active Dane. She takes an extremely low dose of Percorten-V as a shot that I give her at home, along with 1 mg prednisone daily. She gets her electrolytes checked every two to three months at the vet’s office to make sure the medicine is working well and that her electrolytes are balanced. Zala Bu started on 2.8 ml of Percorten-V and I have tapered her down to a .9‑ml dose.”
According to Schultz, a big challenge after an Addison’s diagnosis is to find a veterinarian who is willing to fine-tune the dog’s medication. “When dogs are at their lowest effective dose, they feel their best,” she says. “There are still many vets who don’t know how to treat this disease. As a result, dogs in their care are not as healthy as they could be.”
If problems continue after electrolytes are stabilized and the appropriate glucocorticoid dose is determined, consider other concurrent causes, such as liver disease, spay incontinence, or gastrointestinal disease. Dogs with Addison’s may be particularly prone to other autoimmune diseases such as hypothyroidism.
Jenn, a chocolate Labrador Retriever belonging to Margaret Daunt of Modena, New York, developed typical Addison’s 10 years ago at age 4. One year later she was diagnosed with hypothyroidism. At age 13 she survived bloat (“I believe quick action on my part saved her life,” says Daunt), and earlier this year, she was diagnosed with the tick-borne disease ehrlichiosis.
“Jenn has led an active life,” says Daunt. “She competed in agility, trained in obedience, and even dabbled in drug detection work. Now that she has recovered from ehrlichiosis, 14-year-old Jenn is back to her old self!”
It’s important to be alert, as Daunt was, to all symptoms of Addison’s disease in dogs. Don’t assume that every time your dog doesn’t feel well it must be due to Addison’s disease. Addison’s dogs develop illnesses just as other dogs do. If an Addison’s dog is sick from something else, her prednisone dosage may need to be increased temporarily.
To make Addison’s treatment affordable, many caregivers purchase compounded fludrocortisone from a compounding pharmacy. “The compounded version is much more cost-effective for larger dogs than brand-name Florinef,” says Schultz, who participates in online forums for canine Addison’s. Most dogs who receive Percorten-V injections and about half of those who take Florinef require a small daily oral dose of inexpensive prednisone as well.
The online Addison’s groups share information about the disease and suggestions for reducing costs. “Our FaceBook and Yahoo groups help people understand lab test results and talk to their veterinarians about adjusting medications,” says Schultz. “We also help people find lower-cost options for treating their pets. In some cases owners were able to keep their pets when they couldn’t afford the prices their vets were charging. One single mom was paying $300 per month for her Great Dane’s shots until she switched to compounded medications that cost only $30 per month. Two years later, her Dane is still with her and doing well.”
Other money-saving strategies include giving shots at home to avoid having to pay for an office visit for each injection, purchasing medications online at a discount with the help of veterinarians willing to write the necessary prescriptions, or negotiating with veterinarians to keep office visit costs to a minimum. Schultz estimates her monthly expenses at $35 for Percorten-V and another $25 for electrolyte tests. “We test Zala Bu every other month now because we’re adjusting her dose downward,” she says. “She is small for a Dane, weighing in at 102 pounds. I get a large script for prednisone filled at a pharmacy for $4. Zala Bu is the poster child for low-dose effectiveness in big dogs.”
Elizabeth Andrews of Pleasantville, Nova Scotia, Canada, joined the online group AddisonDogs in 2006, when Raider, her 75-pound Labrador Retriever, was diagnosed with typical Addison’s. Raider is now six years old and thriving, and Andrews is a list moderator. “The AddisonDogs group was founded in 2002 and currently has 4,594 members,” she says. “We also run a 501(c)(3) non-profit organization called AddisonDogs to educate and support the companion animal community about this condition, and the AddisonDogs website helps re-home dogs with Addison’s disease and assists with vet bills and other expenses. I am also the owner of a FaceBook Group, Addison’s Disease in Dogs, which has 559 members and is growing daily.”
Andrews explains that in the U.S., brand-name Florinef costs about $1 per 0.1-mg tablet, and the minimum starting dose is 0.1 mg per 10 pounds of body weight with dogs normally needing two to three times the starting dose. In Canada, Florinef costs about 27 cents per tablet when purchased at a drugstore. Florinef can also be purchased in the U.S. from compounding pharmacies, which reduces the total monthly cost regardless of dose to about $30.
Percorten-V purchased online costs $150 to $190 per vial depending on the supplier. “Most AddisonDogs members buy it for $150 from the online pharmacy 1-800-PetMeds,” says Andrews, “because that company price-matches the lowest price online. However, many veterinarians in the U.S. refuse to give their clients a prescription for Percorten-V, arguing that the drug sold online may be counterfeit. A few vets will price-match. Veterinarians pay approximately $130 U.S. for a 4-ml (100-mg) multi-use vial directly from the manufacturer, Novartis, but this life-saving drug often has a high retail markup.”
The typical starting dose of Percorten‑V is 1 mg per pound of body weight. Dr. David Bruyette, DVM, DACVIM, of VCA West Los Angeles Animal Hospital and an internal medicine specialist with an emphasis on Addison’s disease, prefers to start large dogs (over 60 pounds) at half that amount, because their metabolism is slower. He points out that electrolytes should be measured more frequently when using a lower starting dose; he recommends checking at two, three, and four weeks after the first injection.
Julia Bates, DVM, of Veterinary Specialty & Emergency Care in Madison, Wisconsin, is a veterinary internist whose research during her residency involved the use of low-dose Percorten-V in the management of Addisons disease. She routinely treats dogs diagnosed with Addison’s disease with a low dose of Percorten-V. In her experience, the majority of those dogs do very well.
Ideally, the dose is gradually tapered down until the lowest effective dose is found. “We know that lowering the dose works,” says Andrews, “as many in our Yahoo group have been doing so for over five years.”
As mentioned, dogs should be monitored while their drug dosages are being adjusted. “With Percorten-V, blood electrolytes should be tested at day 14 and then at day 25,” says Andrews. “The day-14 electrolytes show how well the Percorten-V is working, and the day-25 electrolytes show whether the dog will be ready at day 28 for more Percorten-V and whether the dose can be reduced. It is very common for a dog not to be ready for more during the first few months. Giving more Percorten-V before the dog is ready just drives potassium levels down. By waiting for potassium levels to rise and then reducing the dose, you ‘balance’ the electrolytes. Once the lowest effective dose has been found, you can test electrolytes every six months or whenever the dog’s behavior or symptoms seem different.”
Adjusting patients to Florinef requires much closer monitoring of electrolyte levels. “It’s important to test weekly until they stabilize,” says Andrews. “Most dogs need their dose increased frequently over the first few weeks and months. Once you find a dose that maintains stable electrolytes for a few weeks, you can move to biweekly testing and then monthly tests. After an effective dose has been found, testing every three months is recommended for life. Of course not everyone does this, and those who don’t generally end up having a dog go into crisis.”
All the experts agree that a properly treated dog can live a normal, happy, healthy life despite having Addison’s disease.
“Since stress can be an issue for dogs with Addison’s,” says Jenny Schultz, “caregivers may have to cut back on stressful activities depending on their dogs’ temperament. My Great Dane used to make therapy dog visits to a nursing home. She enjoyed the activity and it didn’t seem to stress her too much. A little extra prednisone as a boost and a good nap was all she needed to continue on with her day. She is by far the most active dog in our pack. Some dogs with Addison’s continue to compete in agility and obedience events with no problem after their condition has been stabilized.”
In her book, Addison’s Disease in Dogs, Stephanie Kenrose describes the importance of long-term stress management and supplying extra prednisone whenever an Addison’s dog is stressed by injury, trauma, illness, or other events. She also discusses the stress created by annual vaccinations and heartworm prevention medications, noting that titer tests can be used to monitor immunity to common canine illnesses, and decisions about heartworm prevention depend on one’s location as well as the dog’s condition. “You’ll want to discuss these risk factors with your veterinarian,” she says, “so that you can decide whether it’s worth giving these medicines to your Addison’s dog.”
After eight months of treatment, Aiyana, the Italian Greyhound, is doing much better. “She was spayed just three weeks ago,” says Lydia Kunzler, “which caused her Addison’s to flare and her electrolytes to go a bit off again, but she was much easier to stabilize this time. The blood work we took last Wednesday was the best it’s been since she was first tested!
“She still struggles with muscle weakness especially in her rear from time to time, and she needs a little extra prednisone some days, but getting her spayed so those hormones weren’t complicating things seems to have made a big difference. I’ve also stopped feeding any dry food, per my vet’s advice, as we were having a hard time maintaining her hydration levels. She mainly eats raw now, or canned food if I’m going to be traveling, and I feed her three to four small meals a day instead of two big meals to make it easier on her GI system.”
Caring for a dog with Addison’s disease can seem overwhelming at first, both financially and emotionally. But properly treated, your Addisonian dog can live just as long and just as well as her disease-free counterparts.
Freelance writer CJ Puotinen lives in Montana. She is the author of The Encyclopedia of Natural Pet Care, and other books, and is a frequent contributor to WDJ.
Mary Straus is the owner of DogAware.com. She and her Norwich Terrier, Ella, live in the San Francisco Bay Area.
On occasion, an adult dog who has been trustworthy with his chewing habits may suddenly surprise you with an oral foray into the forbidden.
This may be a stress response to something environmental happening in your absence, such as a burglar trying to break into your home, loud equipment working in the street in front of your house, or stray dogs romping through your yard. Sometimes even something like a compelling need to urinate or defecate can stress a well-trained dog into inappropriate chewing.
If you can determine the nature of the stressor and control or remove the cause, your dog should quickly revert to his prior good chewing behavior. He might also need a refresher course in the crate, after a veterinary exam to rule out possible medical causes. (Anytime there’s a significant behavior change in an adult dog it’s important to rule out – or treat – any possible medical contributors to the undesirable behavior.)
A return to inappropriate chewing may be a result of inactivity and pent-up energy. Perhaps the weather’s been bad or your workload extra heavy, curtailing your normal exercise sessions with your canine companion. That energy has to go somewhere – and for some dogs, it goes right to their jaws. The solution here is a renewed commitment to provide adequate exercise, with the addition, perhaps, of mental exercise into your dog’s daily routine.
For more details and advice on ways to prevent and cure destructive chewing habits, purchase Whole Dog Journal’s ebook, Simple Ways to Prevent and Cure Destructive Chewing.
Dog nails aren’t supposed to fall off, thought first-time dog owner Terrie Huberman some 18 months ago. That’s when she first realized that finding one of her Pug-Poodle mix’s nails on the floor of her Sherman Oaks, California, apartment wasn’t an isolated incident.

It all started when, after coming in from a walk, Terrie picked up what would turn out to be the keratin shell from one of Bonzo’s claws. At the time she thought it was something he’d tracked in from outside. Only later did she learn the shell was a telltale sign of Symmetrical Lupoid Onychodystrophy, SLO for short.
SLO is an inflammation of the nail matrix where the nail is formed. The pattern of inflammation is similar to lupus, giving the condition its “lupoid” designation. The inflammatory reaction at the nail matrix results in abnormal nail development and growth, resulting in compromised claws that lift, separate, and often fall off. Flare-ups are painful and many owners first notice a problem when the dog begins favoring or nursing an affected foot.
While SLO can affect all breeds of dogs, some vets report seeing far more cases among certain breeds. “When I think of SLO, I think of German Shepherds, Miniature Schnauzers, Rottweilers, and Corgis,” says holistic veterinary practitioner Frank Bousaid, DVM, of Harmony Animal Wellness Center in Monroe, Washington. “In the German Shepherd, it seems to be worse, with more toes involved, in males than females.” His experience supports further anecdotal evidence found online, which cites German Shepherd Dogs as being predisposed to the condition.
A dog’s claw is made up of three distinct layers. The visible outer portion that must be routinely trimmed is hard, dead material. The innermost layer – the “quick” – is comprised of nerves and the blood supply; this is what bleeds when the nail is trimmed too short. Initial nail growth occurs at the root, located deep in the toe. In dogs with SLO, damage takes place at the root level about three to four months before the nail becomes visible. When affected nails emerge, they are misshapen and can also be hollow, soft or brittle, or discolored.
Onset is typically acute, with one or two claws initially being affected. “One of the hallmarks of SLO is multiple claw lesions,” says Alexander Werner, VMD, Diplomate of the American College of Dermatology. “If I had a case that came in with a single digit where the claw was abnormal, Lupoid Onychodystrophy would not be high on my list. SLO by definition affects multiple nails.”
Both vets agree the condition is relatively rare. As a veterinary dermatologist, Dr. Werner estimates he treats fewer than 10 patients per year.
Diagnosis
Achieving a definitive diagnosis can be tricky because it requires a biopsy of the nail matrix, which must be accomplished by removing a piece of the third phalanx – the last part of the toe. This surgical procedure, much like a de-clawing of a cat, has a painful recovery and results in a malformation of any nail growth that follows (since the nail matrix has been surgically altered). For owners looking for an absolute diagnosis, dogs with affected dew claws are considered the best candidates for biopsy.
Due to the highly invasive nature of the biopsy, vets often make an initial diagnosis based on the characteristics of the disease, or, because treatment is well tolerated by most dogs, many vets will begin treatment on the suspicion of SLO, watching for signs of improvement.
Treatment
Both traditional and holistic practitioners agree on the core treatment protocol for SLO. High-dose essential fatty acids (EFAs), specifically omega-3 and omega-6, along with a generally well-tolerated antibiotic such as tetracycline or doxycycline is the most common approach. Antibiotics are used to try to save affected nails while preventing nail bed infections, which can get into the bone and lead to the loss of the toe. Nail bed infections also affect circulation to the feet. EFAs are used for their anti-inflammatory properties.
“In SLO, there is an unexplained inflammatory process that is happening at the cuticle level,” explains Dr. Bousaid. “There’s an infiltrate of inflammatory cells into the nail bed. That’s the immune-mediated part; this huge attack by the immune system on the nail bed. Omega-3s and omega-6s act as an anti-inflammatory to help calm down the overactivity.”
When it comes to EFAs, Dr. Bousaid strongly recommends salmon oil dispensed in free-fluid form rather than processed and encapsulated for convenience. “I like salmon oil specifically; I think it’s the gold standard of fish oils in dogs,” he says, noting that salmon oil has an ideal ratio of omega-3 to omega-6 for dogs. He recommends clients stay away from cod liver oil , which is frequently manufactured in China and can be months or years old by the time it’s purchased and consumed in the U.S. He does not recommend the use of flaxseed oil, which is often popular with vegetarian clients looking to avoid animal products. He cautions that Omega-3s and omega-6s from non-animal sources such as flaxseed oil are poorly utilized by dogs.
In addition to antibiotics and high-dose fatty acids, Dr. Bousaid also incorporates vitamin B (specifically niacinamide, not niacin or nicotinic acid), vitamin E, and plain gelatin.
“Vitamin B serves as a natural free radical scavenger for anything that’s collagen based – skin, nails, etc.,” he says. “It has to do with the development of the dermal layer and aids in the foundational structure of the nail. I use vitamin B for its nail-strengthening properties. It aids in the development of the nail matrix that will harden and become part of the nail. Vitamin E also helps the nail matrix, playing a role in healthy nail formation.” It’s believed that the fatty acids and vitamins work in tandem. Fatty acids help reduce inflammation and vitamins B and E serve as tools to help rebuild the nail.
Long-Term Challenge
One challenge with treatment is that much of the disease activity takes place before nail growth is even visible. Additionally, the disease is often cyclical, so many vets opt for lengthy treatment plans.
“I usually follow a treatment protocol of four to eight weeks,” says Dr. Werner. “The four weeks is just to make sure things are going well and to see that we’re starting to get some good re-growth of lost nails and no additional nail loss. At eight weeks we’ll get a sense of how well the nails are doing. This disease can wax and wane and I want to make sure we’re not in a waning phase before I withdraw a drug that might be helpful. Because the therapy is so well tolerated, inexpensive, and benign for long-term use, I usually go six months before thinking of changing the therapy.”
Many vets, especially those who rarely encounter cases of SLO, will prescribe a steroid such as prednisone in an attempt to reduce inflammation. Both Dr. Werner and Dr. Bousaid consider this ill-advised, noting the host of secondary problems that can arise from steroid use.
“In situations where a vet has prescribed steroids to treat suspected or confirmed SLO, a referral to an animal dermatologist is very important,” says Dr. Werner. “One of the reasons people see dermatologists is to get dogs off steroids for skin conditions. I think steroids are overkill; you may produce a lot of systemic problems by using a potent medication that may or may not be necessary. I think it’s pulling out a big gun when you need a sharp shooter.” Steroid use can result in increased thirst, appetite, weight gain, and muscle loss, and can have negative effects on the liver.
“In extreme cases, short-term steroid use may be needed, but given a choice, it’s best to use something else,” cautions Dr. Werner.
Prognosis
While not curable, most dogs tolerate treatment well and once it stimulates new nail growth, antibiotics can often be eliminated from a maintenance regimen of EFAs and vitamins. when flare-ups occur, booties or restricted activity are recommended to help protect the affected claws. Many patients report success with bathing the feet in a saline or diluted antiseptic solution after walks.
“I don’t think it’s curable, but it’s controllable and most dogs do very well,” says Dr. Werner.
Such is the case with Bonzo. One year into treatment, the veterinarian successfully dropped antibiotics from Bonzo’s treatment plan; Terrie continues to give Bonzo EFAs and vitamin E daily. An energetic bundle of youthful energy, his quality of life remains unaffected, except for occasional flare-ups, which fortunately are nowhere near as involved as the initial presentation of the disease.
“His nails are looking much better,” she says. “The SLO is totally manageable now. When he has a flare-up, mostly in the summer, we avoid going hiking. I feel like it has stabilized, and I’m not nearly as panicked about it.”

[Updated July 19, 2017]
– If you find yourself getting frustrated during training, stop. Don’t risk taking it out on the dog.
– Take time to evaluate the situation. Use management to prevent unwanted behavior as you decide what to do next.
– Consider seeking outside help from a professional, positive trainer.
– Try to think of ways to vent frustration that don’t involve your dog.
Some people grit their teeth or hold their breath. Others clench their fists or rattle off a string of expletives that would make Pacino blush. When the frustration of daily life comes to a boil, people respond in myriad ways.
Dog training comes with many opportunities for human frustration. You wanted a dog. You didn’t realize that “dog” was potentially code for “eats everything in sight, jumps on the kids, barks like a jackhammer, and if given the chance, leads you on a wild goose chase around the neighborhood as your recall word falls on deaf ears.”
Training a dog, regardless of the method used, is bound to bring about moments of frustration. Addressing unwanted behavior can take time, and today’s modern family often finds spare time to be in limited supply. In the midst of juggling busy personal and professional lives, it’s easy to suddenly find yourself at the end of your rope when it comes to dog training.
The problem with frustration is that, when left unchecked, it can lead to an emotional outburst. Ever lash out with harsh words directed at your kids or spouse after a particularly challenging day at work? We are only human. It happens. In dog training, these emotional outbursts often manifest in strong verbal reprimands, leash pops, and other physical corrections.
Interacting with your dog in an angry or physically forceful way carries the substantial risk of damaging the dog-owner relationship. It can also create an anxious dog, or one who “shuts down” when uncertain what to do. In extreme cases it can become abusive. Additionally, there’s a dirty little secret about losing one’s temper and responding to the dog in a vindictive manner: behaving this way can be rewarding.
How can something as unpleasant as yelling at or jerking the dog’s leash be rewarding? After all, very few of us feel good about losing our temper and resorting to violence (no matter how mild). But even a moment of lashing out (verbally or physically) serves to vent our frustration, and worse, it can alter the dog’s behavior. Pain or fear may temporarily suppress the dog’s unwanted behavior. In the moment, this can feel like a “win” for the handler . . . but this sort of emotional outburst on the part of the handler generally doesn’t result in a lasting behavior change in the dog.
It’s infinitely easier to teach a dog what you want as opposed to what you don’t. That’s why positive reinforcement training can be so effective. It’s built on a foundation of recognizing and rewarding correct behavior – not waiting for the dog to make a mistake. It’s proactive, not reactive.

I freely admit to having moments of frustration while training. Despite the years of effort I have put into building strong, trusting, positive reinforcement-based relationships with my dogs, I still sometimes find myself gritting my teeth when things aren’t going as I’d hoped and my dog can’t seem to correctly perform a behavior we’ve spent generous amounts of time training.
The trick lies in learning to manage the frustration in ways that don’t involve taking it out on the dog. The following strategies can prove helpful:
Relax and remember to breathe. Sounds easy enough, but frustration and stress can inhibit our breathing, which affects our body language – something our dogs are keenly aware of. By concentrating on slow, deep breathing, you take in more oxygen, and the shoulders, neck, and upper chest muscles are used less in the breathing process. This helps relax your body posture, which sends a different picture to your dog.
Pay attention to your dog’s behavior. Dogs often respond to stress with one of many fine-tuned signals. Yawning, lip licking, sniffing the ground, and averting their gaze are behaviors dogs use with each other to reduce stress and defuse potential conflict. If you notice your dog engaging in these behaviors during training, take note. He may be aware of your rising stress level even before you are. These signals can be a sign your dog is attempting to self-soothe in the presence of a stressed handler.

It’s okay to stop. When things aren’t going well, sometimes the best thing to do is call it quits for the day. People often feel the need to end on success, and keep training as things start falling apart. According to legendary animal trainer Bob Bailey, whether or not you end a training session on success does not affect the animal’s ability to successfully learn the task at hand.
“Ending a training session on a ‘high note’ is of little significance in itself,” says Bailey. “This assumes that the session more or less randomly ends with a success or a failure.” However, he cautions against creating training scenarios where the dog consistently fails and then shuts down – a poor precedent for the dog.
Remember how patient and forgiving your dog is of you. That’s advice from professional trainer BK Grice of Muncie, Indiana. “Take some time to just hang out with your dog. Break off training and share an ice cream together. Remember that there may be other dogs in your life, but there will only be one Rex or Lassie. When you’ve calmed down, look at what you were doing and see if you can make some changes.
Take notes. In her book, Tales of Two Species: Essays on Loving and Living with Dogs, Patricia McConnell talks about the importance of being patient, and recognizing that training takes time. In an example of teaching impulse control to dogs, she writes, “It takes growing humans about 20 years to learn to control their emotions … so be patient with your dogs, and think in terms of months and years when training, not days and weeks.”

In an age when popular media aims to convince dog owners that behavior dramatically changes in the course of an hour, this reminder is a refreshing dose of eye-opening honesty that should be considered.
Feeling like your dog’s behavior is not improving can be a major source of frustration for people. Often, he is getting better, but owners who are deeply embroiled within a training program might have difficulty recognizing the incremental changes.
“I often get clients who call me to talk about how they aren’t progressing in their training programs. Then I go out and find a dog who is so much improved, it’s amazing,” says Louise Kerr of Elite Pet Care & Education in New South Wales, Australia. “Clients often cannot see the small changes.”
Learning to recognize and appreciate the “baby steps” along the way to complete problem solving can be a valuable tool in reducing human frustration. Organized trainers routinely keep training logs and journals that document results of each training session. Analyzing the data offers concrete information about a dog’s rate of progress, and helps trainers fine-tune training programs when necessary.
Styles of record-keeping are as varied as the trainers using them. Sometimes I keep track of how many times we practiced something and how often my dog was correct. Other times I jot notes about what issues I discovered during the training session, which directs my focus for the next session.
Even something as simple as a happy or sad face drawn on the calendar – denoting an overall “good” or “bad” day in training – can prove helpful. When working to modify problem behavior, it’s easy to forget where you started. A quick glance at the ratio of happy to sad faces on the calendar can provide the confidence boost you need to keep pushing forward with what feels like a slow-moving or stalled training program.
Many of the routine problems clients ask trainers about can be prevented with management: not letting the dog practice the unwanted behavior in the first place. If your dog is reactive to people and dogs walking past his territory, he shouldn’t have unsupervised access to the front room of the home, where he perches atop the sofa, ready to sound the alarm at the first sign of passersby. Nor should he be unsupervised in the backyard where he launches himself at the fence. Of course, you need to spend time teaching an alternative behavior, but if you aren’t prepared to actively train, the next best thing is to prevent what you don’t want.
“When possible, don’t let the dog make the mistake in the first place,” says trainer Gail Rhyno of Prince Edward Island, Canada. “I didn’t get this right away, and looking back, I likely could’ve prevented a few behaviors from becoming problems in the first place. Much of my frustration appears when I’m not training – when I’m tired and I don’t have a plan. The unwanted behavior would happen and I wouldn’t have a response ready and the frustration wells up; I’d feel like all the work I’d done the days before was wasted.”
As an example, Rhyno says, “With my little dog – who’s on high alert all the time – I make sure I’m ready, or I don’t put her in the situation to make mistakes. I don’t have to take her out into the yard every time I go. I don’t have to go to the places in town that I know are full of things that will set her off. I can put her on-leash in the house so that when guests enter, she doesn’t have the chance to jump of them. Things like this have really helped me get around myself. I can’t train all the time; I get tired of it, so in order to not get tired and frustrated, I have to find a way to not let my little pooch make the mistakes in the first place.”
It’s sometimes hard to not internalize your dog’s misbehavior and take his noncompliance as a personal affront. Factor in any perfectionist tendencies you may have, and it can be a real test in emotional self-control to keep from feeling like your dog is purposely pawing his nose at you when things aren’t going as planned – especially when training in a group. You’re being watched. The heat is on. “Please, for the love of dog, will you stop jumping around and just sit?!”
Emotions are tricky. We know on a logical level that noncompliance isn’t personal, but this can be tough to remember in heat of the moment. One of the greatest gifts I’ve gained in training dogs – especially my own, where the emotional involvement can intensify my perfectionist tendencies – is the ability to accept my training mistakes, recover, and move on. It’s easy to blame the dog. “He knows this,” or “He knows better,” or even, “He did it right yesterday at the park.” It’s harder to look at how our own actions likely contributed to the dog’s inability to perform to your expectations or hopes.
It’s easy to underestimate how a simple location change can affect a dog’s ability to perform correctly. Clients who primarily practice behaviors with their dog at home and during dog class often report that their dog struggles when asked to work in new, unfamiliar surroundings. This is a normal part of the training process, and why I encourage my clients to not believe their dog “knows” something until they’ve had training success in several different locations away from home. Be aware that certain environments will be more challenging than others, and gradually raise your expectations at a level that is fair and appropriate for your dog.
It’s also important to look at how your behavior might affect your dog. If you primarily lure your dog into positions like sit and down by using treats, you might believe your dog “knows” down, only to be surprised by his inability to perform correctly in the absence of the treat. Sudden behavior changes on your part – such as switching from treat to hand signal, or even changing how you present a hand signal – can reduce the dog’s ability to be correct, which can lead to frustration. Make changes like this to your training program gradually.
Finally, don’t forget that dogs can get frustrated, too. My Golden Retriever reserves a specifically pitched bark for when I suspect he feels that I’ve failed to provide clear direction while running agility. More often than not, he’s right and my body cues were incorrect. “Dang it, woman!” he seems to say. “Where exactly do you want me to go?”
We’re Only Human
Do I still get frustrated? Of course. I’m only human. I’ve been known to call my dog a creative “pet name” or two, or rattle off something to the effect of, “It’s a good thing you’re cute,” as I re-set an obedience jump bar that he just knocked down – again. My secret? I deliver my monologue in a happy, upbeat voice, and often while delivering a stream of treats or tugging with a toy. I release the necessary steam and hope my dog is none the wiser. I’m far from perfect, but this trick often helps me keep my emotions in check so I’m not as apt to unfairly direct frustration toward my dog.
I often think about something an agility judge once said during a pre-run briefing. I don’t remember her name, but her words will stay with me for as long as I choose to share my life with dogs. “Run every run like it’s your dog’s last,” she said. Powerful words. Our dogs are never with us long enough. I want to fill my memory bank with joyful interactions, not frustration-filled memories that potentially led me to treat my dog with less than the respect and compassion he deserved.
After all, as an anonymous author is widely quoted, “He is your friend, your partner, your defender, your dog. You are his life, his love, his leader. He will be yours, faithful and true, to the last beat of his heart. You owe it to him to be worthy of such devotion.”
Stephanie Colman has been training dogs in Los Angeles for 10 years. She actively competes in obedience and agility with her Golden Retriever, Quiz, and enjoys spoiling her retired Whippet, Zoie.

1. Select a menu of strategies from those offered in this article, and start working with your dog.
2. As you try them out, determine which strategies work best for the two of you, and discard the ones that don’t.
3. If you don’t seem to be making progress, seek the help of a qualified, positive behavior professional.
4. If your dog is extremely anxious and fearful, through discussion with your behavior professional and in consultation with a veterinary behaviorist, explore the use of anti-anxiety medications to help improve your dog’s quality of life.
There are a lot of things in our world that have the potential to frighten our dogs. How is it that some dogs deal with these stimuli without batting an eye, while others cower behind their owners with little or no apparent provocation? The Cowardly Lion in the Wizard of Oz seems to say it all in one simple word: “Courage!” But it’s really not so simple. Why do some dogs seem to be consistently brave, while others are timid? Even more important, absent Dorothy and a wizard, how does one go about helping their timid dog get brave?

We’ve written (a lot!) in the past about using counter-conditioning and desensitization to help dogs change their association with fear-causing stimuli in order to change their emotional response. (As just one example of step-by-step instruction for a counter-conditioning program, see “Reducing Your Dog’s Anxieties,” WDJ April 2007.) That’s still good information, and I urge you to review the article to refresh your understanding of that important behavior modification protocol. This article, however, is going to introduce you to several other complementary exercises you can do in addition to counter-conditioning, to help your timid dog learn to cope with a scary world.
Some of the exercises that follow we’ve introduced in other training contexts. Some come in the “change behavior to change emotional response” category by doing fun stuff your dog loves; some have more to do with management; and some do both. If you’ve already taught some of these to your dog it will be easy to apply them in situations where he’s acting fearful. If you haven’t already taught them, there’s no time like the present!
Note: Be vigilant and protect your dog. During the confidence-building period, you must protect your dog from becoming overwhelmed by things that scare him. If, for example, you force your timid dog to accept the attentions of bearded men while he is still fearful of them, or you stay at an event that turns out to be noisy with your noise-phobic dog, he may become sensitized to the scary stimuli, making his behavior worse, instead of better.
You don’t have to do a lot of fancy stuff to help your dog become more confident in his world. Simply teaching him basic good manners – to respond appropriately to your cues – will make his environment more predictable. It builds confidence to understand what you’re asking of him, and to understand the consequences of his behavior. Of course it goes without saying that you will use positive reinforcement-based training with him so the consequences are happy ones. Nothing can destroy a timid dog’s confidence faster than the application of verbal or physical punishment; this will convince him he’s right to think the world is a scary and unpredictable place.
Combine his positive reinforcement good manners training with structure in his routine and stability in his life and you will have taken a large step toward increasing his confidence. But of course, you want to do more to help your dog get brave. Happily, you can do that simply by doing fun stuff with him, such as:
Targeting means teaching your dog to touch a designated body part to a designated target. (For in-depth information on teaching a dog to target, see “Train Your Dog to Target,” February 2006.) That description doesn’t do it justice; targeting is tons of fun! Many dogs love targeting, partly because it’s easy to do, and partly because it pays off well – “push the button (the target spot), get a treat.”

Since dogs naturally explore the world with their noses and paws, nose and foot targeting are the two easiest. Nose-targeting draws your dog’s eye-contact and attention from a worrisome stimulus to a pleasant one, so that’s the one I find most useful for timid dogs, although foot-targeting can work too.
It’s an embarrassingly simple behavior to teach. Hold out your hand in front of your dog, at nose level or below. When he sniffs it (because he’s curious!), click your clicker (or use a verbal marker, such as a mouth click or a word) and feed him a treat. Remove your hand, then offer it again. Each time he sniffs, click and treat. If he stops sniffing (boring – I’ve already sniffed that!), rub a little tasty treat on your palm, to make your hand smell intriguing, and try again.
You’re looking for that wonderful “light bulb” moment – when he realizes he can make you click and treat by bumping his nose into your hand. His “touch” behavior becomes deliberate, rather than incidental to sniffing your hand. When you see him deliberately bumping his nose into your hand, add the “Touch!” cue as you offer your hand to him. Encourage him with praise and high-value treats. Make it a game, so he thinks it’s the most fun in the world. You want to see his eyes light up when you say “Touch,” and you want him to “bonk” his nose into your hand, hard! Start offering your hand in different places so he has to move to touch it, climb on something to touch it, jump up to touch it.
When he loves the touch game, occasionally ask him to touch twice; tell him he’s a good dog after the first one, and click and treat only the second one. Gradually decrease your rate of reinforcement, until he’ll touch several times before he gets his click and treat. Then click and treat several in a row. Mix it up, so he never knows when the click will happen – but the click and treat always happen eventually!
Now try playing touch when your dog is a little bit nervous about something. Scary man with a beard and sunglasses passing by on the sidewalk? Hold out your hand and say “Touch!” so that your dog takes his eyes – and his brain – away from the scary thing and happily bonks his nose into your hand. Click and treat. He can’t be afraid of the man and happy about touching your hand at the same time. He also can’t look at the target and stare at the scary man at the same time.
Ask him to touch several more times, until the man has passed, and then continue on your walk. If you do this every time he sees a scary man, he’ll decide that men with beards and sunglasses are good because they make the touch game happen! By changing your dog’s behavior – having him do something he loves rather than acting fearful – you can manage a scary encounter, and eventually change his emotional response to and association with something previously scary to him.
Like targeting, “Find it” is a behavior many dogs learn to love, and another game you can play to change your dog’s behavior in the presence of a fear-causing stimulus, eventually changing his emotional response. This is also another ridiculously easy and delightful game that any dog can play.
Start with your dog in front of you, and a handful of tasty treats behind your back. Say “Find it!” in a cheerful tone of voice and toss one treat a few feet to your left. When your dog gets to the treat, click just before he eats it. When he comes back to you say “Find it!” again and toss a second treat a few feet to your right. Click – and he eats the treat. Do this back and forth, until your dog is easily moving from one “find it” treat to the other. Then toss them farther each time until your dog happily runs back and forth.
Now if a scary skateboarder appears while you’re walking your dog around the block on his leash, play the find it game, keeping the tossed treats close to you. Your dog will take his eyes off the scary thing and switch into happy-treat mode. You’ve changed his emotions by changing his behavior.
Targeting and find it can also work to walk your timid dog past a scary, stationary object, like a manhole cover, or a noisy air-conditioning unit. Play touch and treat as you walk past, or toss find it treats on the ground ahead of you and slightly away from the scary thing, to keep him moving happily forward.
An emergency escape game gives you a “run away” strategy when you know an approaching stimulus will be too much for your worried dog. However, because you’ve taught it to your dog as a fun game, he’s not running away in panic; he’s just playing one of his favorite “get brave” games that just happens to move him farther away from the scary thing.
Teach this game to your dog in a safe, comfortable environment when he’s not being afraid of something. As you are walking with him on-leash, say your “Run away!” cue, then turn around and run fast, encouraging your dog to romp with you for a squeaky toy, a ball, a handful of high value treats at the end of the run, or a rousing game of tug – whatever your dog loves most. The key to success with this exercise is convincing your dog that the “run away” cue is the predictor of wonderful fun and games. Again, you’re teaching him a new, fun behavior – “Run away!” – that you can use to change his emotional response in a scary moment.
You can use any behavior your dog already loves – a trick, a toy, a game, anything that lights up his face – to convince him that good things happen in the presence of something scary. If he loves to roll over, ask him to do that. If he delights in snagging tossed treats out of the air, do that. High five? Crawl? Do those.

The key to making any of these games work to help your dog be brave is to be sure you keep him far enough away from the scary thing, at first, that his brain is able to click in to “play” mode. You will always be more successful if you start the games when you see low levels of stress, rather than waiting until he’s in full meltdown. (To learn to recognize how dogs show stress, see “Signs That Your Dog Has Stress,” June 2006.)
If he’s too stressed or fearful, he won’t be able to play. If he’ll start to play with you while the scary thing is at a distance, you’ll be able to move closer. If he stops playing and shuts down, you’ve come too close. Depending on your dog and how fearful he is, you may find some of these play-strategies work well enough to walk him past scary stimuli the first time you try, or you may have to work up to it.
“Get behind” is more of a management strategy. Timid dogs often try to hide when they’re afraid. If you teach your dog a cue that means “hide behind me,” your “body shield” can help him get through scary moments. To teach this behavior:
1) Have your dog in front of you, with an ample supply of small, high-value treats in your treat pouch, or in a bowl on a nearby table.
2) Say “Get behind!” and lure your dog behind you and into a sit. Click and treat.
3) Repeat several times, until he lures easily into position.
4) Now say the cue and pause, to give him a chance to think about it and respond. If he moves even slightly, click, lure him into position, and treat. A tentative movement is sometimes a question to you – “Is this what you want?” If you answer with a hearty “Click (Yes!!)” and treat, you can move the training forward more quickly.
5) Keep repeating the cue/pause, gradually reducing how much you lure, until he’s moving into position on his own when you give the cue.
Alternatively, you can shape the “get behind” behavior by clicking and treating small movements toward your final goal. (For more information about shaping, see “Fun Dog Training Techniques Using Shaping!,” March 2006.)
You can start applying this strategy in real-life situations early on in the training, even if before your dog fully grasps the concept, simply by luring him into his safe position as the scary thing passes.
“Treat and retreat” is a procedure to help timid dogs get brave. Its development is attributed to two well-known trainers: Dr. Ian Dunbar, veterinary behaviorist and founder of the Association of Professional Dog Trainers, of Berkeley, California; and Suzanne Clothier, who trains in St. Johnsville, New York. While Dr. Dunbar claims credit for introducing the concept, Clothier is generally credited with popularizing the procedure under the “Treat and Retreat” appellation.
To use treat and retreat, start with your dog a safe distance from a person who worries him. Have that person toss a piece of low-value kibble over your dog’s head. Your dog will turn and walk away to get the kibble, then turn back to look at the scary person. When he turns back, have the person toss a high-value treat in front of the dog, in the approximate place the dog was originally. (You may want to use some kind of marker to help your tossing-person’s aim.)
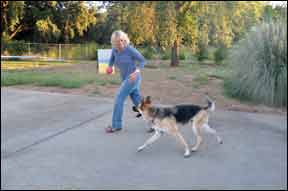
When the dog comes forward and eats the high-value treat, have the person toss another low-value treat behind the dog, then another high-value treat in the original spot. As your dog gets more relaxed about coming forward for the high-value treat, have the tosser gradually decrease the distance, so the dog is going closer to the scary person to eat the treat. If you see increased signs of reluctance with the decreased distance, you’ve decreased the distance too quickly. Go as slowly as necessary to keep your dog happy about this game; you want him moving toward the person tossing the treats happily and voluntarily.
In addition to counter-conditioning, there are other well-developed protocols available to help timid dogs gain confidence. We’ve written about the Constructional Aggression Treatment (CAT) at length (“Modifying Aggressive Dog Behavior,” May 2008; and “Constructional Aggression Treatment (CAT) Can Improve Behavior,” December 2009).
CAT, developed by Kellie Snider and Dr. Jesus Rosales Ruiz at the University of North Texas, uses operant conditioning and shaping (dog does deliberate behavior to operate on his environment) to convince a dog that his old behavior, in this case acting fearful, no longer works to make a scary thing go away. In the presence of a scary stimulus, the smallest sign of relaxation or confidence now makes the scary thing go away – until the dog learns that acting confident (and becoming confident as a result) is a better behavior strategy.
BAT is similar to CAT in some ways, but focuses on having your dog move away from the scary stimulus rather than having the scary thing move away from the dog. Developed by Grisha Stewart, CPDT-KA, CTP, of Seattle, Washington, BAT uses desensitization together with a functional reward for calm behavior. You begin at a distance where your dog can see the fear-causing stimulus (scary man with beard) without reacting to it. When your dog offers any form of calm body language you move away from the bearded man as the functional reward.
BAT defines “functional reward,” as “what your dog wants to happen in that moment.” In the case of a fearful dog, what the dog wants is for the scary thing to be farther away. According to Stewart, a good functional reward for a dog’s calm behavior can be to move away from the scary thing. Similar to CAT, if you teach your dog that calm behavior makes scary things get farther away, your dog will learn to be calm, confident, and not fearful in the presence of those things.
A newer version of BAT simply has you keep your dog on a long leash at a sub-threshold distance from the stimulus until he habituates to its presence, then gradually move closer as his behavior and body language tell you he ready to do so.
LAT stands for “Look At That” – a protocol developed by Leslie McDevitt, CPDT-KA, CDBC, author of Control Unleashed, at her training center outside Philadelphia, Pennsylvania. In LAT, the key is to keep your dog below threshold (quiet and calm) while teaching him to look at a scary stimulus, then rewarding him for looking at it. To train LAT, click and reward your dog the second he looks at the bearded man, as long your dog doesn’t react adversely. If your dog is too close to threshold with the scary stimulus at any distance, start with a neutral target and click as soon as he looks at it. When your dog is offering a quick glance toward the target, name it “Look!”
Your dog will quickly start to look at his scary triggers when you give the “Look!” cue, and turn back to you for a reward. If your dog does not turn quickly, he’s probably too close to or over his threshold. Increase the distance between you and the bearded man and try again. Gradually decrease distance as your dog learns to do the “Look!” game with things that are worrisome to him.
Many of the above games and strategies are compatible with each other. CAT and BAT tend to be mutually exclusive because one moves the dog away from the scary thing, while the other moves the scary thing away from the dog. Other than that, the more of the above strategies you apply, the more tools you’ll have at your disposal to help your dog cope with fear-causing stimuli in his world, and the more confident he’ll become.
There is an unfortunate myth floating around in some parts of the dog training world that if you give reassurance to a fearful dog you will reinforce his fearful behavior. Therefore you must ignore your dog when he’s trembling at your feet in fear.
Hogwash. Think back in your own life to a time when you were very frightened or upset. Did it help (or would it have helped) you feel better to have someone you trusted come and put his or her arm around your and calmly reassure you that everything was going to be alright? Of course it did. Our dogs are no different.
One writer created a list of ,”6 Things to Remember When You Have a Fearful Dog,” which is a nice illustration of how kindness and patience can take your dog a long way.
At times when emotions run high, we are more concerned with helping our dogs get those emotions back under control than having him respond perfectly to our cues. In fact, when a dog is very afraid, the emotional part of the brain — the amygdala — takes over, and the thinking part of the brain — the cortex — doesn’t work well. The over-threshold dog isn’t even capable of connecting his behavior to reinforcement, which is why we try hard in our behavior modification protocols to keep the dog below threshold — so learning can happen. If he is shaking in fear, your calm voice and slow, gentle petting can be hugely reassuring to him; fast rubbing and an anxious tone, however, are not.

[Updated February 9, 2018]
Kids and dogs. Everyone agrees they go together, but for children with autism, dogs can be far more than best friends. They can be therapists, comforters, mood stabilizers, and conversation starters. They can help wandering children stay home, help distracted children stay focused, improve a child’s communication and social skills, and help everyone in the family relax.
Wisconsin residents, Rachel and Terry, knew their daughter, Prudence, was different. Two years ago, at age four, she was diagnosed with Autism Spectrum Disorder (ASD). Prudence didn’t interact with other children, had a short attention span, struggled to express herself, was easily distracted by sounds, tastes, smells, and movement, often felt anxious, and found comfort in repetitious behaviors and language. “The autism diagnosis scared us but it made sense,” says Rachel. “We searched for anything that could help her.”
Rachel discovered Blessings Unleashed, a nonprofit organization that pairs autism service dogs (also called autism assistance dogs) with children. In early 2011, a yellow Labrador Retriever named Kaiya officially became Prudence’s service dog. According to the Americans with Disabilities Act, service dogs have been trained to do work or perform tasks that benefit individuals with disabilities and must be allowed access to businesses and organizations that serve the public.
As soon as the two met, Prudence lay next to Kaiya and didn’t want to leave her side. At the family’s initial orientation at Blessings Unleashed, Prudence said without prompting, “Kaiya makes me feel better.”

Now, six months later, Rachel and Terry are amazed at how in tune Kaiya is to Prudence’s needs. “If Prudence cries or screams,” says Rachel, “Kaiya is immediately at her side to provide comfort. Kaiya sleeps on Prudence’s bed every night and we often wake to hear Prudence talking to Kaiya, which is wonderful for her speech development and pragmatic language skills. One day we went to a party where we couldn’t take Kaiya, and the experience was difficult for Prudence. As soon as we returned home she ran to the dog and said, ‘Kaiya, I wish you were at the party – I missed you so much!'”
Kaiya’s most significant impact may be her calming effect. “Prudence is much more present and less anxious with Kaiya around,” says Rachel. “We have noticed less scripted speech and more spontaneous conversation. An added benefit is the improvement we have seen in Prudence’s awareness of others. Because she’s responsible for feeding and brushing Kaiya, she has started to show a greater interest in others. She now plays with baby dolls. She feeds them, holds them, sings to them, walks them in a stroller, and puts them to bed every night. She showed little interest in this before Kaiya arrived. She also plays and talks with her little sister. We couldn’t be more thrilled with these new interests!”
Six years ago at the Southeast Regional Facility of Canine Companions for Independence (CCI), an organization that breeds, raises, and trains service dogs for children and adults with disabilities, Xander Rousseau met his service dog for the first time. “It took three days of working with several different dogs before we had our official ‘match,’ ” recalls his mother, Adrienne Levesque, “and Xander had his heart set on a black Lab named Woody. The entire class cheered when his wish was granted.”
On their first Friday night at CCI, Woody slept in the family’s dorm room. “It was the first night in Xander’s illness history that he slept through the night,” says Levesque, who is a founding and current board member of the National Autism Association. “It was a miracle! At the conclusion of the two weeks, Xander was answering simple questions about ‘his dog’ and he hugged Woody’s trainer! Wow! In two short weeks we rejoiced over major milestones!”
For the past six years, Woody has provided Xander with constant acceptance and affection, accompanying the boy to hospitals where he underwent tests and surgeries as well as to grocery stores, Walmart, and other places that had previously been overwhelming.
“He made it possible for us to navigate a parking lot without the fear that Xander would run away. Woody visited school at the beginning of each year so that Xander could transition successfully, and he became Xander’s motivation to work hard in the various therapy programs we used.”
With Woody’s help, Xander moved from the nonverbal, self-stimulating world of rocking and moaning to a life less dominated by ASD symptoms. “Is he cured? No,” says Levesque. “We still face communication and social hardships. We still battle digestive and seizure disorders. Hopefully we will continue to prevail, battle by battle, until we can say we have completely defeated autism.”
Today 13-year-old Xander is heading into eighth grade, where he is enrolled in academically advanced classes, enjoys the swim team, and plays year-round soccer. “We rejoice over the fact that he has many friends,” says Levesque, “the best of which remains his faithful Lab, Woody.”
Although the demand for autism dogs has created many approaches to this type of therapy, the field’s established foundations focus on careful breeding, raising, training, placement, follow-up, and support for these special animals and the families who adopt them. The traits that make good service dogs are well documented and can be tested for at a young age. Because of their stable temperament and intelligence, Golden Retrievers, Labrador Retrievers, and Golden Retriever-Labrador Retriever crosses are widely used.
These dogs can be trained to go after a child who is running away and return the child to the parent, interrupt repetitious or self-harming behaviors, calm a child who is having a tantrum by crawling onto the child’s lap, alert parents if the child wakes at night, and improve the child’s verbal skills by responding to spoken commands.
At Blessings Unleashed, Kaiya was trained to lean or “snuggle” on Prudence when the girl is having a meltdown, interrupt repetitive behaviors by nudging or licking her hand to break the cycle, and to track and find her if she becomes separated from her family.
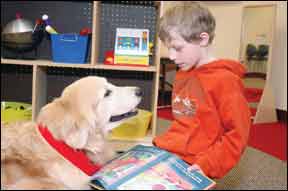
Eighteen years ago, in what she calls the “dark ages” of autism, Patty Dobbs Gross turned to Canine Companions for Independence on behalf of her son, Danny, whom the organization paired with Madison, a Golden Retriever. “Madison helped Danny grow into the emotionally balanced and socially confident young man he is today,” she says. “He is currently a graduate student at the University of Southern California’s School of Cinematic Arts.”
Madison so inspired Gross that she went on to create North Star Foundation, which during the past 10 years has placed over 100 unique assistance dogs with children who face social, emotional, and educational challenges. Her program differs from that of most service dog organizations because instead of placing trained adult dogs with children, North Star places carefully screened puppies with carefully screened families. Puppy and child grow up together, and the entire family participates in the puppy’s training.
“We educate parents carefully over a long period of time to be sure they provide the necessary supervision and training,” says Gross, “and we screen out children who lash out physically when upset. Having this happen is the only reason besides neglect for which we would remove a dog from a home; we once went to court to do this. In a service dog/child team it is very important to meet the dog’s needs as well as the child’s to keep the placement safe as well as effective. Our dogs ‘work’ for their children, not just the parents, but this is because we actually breed specifically for dogs who take a shine to children, and then we socialize them for children in general and for their own child specifically.”
Gross and her trainers use positive reinforcement training methods exclusively, so North Star dogs are never punished. Instead, they are encouraged to think and act independently.
“We strongly disapprove of programs that use ‘tether dogs’ or ‘babysitter dogs’ that are physically tied to children with autism,” she says. “That’s cruel to the dog and dangerous for both. On five separate occasions, North Star dogs have kept their children safe from wandering, once by delivering a warning bark when the child was taking off, once by nudging the child homeward, and three times by simply following the wandering child until someone noticed the team, read the dog’s collar, and notified the family. But safety is not our primary goal. Our primary focus is meeting our children’s social, emotional, and educational needs.”
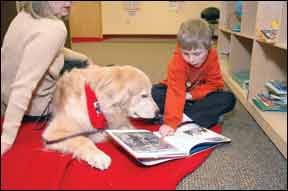
For years reports about the benefits of canine companionship for children with autism were considered heartwarming anecdotes of no scientific importance.
Then researchers began taking a closer look. In 2008 the Journal of Veterinary Medical Education described challenges faced by families with autistic children paired with service dogs, including public-access issues, learning to understand canine behavior, the extra work involved, training commitments, financial responsibilities, and the dog’s impact on family dynamics. “Despite the effects and consequences of these challenges,” researchers concluded, “parents overwhelmingly reported that having a service dog to keep their child safe and to provide companionship was well worth the many inconveniences of service-dog ownership.”
At Maryville College in Maryville, Tennessee, Ariane K. Schratter, PhD, Associate Professor of Psychology, developed an ongoing community-based research partnership with Wilderwood Service Dogs to study the effects of using specially trained dogs for children with autism.
“After the first year with their service dog,” says Dr. Schratter, “parents tended to report decreased problem behaviors such as aggression, fear, and arousal, and an increase in adaptive behaviors, such as eye contact, joint attention, and social inhibition. Many of the children showed improvement in their overall level of functioning.
“The dogs likely elicit positive social interactions in public, helping children with autism successfully interact with others. The dogs’ presence may also reduce physiological arousal at the root of some problem behaviors while providing clear and consistent nonverbal communication cues that children with autism can interpret, thus increasing their adaptive skills. The data suggest that the innovative use of specially trained service dogs may be an important tool for helping the social and language behaviors of children with autism.”
One of the most widely reported benefits of canine-child interaction is reduced anxiety. Now researchers think they know why dogs have such a calming effect. In September 2010, the medical journal Psychoneuroendocrinology published a study that compared levels of the stress hormone cortisol in 42 children with ASD before and during the introduction of a service dog into their families and after the dogs were removed for a short period.
“We found that the introduction of service dogs translated into a statistically significant diminished Cortisol Awakening Response (CAR),” they reported. “Before the introduction of service dogs, we measured a 58 percent increase in morning cortisol after awakening, which diminished to 10 percent when service dogs were present. The increase in morning cortisol jumped back to 48 percent once the dogs were removed from the families…. These results show that the CAR of children with autism is sensitive to the presence of service dogs, which lends support to the potential behavioral benefits of service dogs for children with autism.”
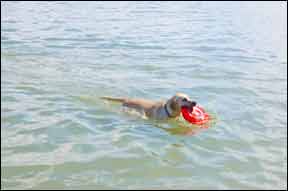
Service dogs aren’t the only four-legged therapists that help children with autism. Therapy dogs make a difference, too. Unlike service dogs, which are permanently paired with their human partners, therapy dogs belong to volunteers who take them to nursing homes, hospitals, schools, and other facilities, usually for an hour at a time. Their visits are considered Animal Assisted Activity or Animal Assisted Therapy depending on whether the visits have specific therapeutic goals and are documented.
For more than 10 years, Reading Education Assistance Dogs® (therapy dogs participating in the READ® literacy program) have visited schools and libraries, where children read out loud to them.
Seven-year-old Joshua (seen in the photos below) had trouble making sense of human emotions until one of his therapists started taking him to read to a dog in the READ program named Journey. “Until then,” says his mother, Ginger Rasmussen, “he was indifferent to animals, as though they were a piece of furniture or a stuffed animal. But after he began reading to Journey, he started petting his own dog and cat, started talking to them and interacting lovingly with them, and before long he began caring and asking why the baby was crying or why mom was happy. He began to feel empathy. Reading to Journey gave Josh the last piece of the puzzle to make him whole. The quiet patience of a READ dog opened a door that we thought was locked forever.”
As reported in the New York Times in November 2010, visits from therapy dogs have become part of the curriculum at the Anderson Center for Autism in Staatsburgh, New York. One nonverbal 11-year-old boy who at first hid from Shadow, a black Labrador Retriever, now asks to walk, pet, and feed her, interactions that help him communicate with teachers and fellow students.
A California teacher who brings her therapy dog to school tried for years to teach one boy to say hello and goodbye. He began greeting the dog, then the teacher, and now he says hello and goodbye to his classmates.
It would be wonderful if dogs improved the lives of all children with autism – and if all dogs paired with children lived happy, relaxed, fulfilling lives of their own. But service dogs aren’t for everyone, and not every child is a good match for a dog. Here are some factors for parents to consider before applying for an autism service dog.
Expense. Because of their successful fund-raising, Canine Companions for Independence and Guiding Eyes for the Blind provide service dogs to children with autism at no cost, but most service dog organizations ask families to pay part or all of the considerable cost of raising and training these special animals.
North Star asks families to raise half of a service dog’s $10,000 placement cost ($5,000). Wilderwood Service Dogs requires families to raise the full cost of each service dog ($12,000), as does Autism Service Dogs of America ($13,500). Blessings Unleashed asks families to pay the full cost of a service dog ($10,500) or companion dog ($5,500). Companion dogs provide emotional support and do not require the extensive training that service dogs receive.
When Prudence’s parents began raising money to pay for Kaiya, they reached their goal in less than two months. “Fund-raising may seem like a daunting task,” says Rachel, “but it helps to just tell your story. People often feel helpless and don’t know what to say or do for a family affected by autism. Our supporters were excited about Kaiya and most had no idea that service dogs were being utilized to help autistic people.”
Commitment. Bringing a service or companion dog into a household requires commitment. In addition to basic care, these dogs need ongoing training with the entire family, close supervision from parents, and ample play, exercise, and down time. In many ways bringing a service dog into the family is like adopting a child. Families with canine experience, a fondness for animals, and good organizing skills have a head start.
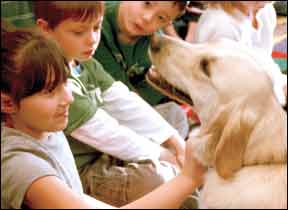
As Rachel explains, “Our responsibilities for Kaiya include working on her service dog-skills daily, keeping her well groomed, feeding her a high-quality dog food, and keeping her in peak physical condition. When Kaiya is not working it is important for her to be a regular dog, so when she is at home we make time every day for her favorite game – Frisbee! We will also have to take yearly public access tests that demonstrate Kaiya’s service dog-skills in order to be re-certified as Kaiya’s handlers. Having a service dog is definitely an added responsibility with two small children, but the rewards have been many, and we are so thankful to have Kaiya in our lives.”
The Right Child. Not every child with autism can be successfully paired with a service or companion dog, such as children who are afraid of dogs, whose uncontrolled actions may harm a dog, whose families are not able to adjust to the needs of a dog, or whose parents expect the dogs to perform magic.
As K. Burrows, C. Adams, and S. Milman reported in the Journal of Applied Animal Welfare Science in 2008, “There is a tendency for parents, especially those with little experience with dogs, to fall victim to ‘Lassie syndrome’ and the belief that real dogs are capable of the sorts of things that fictionalized dogs do, that they are capable of reasoning as humans do, and are qualified to babysit children.”
The Right Program. Researching autism dog programs can be exhausting, especially for those who are new to dogs, but informed parents are better equipped to make good decisions. The Burrows study, which examined 10 children and 11 dogs from a program that tethered dogs to children with autism, revealed problems that had not been addressed prior to the dogs’ placement.
Most of these children showed no interest in their dogs during the first six months of placement. Dogs bonded primarily with one of the parents and some showed signs of separation anxiety when forced to sleep in the child’s room at night or when sent to school without the parent. One dog was returned because it ran after another dog, dragging the child to whom it was tied. These dogs showed evidence of stress and fatigue, especially when sent to school with children because of the long hours and lack of down time, and dogs experienced stress when their child had a tantrum and aggressively struck at the dog.
Programs that emphasize family education, give parents realistic expectations, provide extensive training, follow-through, and support, select appropriate dogs for this type of work, prevent their dogs from suffering stress or abuse, and utilize positive rather than punitive training methods are most likely to generate positive results.
Freelance writer CJ Puotinen lives in Montana. She is the author of The Encyclopedia of Natural Pet Care and other books, and is a frequent contributor to WDJ.